
 These are notes about a dear old Craftsman lawn vac, started in 2012. More repairs and plans for the bag here. I’ve scanned most of the manual here. See end of life note near end of this post.
—————————————————-
It’s that time of year again – time to get the old leaf sucker into shape to perform its annual duties. I’ve had this thing for just 20 years now, and there’s always something that needs fixing. It’s worth it, though: it works so well I often feel like I’m making a commercial for it when I clean up the leaves.
The two repairs this year were fixing a seam in the canvas tube that feeds the bag and beefing up the patch on the hole in the right angle plastic chute that redirects the leaves so they go up the tube.
 The seam repair was two rounds of whip stitch with a big needle and some heavy thread. There’s usually some part of the aging canvas bag that needs to be patched up. A dirty job, but pretty quick.
The plastic chute repair was more challenging. In addition to the fairly benign leaves that get blown horizontally into the chute to be rerouted up into the bag’s canvas tube, stones are occasionally picked up and whipped out by the impeller. Many years ago, one knocked a hole in the corner of the chute. I’ve covered it up with a couple layers of duct tape every year, but new stones blow holes in that, too. I found a piece of HDPE covering part of the hole from an earlier repair when I ripped the tape off this time.

 This year I went a step further and formed a piece of 0.020″ galvanized sheet steel to cover the odd-shaped hole. Several short cuts in the part that wraps around the edge let me form the 3D curves pretty well. Let’s see a stone knock a hole in that! I taped it down with several layers of duct tape, and it’s done for another year. (Or with luck, maybe a couple of years!)
Update 11/30/12: Oops. To my substantial surprise, maybe the second time I used the vacuum after the repair, I noticed the patch had blown out! No damage to the steel patch or the plastic, but the duct tape on the large curved side had all pulled off. I’d been lazy and didn’t really clean up the old tape residue, though I’m sure I did a quick alcohol wipe off. OK – I took all the tape off, cleaned it all up properly with Goo Gone and alcohol, used the good duct tape, and extended the tape all the way across that curved side and a little on the other side. Now it should be good for another year or two.

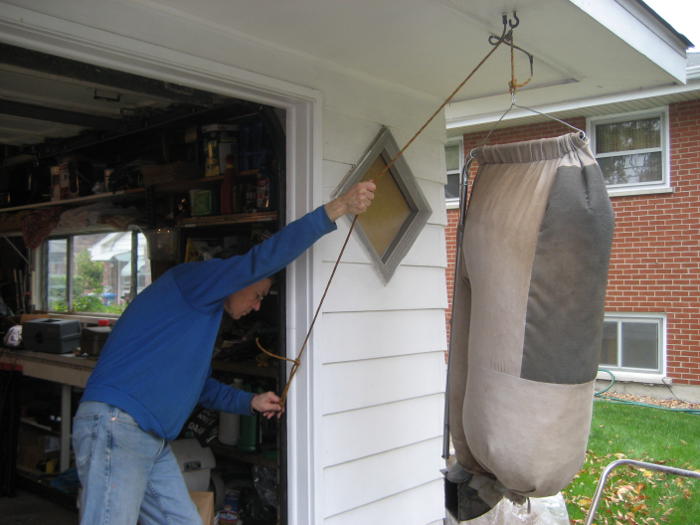
 Here it is with the repaired chute in place. It has a clever safety interlock to keep it from being started when the chute/bag are not installed: A spring that clips over a hook on the chute to hold it in place is positioned so it shorts an ignition wire to ground when it’s not stretched over the chute hook. An elegant solution.
While the machine picks up leaves (at least dry ones) very well, and shreds them so they pack to about twice the density of hand raked leaves in the paper bags our town requires, it’s a nuisance to empty the canvas bag into the paper bags. The canvas bag empties out the bottom (tied closed with a cloth string while running – another low tech but very effective design), but the bottom of the bag is near the ground – not easy to dump into a paper bag, especially after the first load.
 I addressed that many years ago by building up a platform out of scrap plywood and bent 1/2″ conduit. (Yes, there are a couple of supports under the ramp.) It’s a little bit of hassle to haul out and set up, and for emptying the bag once or twice it’s not worth it. But with the twenty-odd dumps of a major leaf pickup, it’s a very welcome helper.
Update 2/27/16: Some time ago (pictures were dated 10/13; might have been before that) I replaced the ramp 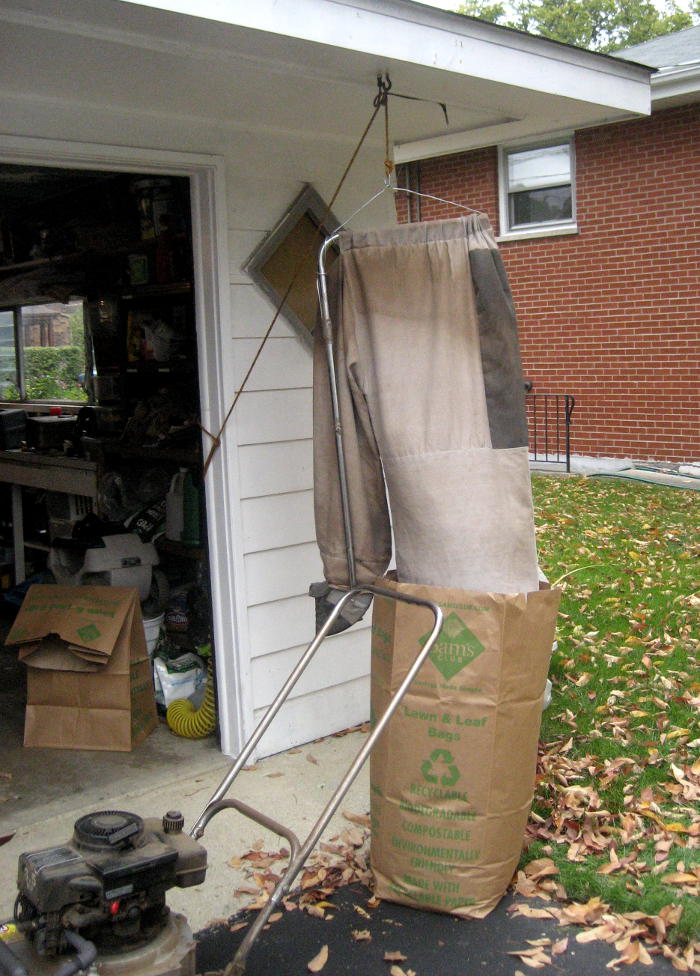 bag emptier that had served for years with a rope and pulley system that works better and has a much smaller storage footprint.
 It requires the extra step of disconnecting the bag from the machine and reconnecting it after emptying, but the actual hauling the bag up in the air is quite fast. A heavy wire bridle attached to the bag’s support tube provides a place for the hook on the end of the rope. Another hook on the free end of the rope hooks nicely into a hole in the garage door track. The big benefit is that the bag is noticeably higher and thus easier to empty into the paper bag, especially for the last bit to fill the paper bag. (I’ve been planning for a long time to replace the twisted poly rope with something braided. Maybe this year!) Looks odd, but this is a real winner.
The steel patch re-taped in the note above held thru the 2015 leaf season, but the tape was in pretty bad shape at the end. I brought it in the house with plans to clean and re-tape it some time over the winter/spring/summer. I did that cleanup at the end of February.
Remembering that the tape didn’t stick well to old tape residue, after pulling off all the old tape, I removed the residue with Goo Gone and naptha. A final wash with alcohol left it 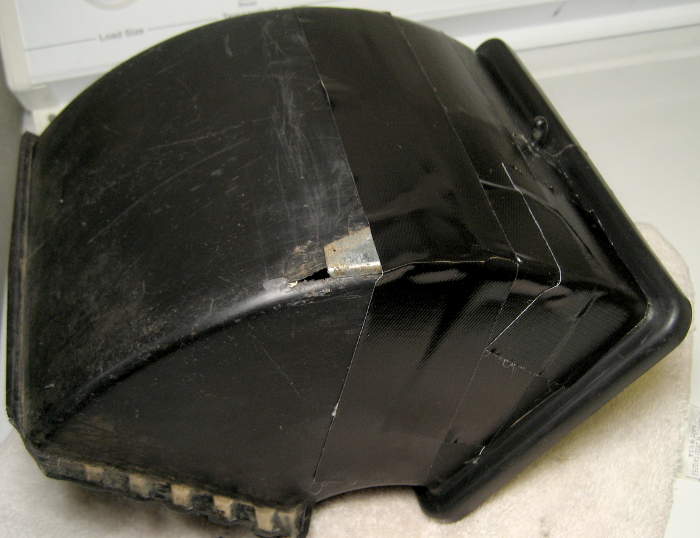 ready for new tape. Since this repair was likely to be in use for years, I went with the good stuff and used Gorilla Tape. (While I found a roll of black Gorilla dated 11/08 in the tape box, all the tape I pulled off was silver.)
Unfortunately, the chute had suffered further thinning to the  point of a full opening past the end of the galvanized patch. I bent a bit of the 3/4″ x 0.022″ black steel strap I scavenged from pallets of pipe for storm water plumbing under our street a few years ago. It’s all taped up and ready to serve next fall and, I hope, several falls to follow.
Update 11/22/16: Special thanks to Jack (in comments below) for a suggestion for the mesh material to make a bag. I haven’t tried it, but Phifertex, a sturdy woven fabric for outdoor furniture might be just what a bag maker or repairer needs. If anybody tries it, please post and let us know how it works out!
Also – I finally replaced the rope on the bag lifter with a braided one. It’s nice to have it not spin any more while trying to untie the bottom of the bag and get the leaves into the paper bag.
Update 12/14/17: I may be able to score a sample of a Phifertex mesh material for a test of [re]building a bag. If anyone reading this is actively interested in working on a bag but has been stymied on the mesh, maybe we can work something out. Especially if you’re in a position to produce some bags for the niche market of users of these great old machines, I’d like to try to help, including reverse engineering a bag to make a pattern. Please reply in the comments. Thanks!
Update 11/1/18: Bag plans are now available! Check them out here. Pics here. Link updated 10/16/20. Apparently wasn’t public.
Update 10/29/19: It looks like the dear old friend is about at the end of its career with me. We got a lawn service that takes care of leaves. I expect it won’t even get fired up this year. If so, I guess it’s Craigslist time. In response to Kipp below, I’ve scanned most of the manual (skipped “unpacking and checking contents” etc) here.
Update 10/15/20: Finally posted the machine on Craigslist today. I cleaned it up some, took some current pics, and posted with this text:
This “Power Brush” machine does a really impressive job vacuuming up leaves, and I get about twice the weight of leaves per curbside bag thanks to its shredding. Bought new in 2012, it has been in use every year until I got a lawn service and no longer need it. (It does a great job with the leaves, but having somebody else do it is even better.)
Some notes on its history here: http://jimlaurwilliams.org/wordpress/?p=3204.
It’s been out on the lawn for a couple of days with a For Sale sign. Farewell, old friend!
The Craigslist ad worked: Someone came by and picked it up a few days later.
Hi Jim,how are you? I recently purchased at a yard sale, the Craftsman Yard vac. featured in this article. I love was wondering if you might be able to hook me up with a bag assembly or lead me to a place I might find one. You can reach me on the E-mail above or 973 868-0525
Hi Louis,
Sorry, not much help. I do have 2 bags, but the older one is really worn out. Dry rot, several rips in the canvas (some with frankenstein patches). Worst is the exhaust screen stuff. Several patches there, but more rips unpatched. I guess I got my second one just before they stopped making replacement parts. So the old bag is essentially useless as is, but I guess I’d like to keep it around in case the machine outlasts the current bag.
If that happened, I suppose I might take the old one apart to use it as a pattern for making a new one from scratch. The canvas should not be much of a problem, but I don’t know what I’d have to do to find a suitable screen material. I suppose if you were desperate enough to design/make your own bag and open source the plans, we could talk.
Good luck!
Jim
Thanks for the link to purchase the bagger for this machine.
anyone looking for bags or chutes for the old Craftsman leaf vacs this website has them i have 3 of these units and i have bought new bags and chutes and they work just like the oem ones, http://www.lawnbagz.com
Thanks, Adam! I don’t usually allow commercial comments, but this is right on target for a hard to get item. I’ll keep it in mind if my dear old vac outlasts its current bag. Wow – those bags are really big!
Since emptying the bag represents maybe half the time it takes to do the leaves, a bigger bag could be pretty useful, depending on how much of a hassle it was to empty it. While the platform pictured above was very helpful, I’ve since scrapped that in favor of a rope and a pulley under the eaves on the garage. It lets me lift the bag a little higher, and takes up a whole lot less room to store! (I really thought I had pictures, but can’t find them. I’ll take some next leaf season.)
Jim
Adam,I purchased the chute and bag. Does the bag include the hanger because I didn’t see that as a separate item.
I need a bag for mine as well. The Lawnbagz website seems to be having issues now. I am not able to see what or if they have anything.
Does anyone know where else to buy these bags?
Peter
Calgary
Hi Pete,
I’m sorry for all of us that Lawnbagz.com seems to be out of business. I found a skeleton of their home page in the Wayback machine here. My machine, a 113.796812, originally spec’d the bag as 71.85681, for which the 806008 is a replacement. I have one good bag that’s in service, and its beat-up, retired predecessor.
Given that we can’t get replacements from Lawnbagz any more, I’m kind of inspired by this note found on fixya by stuvantine:
I’m not interested in going into production, but it would be nice if someone jumped in to fill the vacuum (pun intended) left by Adam’s closing down. I suppose if someone wanted to do that, I might be talked into donating my old bag as a pattern, in exchange for one of the new bags.
Anybody else with info please chime in!
Jim
I’ve got 7 of these machines….I have modified the motors…if anyone knows, Sears has no reason for their troubles…these machines paid Sears to be debt free, they sold MILLIONS! Shame on you Sears for NOT keeping the good tools and for not remaining to sell parts to things you sold…sad..really sad…Anyways, I have myself one old bag left and a new one made….I may be able to have someone I know make me some more of these bags. I’ll have to see….in the meantime…don’t give up on these machines…they so cool……a tool……….
Hi Doug! I agree that these are amazing machines (and sad/surprised Sears abandoned them). Thanks for the comments about the bags. Some people have found their way here looking for them, so if you end up with a source, I’ll be happy to post a link here.
I need a new bag, too. I am going through our third bag (I inherited the vac) and the mesh vent has ripped (and the rip is expanding, of course). Too dusty for duck tape. I thought that I would start looking for a bag now, with fall coming up soon enough, but found that nobody seems to sell them anymore. Maybe I’ll look for some plastic mesh that can be sewn onto the canvas to cover the existing, ripped mesh, as Jim suggested. I vacuum a lot of leaves, by the way, countless bags each fall, and so heading to a pulley system each time to empty the bag would be too time consuming. I put the end of the bag (open, tied end) into a lawn bag (lowes; home depot paper lawn bag) and then shake the vac bag contents into the lawn bag. The lawn bags hold about two vac bags worth of shredded leaves. If anyone decides to make and sell a canvas replacement, a zipper at the opening instead of a tie string would save a bunch of time (wrapping and re-tying the string while wearing gloves is no fun).
I agree that this is a near perfect machine for picking up and shredding dry leaves. Has anyone experienced an alternate that performs as well?
Hi Jack,
Just curious: How do you manage to get the filled canvas bag into the top of the paper bag, especially for the second (or second-and-a-half) canvas bag load? It’s avoiding that wrassling that has made it worthwhile to me to haul the machine and bag back to the garage pulley to dump each time. (The old platform was portable, so I’d haul that out to where the leaves were for emptying before the pulley thing.) I go out several times a season, but rarely fill more than 5 paper bags at a go.
Hmm – Maybe a hybrid approach? Emptying the first canvas load into a paper bag is pretty easy, and certainly quicker than hauling back to the pulley dumper. Maybe start the first several paper bags on the spot, as you do, then schlep those 40% full bags back to the pulley dump place and finish up as I do now. Would save several trips back to the garage and several pulley cycles. I’ll have to try that next time. Thanks for the inspiration!
If you used a good quality heavy duty zipper, I agree it would be easier to open and close. I have to take my gloves off/on for each string retie, too. I’d be a little concerned about leaf debris jamming the zipper, but it’s worth a shot.
I haven’t looked either, but it seems like somebody ought to make a similar machine. Anybody find one?
Jim
Jim I just picked up one of these that someone was throwing away they thought it did not work. Started up on the second pool just need some gas some oil and that was it. Where did you say I can get any type of parts for them.
Hi Nick,
I just took a look at searspartsdirect, and most (all?) of the machine-specific parts are marked “no longer available”, so no luck on a parts source. I keep hoping someone will chime in with a source or offer for bags, but nothing so far. Looks like you’re pretty much up to Mac Gyvering your own replacements.
If you (or anybody else) is desperate enough to try to make up a bag from scratch, let me know and I’ll take some pics and make measurements of my bag and support tube.
Good luck with your machine!
Jim
Fortunately I’m pretty darn good a fabrication. I was thinking of fiberglass and resin to repai and reinforce the plastics. I doesn’t hurt that I’m bit of a perfectionist. I think I’ll take my bag and make a template. Then sew a new one with a heavy grade material. I might even try to make a new blade with serrated edges
I just had a great idea that may add life to your bag. I own one of these lawn vacuums as well and really fear the day my bag splits open. I was thinking if you turn it inside out and spray it with flex seal. I may try this to see if this can add some life to the bag.
Hi Lance,
Interesting idea! I’ve never used Flex Seal (and hadn’t heard about it until just now!), but it sounds like it might do a good job of reinforcing the canvas. In my experience with these bags over the years, I don’t think I’ve seen split bags, but mine live in the garage and don’t get baked in the sun. I’ve seen a couple of split seams, and Flex Seal might well seal the threads and help keep those from failing.
But the larger problems I’ve seen are with the exhaust mesh. Over time that tears, and repairs are hard. I’ve never made a search for a suitable material, but what I’ve seen at normal fabric stores is too wimpy. I just took a closer look at it. Here are pics of my current bag (left) and the original. Don’t recall ever seeing fabric like this. It also looks like the newer bag has heavier threads in one direction. If we could get the material, it might take a kind of heavy duty sewing machine, but the repair probably wouldn’t be too hard. Anybody ever see this stuff? I suppose a first place to look might be sailmaking suppliers for tough, long wearing materials.
I picked up one of these machines for $10 on Craigslist a couple years ago. The seller was unloading it cheap because he thought it had a bad piston. I took it home and discovered that the only problem was a pinhole in the carburetor float. I had a spare float in my garage so I immediately swapped it out, changed the oil and added fresh gas. It’s been running like a champ ever since. Regarding the bag, if you have the old bag as a template a new bag would be fairly straightforward to recreate. Canvas fabric isn’t that expensive and if you don’t know anyone who can sew it, then a wanted ad on Craigslist should help you find someone willing to take on the job. For the mesh part, I think Phifertex mesh might work. It is used for cushions and is pretty durable.
Great Craigslist buy, Jack! I agree the canvas side of making the bag shouldn’t be too hard. And thanks for the suggestion of jobbing it out on Craigslist. I wasn’t even aware of posting a wanted ad like that. And the Phifertex suggestion looks like it might be just about right material. I’ll add a mention to the post.
Thanks so much!
Greetings. I’m in the same boat and starting thinking about using woven speaker grill cloth – a kind with a lattice weave almost like a cane chair. Some of the ones I’ve seen for guitar amp restoration look like they might be ok with respect to airflow.
Hello!
I am looking online for a replacement bag to this 3.5 HP shredder/mower and i can not find it anywhere! Ive checked ebay, amazon, craiglist… does anyone have an extra bag and are willing to sell it, or have any idea on where to buy a replacement.
Please contact me at salbrigati@gmail.com
Thank you for your consideration.
Hi Sal,
Good luck looking for a bag!
I suspect there’s a niche market making these bags if we could find someone with some basic sewing skills and a medium heavy duty sewing machine. As I’ve said, I have an old bag I’d offer for a template. So how do we find somebody looking for some side jobs with those skills and a machine? Sailmakers? Upholsterers? Is there a clearing house for stuff like this? I just posted on my local makerspace’s email list asking if anyone knows anyone who might be interested.
Jim
do you know where i can get ca carburetor for this ?
Sorry, I can’t provide any direct help. I seem to remember running across ca carbs (or references to them) when I was trying to figure out which one I had and what would fit. The good news is that there’s a fair amount of info about parts and substitute parts for various Mantis models on the internet. If you can’t find a ca, I’m quite confident there’s another Zama carb that would be appropriate. Or just take the old carb to a local lawn mower repair shop and ask.
Good luck!
Jim
Another autumn has come and gone and the old Craftsman lawn vacuum helped me through it once again. I can’t believe how incredibly dusty I get when I use this thing. I couldn’t imagine using it without a breathing mask, especially when emptying the bag. I just ordered a replacement carburetor (Tecumseh 632046) for $15 because the engine would start and quit after a few seconds until the engine was warmed up. Hopefully the new carb will have it running strong again. My bag is still holding up, but part of me is compelled to try to make a replacement since we have a heavy duty sewing machine in the house. Hmmm. Other than that, I’ll clean it up, give it an oil change and store it until next year.
The best $20 I spent on Craigslist five years ago was for one of theses machines. Nothing but oak leaves ankle deep here in NW Indiana this time of year. However, similar problem…..the mesh on the bag has been patched many times with pieces of nylon window screen and JB weld. As far as emptying the bag, I use a plastic clamp to secure the bag at the bottom. When full I’ll slide a plastic garbage can up under the bag, reach in and open the clamp. Any ideas on rebuilding these bags would be appreciated. Another note: I also use the machine as a leaf blower. I remove the curved shredder grate and the plastic chute then secure a piece of thin sheet metal over the to of the discharge opening. Works great.
Hi George,
Sorry, no new insights on bag patching. Obviously the hard part is the mesh. How has your nylon window screen worked out? My concern would be that it was fine enough that small leaf debris might clog it from the inside. Have you seen that as a problem?
Interesting that you’re still running the shredder grate for leaves. I pulled that out years ago, and while I don’t get quite as good compaction from my coarser leaf fragments, it feels like I get better overall performance: More air flow and more leaf thruput when I plow into a very deep pile of leaves. Do you have any problems running the grate?
Thanks!
Jim
Thanks for the reply. The nylon window screen material works OK .It cover a place in the mesh where there is a split. The screen is glued on around the edges with JB Weld.
Without the grate that shreds oak leaves into confetti the bag would fill up in only a few minutes. I have to watch as not to overfill the bag. The machine would tip over backwards from the weight. The only drawback about vacuuming leaves is it doesn’t work very well unless the leaves are dry. The shredder grate would clog otherwise. I use it mainly for blowing leaves out to the street. It’s like using a 3.5 HP handheld blower. If there is a way to post a photo let me know.
I’m going to take a stab at making a replacement bag just to get an idea of cost and level of effort. At the very least, I should be able to come up with a template and supply list in case anyone wants to make one for themselves. I’ll update here as I make progress.
Well I started making the bag. I picked up 3 yards of canvas duck material, which seems to be the perfect strength, but I probably only needed 2 yards. I also ordered a yard of Phifertex which should hopefully arrive next week. I used my existing bag as a template and cut out all the material needed to put together a new bag. I still need to pick up some metal grommets to secure the bag to the top bar and to the hook by the discharge chute. I’m probably looking at about $50 in costs. The duck material was $10/yard at Hobby Lobby, but they always have coupons online so I saved 40%. The Phifertex was $26 with shipping. Metal grommets might be $5 or so. More updates soon.
Got the bag finished a couple weeks ago. Looks great. Too cold and snowy to test it but I’m confident it will hold up well.
Pingback: Latest leaf vac repairs and bag plans! | Jim's Projects
I recently purchased one of these machines and am wondering
where I might be able to get a shredder grate. Mine is missing.
Can someone please post pics of the bag and the support pole.
Hi Jeff,
There are several pics of the machine with bag and support in this post, and detailed pics of the bag in the post on bag repair plans. What did you want to know?
Jim
I have one of these machines, the bag is in fair condition but the 3.5 Tecumseh is just about had it. Any ideas on a repower? Shaft size, mounting bolt pattern?> Thanks
Hi George,
I replied to your first question, which you posted to an odd test page rather than the lawn vac post.
Anyway, I didn’t even know about Repower engines until now. Interesting and appropriate marketing by Kohler – thanks. No, I have no cross ref to those engines.
In case it helps, my manual shows engine part# 143.384552 for shredder model 113.796812 (mine) and engine 143.384562 for model 113.797831. But if you have need for the engine, surely you have enough parts of the shredder to measure bolt pattern and shaft diam.
Good luck!
Jim
Hello Jim,
I stumbled upon your website while looking for info for my newly purchased vacuum/shredder. The machine doesn’t have a manual and after extensive searching I was able to find a closely related one on eBay. Unfortunately it does not answer the main question I had which led me to the purchase. That’s where I hope you can help.
It seems that I have the same machine as you do judging by your previous post.
I removed the shredding screen without paying too much attention. I now can’t figure out how it is supposed to go back in. I know there is a little slot inside the machine housing that the flat side of the screen slides into. There is the removable pin which is self explanatory. There is also a flat piece of steel about 1 inch by 4 or 5 inches with a hole in it that I assume plays a role in the retention of the shredding screen. That is what my biggest question is about. How does that go? The manual I have has a different and what looks like a simpler setup than what I have. I hope you can help and I apologize for the lengthy post. Thanks.
Hi Jim.
I recently picked up a craftsman vacuum/shredder at garage sale. No manual and according to the number in your previous post the same machine as yours. I’m hoping you can shed some light as to how to reinstall the shredding screen. I know there is a slot inside the housing to receive the one end of the screen. My question is how to secure the front side. The locking pin is self explanatory. There is a piece of steel about 1 inch by maybe 4 or 5 inches long with a hole on one side. I can’t seem to figure out how that goes and your website is the only info I can find on these old machines. I hope you can shed some light on the setup. Thank you.
Hi Ted,
Is this the steel piece you’re asking about? In the troubleshooting section of my manual (“Loud clanging noise…”) it mentions loosening/retightening two 3/8″ bolts (with pics) to adjust the bracket that secures and locates the pin. Does that help? Otherwise I’m not sure what metal piece you’re referring to.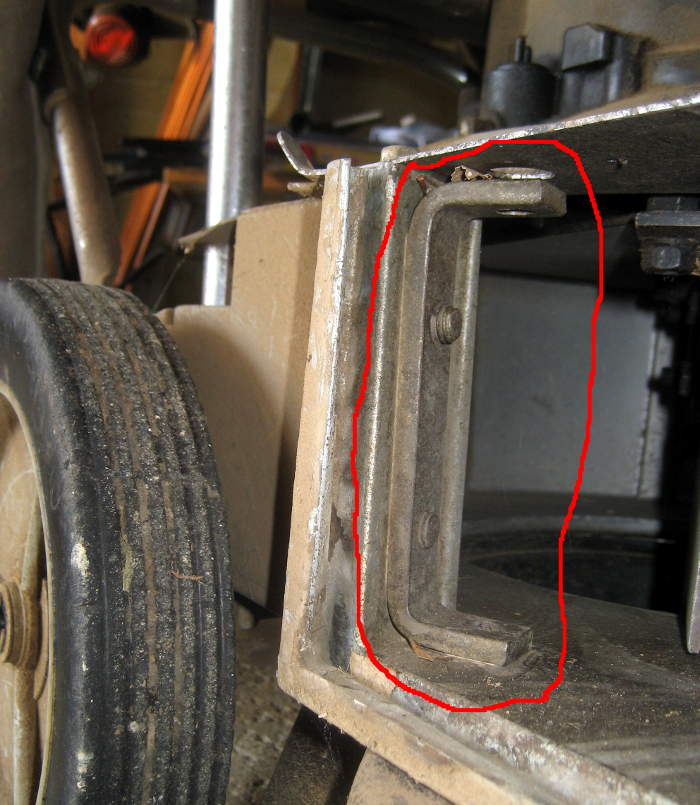
Hi Jim,
My question pertains to the removable shredding grate.
The post you made that included the manual actually answered my question. It seems that the two what I’ll call hoops that the pin slides through and goes into the bracket you highlighted broke off. Could be why they mothballed the unit enabling me to grab it for $15 at yard sale. Appreciate the response and also you still keeping this post going for the rest of us.
Hi Ted,
Glad you got some closure about your question, and glad if I was of some help. Sorry your bracket is busted. 🙂
I’ve been running for years with the grate removed, and am delighted with the results. Yeah, leaves get shredded somewhat finer with the grate – and it takes fewer paper bags to hold them. But the grate got clogged often enough that the tradeoff of a few more bags for not having to mess with the grate was a good one for me. Might work for you, too.
Cheers!
Jim
Hi. I have the model 113.797831. It had been setting in a garage for several years, we very little work it is running great. My problem is I can not find a manual anywhere. Any suggestions or help. Thanks
Hi Kipp,
Have you found the manual yet? I might be able to scan mine.
Jim
Scanned it here: http://jimlaurwilliams.org/Craftsman113.796812+797831VacuumShredderBaggerBlower.pdf
Jim
Thank you so much for the manual. It has been very helpful. I learned a few things. Again thanks,
Jim hows the bag re build going ? Have you ever thought to try paw proof screen ? It a reinforced nylon 7 times strong than regular fiberglass screen. I just picked my first Craftsman looking forward to get it back up and running. Thank you for the great site !
Hi KC,
Haven’t needed to rebuild the bag (though I did reverse engineer it and posted sort of a ‘pattern’). Paw proof screen sounds like a great idea for the mesh. Hope it helps some other visitor out!
I have a generous sample of the Phifer-tex outdoor furniture web suggested earlier, available to the first person who’s trying to build/rebuild one. But your screen sounds just as good. Thanks a lot for the suggestion!
Jim
Jim, do you still have the Phifer-tec? If so, do you have enough to rework a bag, and how much do you want for it? (Very helpful site.)
I do. I sent you an email – let me know if you don’t get it.
Jim
I see online that paw proof screen is manufactured by Phifer (probably other companies as well) so their version is likely the same thing as Phifer-Tex. The bag I made last year has Phifer-Tex as the screen and it has been working great.
Hi Jack,
Thanks for tying those bits together! Makes sense. And thanks for posting about your bag. Congrats on the successful build! Are there pics anywhere?
Jim
Jack …This is Rick..I am in the same boat as everyone else. AS far as your5 desigtn do you have any dimensional information on the pieces and how you sewed them together??
Rick,
I’m not sure how Jack built his bag, but my pattern with all dimensions and pics intended to help sew it together are here:
Hi! I have one of these units and it has been outstanding! But the handle (bottom piece) has broken. Would anyone have access to a handle replacement? Thank you for any help or information you may have!
Hi Jim,
Discovered this blog from your CL ad.
I so enjoyed reading your trials and tribulations with the old Craftsman lawn vac, all the photos, and your ingenious problem solutions. Never met anyone else with one before.
I have the 831 with the brush in front like a vacuum cleaner. I could not live without this awesome machine. I have fiber-glassed repaired the lower plastic shell housing after it was damaged by tree roots.
Like you I find that there are repairs to be made each season. I have had a lot of problems with the all-wooden rotary brush. It now has steel shaft ends but is in poor shape. I just used some JB weld on the brush last week and its back in service (for now).
I have just found a rotary brush from a supply house that I hope to fashion into a whole new (stronger) brush assembly.
I am still using the shredding screen. I have been very fortunate to find a new bag so I’m set with that for a while. The engine gets an oil change every season so it’s in first-pull starting shape. So it looks like I’ll be ready to don my ear mufflers and head into another season. Maybe I’ll get through it without anything breaking… but I doubt it.
Best, Allen (from Brookfield)
Thanks for the note, Allen. I’ve wondered about the name ‘Power Brush’. Looking at the manual, I think I see the kind of vacuum cleaner-like spiral brush on the 831. I guess they just didn’t bother making a new front label plate for my brushless version! Thanks for helping clear that up.
Good luck hacking the third-party brush into your machine!
Jim
Hi All,
I have an old leaf vac that’s been working well since I got it a couple years ago from my father in law. The only issue I have with it is that the spring that holds the chute on is missing. I was just going to make something myself, but could anyone take a picture of it on their leaf vac as I have no idea what I’m even aiming to recreate at the moment. Thank you!
Darren
Hi Darren,
The main thing holding the chute on is gravity holding it down in the vertical slots it slides into. While the spring helps a little, its main job is as an ignition interlock: Unless it’s held aside by hooking it over the finger on the chute, it rides over the screw holding the ignition wire, shorting the wire to ground so the machine won’t run.
I don’t have the machine any more, so the best I can do is the picture from when I discussed it in the body of the post above. Hope that helps!
Jim
Thanks Jim,
Interesting, mine doesn’t appear to have any kind of interlock as I don’t see any wires running down there and it runs even when the chute falls off. I was hoping to put a new spring on there as the chute rides up when the bag moves around. Generally the shredded leaves clog up the gap as it forms so it works out, but it gets annoying having to turn the vac off and clean it out multiple times. That picture gives me a good idea what I need to do, thanks!
Darren
Impressive post! I really enjoyed reading it and thought it was extremely informative. Thanks for sharing such useful content with us.
I’m still using the 831 with the brush in front (like a vacuum cleaner), and it’s starting on the first pull. Currently using full synthetic oil. Have about 5000 sq ft of tree shaded yard to clear each fall. I could not live without this awesome machine.
Would anyone have any good advice for the owner of one that now after an E3.10 Plug and a generous copius amount of small engine tune up in a can sprayed into the combustion chamber runs great 1st time pull every time BUT just doesn’t seem to suck properly either by front intake or by hose ??
How do you get properly up under everything to check all the intake plenum & plastics etc without tipping it over too steep of an ‘oil everywhere its not supposed to be’ angle ???