I’ve been tempted to do a little time-lapse photography for years. My office window looked out over a view that I think would have made a great quick video covering maybe a whole year. With a pic at a given time most every sunny (or cloudy) day (or both – make two clips?), from a marked spot at the edge of the window, the seasonal changes would have been quite interesting. But I don’t work there any more, so the opportunity is lost. Duh – I guess I could do the same from the house. I’ll think about that.
But in the short term, the city is about to tear up and replace the curb (“approach”) and part of the lower part of my driveway (“apron”) . I thought that might make a nice TL clip with lots of people and machines moving around. My Canon SD600 is one of the cameras that the Canon Hack Development Kit gives you lots more control over than the stock firmware does. One of the many capabilities it offers is scripting – including a simple mechanism for taking TL sequences. While an older version I had on my SD card didn’t work quite right, after downloading and installing the latest one I had a reliable timed-shot tool.
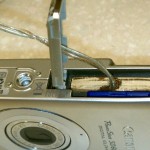
Power was the first concern. The crummy batteries I have (see posts on Li-ion camera battery) wouldn’t begin to last the hours I needed to cover, and the camera doesn’t have an external power input. But DC is DC, so if I could spoof the form factor of the battery and its contacts I should be able to run from an external supply. And the camera does provide a hole in a convenient place for the wire to come out! (There must be a commercial adapter available – I didn’t look.)
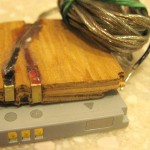
The hack was a piece of ~1/4″ plywood sized just like the battery. I notched some corners to deal with internal stops that prevent you from putting the battery in backwards. (OK, I notched BOTH sides – the wrong side first. Boo.) I cut notches at the spacing of the original contacts to “inlay” some little bits of 0.008″ brass strip. Since clearance for the battery was tight, I Dremel’d out gooves for some speaker wire before soldering it to the strips and epoxying them all in place. I drilled/ground out a place in the end of the wood to match the convenient hole the camera provided for the wire. After a little fitting and making really sure I had polarity marked correctly, I tried it out with my workhorse HP bench supply.
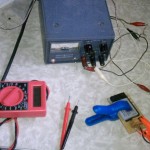
No luck. Camera wouldn’t even turn on. That supply is current-limited at 400 mA – and that wasn’t enough to run the motor to extend the lens. To my amazement, I couldn’t come up with another supply with both enough current and low enough voltage to keep a voltage regulator from getting hotter than I wanted. So I resorted to a true hack – with all the negative connotations – of putting the real battery in parallel with the bench supply to handle the current peaks.
NOTE: Don’t ever do this. Putting a battery directly across the terminals of a power supply is a REALLY BAD IDEA. You’re essentially making a battery charger with NO current limiting. This is a really dangerous hack!
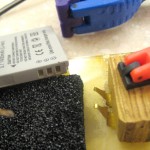
From previous battery discharge testing, I’d built a little jig with adjustable brass spring contacts that would fit this particular battery, so it was just some clip leads to hook it all together. I figured if I was very careful, the stupidity of putting the battery across the supply wouldn’t bite me. So I carefully preset the supply voltage to the open circuit battery voltage, watched current drains, repeatedly felt everything to make sure nothing got hot, rechecked voltages frequently. I got away with it, and it all worked exactly like I hoped it would! Now I had the basic hardware in place.
How often should I shoot? The 2GB SD card is a little over 700 shots at full resolution. If the work day is say 6 hours, that would give me ~116 shots/hour. Let’s call it 30 seconds, and if they’re still working and I’m out of room I’ll swap in another card. I set up the script for 30 sec. Done.
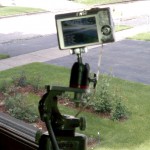
I put the camera in the window and fired it up on the day they were supposed to do the work. Unfortunately, due to recent rains, the schedule had slipped. I got a nice clip of shadows moving across the driveway, but no workers. But everything’s in place, and I think I know when they’re expected next. I’ll post the clip when it’s done.
Update 5/31/11: Got some action today. The Animation Shop software had trouble importing all the pictures, so I only got to see a little of it. I hope the lower res pic today help. I ran out of memory at an inopportune time on this first work day, and I’ll have to leave the camera on its own tomorrow. Taking full-res pictures is overkill for what will end as a video clip. I set up for lower res that will give me ~1800 pictures this time, and cranked the delay down to 20 sec.
Update 6/3/11: The original high resolution pictures were completely inappropriate. I got 10 hours of 640×480 – 1800 pics – in 360MB yesterday and it looks fine and only took 1/5 of the memory card. I cranked it down to 10 sec interval (from 20) for today and expect fine results. I’ll bet 5 would be better – might change later today. I’m learning my way around some tools to find the ‘good’ parts and make a clip from them. For something like this only the ‘good’ parts are worth keeping. I’m looking forward to a pretty good clip out of all of it when it’s done.
I’ve been using the battery indicator on the camera to tweak the power supply. While it dips after a shot, I’ve been keeping it at what it shows as 50-80% capacity. Voltage at the supply is about 4.1V, and the battery is not warm at all. The camera does run warm, but not hot. Looks like it’s working well and I think it’s just about where it ought to be. I do turn the supply off at the end of the day after I turn the camera off.
Update 6/4/11: Bummer. I heard some noise this morning (Saturday) and saw a guy cleaning up some of the cement forms. I ran into the room with the camera (which I had cleverly gotten all set up the night before) and fired it up. (This involves turning the camera on in playback (not camera) mode, going into the menus to do a “firmware upgrade”, going to camera mode, watching the script auto start (a good thing), realizing it was not zoomed right (a bad thing), hitting the ‘print’ button to take it out of CHDK mode, changing the zoom, back to CHDK mode, maybe restarting the script.) Unfortunately in my morning foggy-headedness, I forgot to turn the power supply on. The battery in parallel with the supply allowed it to start, fooling me into thinking all was OK, but died after a dozen pictures. Oh well – that should keep me from making that mistake again!
Update 6/14/11: Sorry no video clips yet 🙂 But I have reviewed the some 40,000 pictures the CHDK script on my camera has taken, and identified the tiny fraction during which some construction activity is taking place. Nothing has happened in the past couple of days (although I can get into my garage again). There is still blacktop repair to both the street and the driveway, so I still fire up the camera each (week) day, hoping to catch the last bits of work.
The camera seems to have a limit of maybe 2000 pictures per folder, and so makes a couple of new folders (with names like 115CANON) each day. The integer part of the image file name wraps at 9999, and the camera also makes a new folder when the number wraps back to 0001. I grind through each folder with the free File Renamer Basic to add a digit to the number range so I end up with unique montonically increasing numbers.
Thankfully, the Windows Photo Viewer cycles through pictures pretty fast (~26pic/sec on my PC) if you hold the arrow key down. That let me view a boring “video” of moving shadows interrupted by occasional fits of activity by bobcats and cement trucks. There is a real hotshot bobcat driver, and standing outside I took a couple of little video clips of him with the camera on my Android phone. I’d really like to include those in the final video, but unfortunately, that camera records to some strange .3gp file format which I haven’t found a transcoder for yet. Yet.
Update 6/21/11: They still haven’t done the blacktop repairs. But the good news is that I think I’ve gotten the script working just about as I’d like. I thought the same thing when I left it running Thursday morning when we went away for the weekend. I’d finally found a way to make it shut down, and found a “seconds since midnight” function so I knew what time it was. I set it up to run from ~7AM-6PM each day, and to shut down after a total of so many pictures. I didn’t have completely accurate info on the number of shots the card would hold, but worst case (wrong) it would just run out of memory in the afternoon on Saturday – which wasn’t a big deal.
Unfortunately, running out of memory is kind of a big deal for the script, since it throws an error and stops the script! I came home Sunday to a camera with a full card (as expected) but still on and hot. Rats. But now I’ve also found a “free memory” function, so it now runs only during the hours I choose, and if either some max total number of pictures is taken or free memory is below some threshold it will shut itself off. And I also figured out how to turn the display off and still run the script. (If you click the Display button while in “Alt” mode – like in a futile attempt to turn the display off – it turns on “raw” mode, which records an additional raw image – at ~8MB each – with each picture, and chews through the memory card in no time. Go out of Alt mode, press the Display button ’til the screen is off, then (blindly) press the Alt (print) button once (only!) and start the script. I put a beep in to reassure myself the script had actually started if it was outside picture taking hours.)
So now it will take care of itself for a couple of days unattended, and shut down appropriately. I think the only copy of the script is on the card, but I’ll post it here some time when the camera’s not busy. Now if they’d only fix the driveway…
Update 6/22/11: Looks like the script did all the things it was supposed to do! Here’s the script: jimtest.bas

Pingback: AC supply for time lapse with Canon SD600 | Jim's Projects