My dear (7 year) old Dell Inspiron 700m with extra capacity 8 cell battery has been running out of battery more quickly than I think it used to. Since Bob G recently bequeathed a couple of laptop batteries to me, and since both those and the Dell seem to use standard 18650 Li-ion cells, it occurred to me that maybe I could rebuild the Dell battery with the scavenged cells.
OK – first, are the new ones any good? I popped one 2P3S battery open, hooked my nice programmable charger to the outside wires and charged it up. (It’s comforting to have gone from “Ooh – lithium batteries are dangerous and require very specific charging techniques – I’m staying far away from those!” to “Oh, you can use about any Li charger for any battery as long as it’s for the right number of cells (in series) and less than maybe 1C  charging current.” And to have the programmable charger I got with my 3.3A-hr 5S Lipo pack.) Then I ran a discharge test with my usual Arduino discharger. Running down to 9.6V (3.2V/cell pair), it gave 3300 mA-hr at ~0.5A. Not bad for a 4000 mA-hr pack.
Here’s the 6 cell pack posing with the 8 cell Dell pack. I bet those cells would just drop into the first 6 slots without even touching the tabs.
Second – what’s the actual capacity of my Dell battery? That was tougher, since it’s my only good battery for my good laptop, and I didn’t want to open it up unless/until I was confident I was going to rebuild it. I took it out of the laptop (fully charged) and probed the connector, looking for nominal 14.4V. Nothing. Google indicated some of these batteries needed some pins shorted before they presented power on the connector pins. I found similar pinouts, often putting V+ on two outside pins and V- on two pins at the opposite end of the connector.
Noisy battery / a lesson on hum
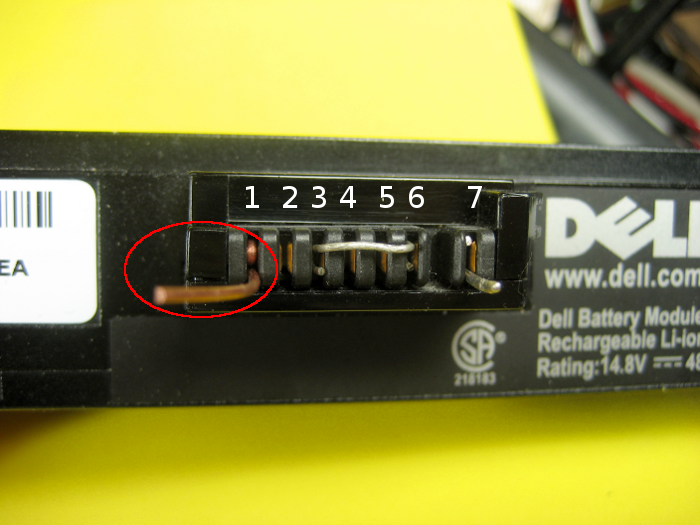
Unfortunately, I couldn’t find anything definitive on the connector pinout on this C6017 (similar to X5458, C7786, W5915, Y4546) battery, so I started to make measurements – first voltages between every pair and then continuity between pairs with 0V between. I don’t know the real pin numbers, so I arbitrarily numbered them as shown in white in the picture below. Sure enough, pins 1,2 were connected. But there was no other pair solidly bonded. The voltage readings were flaky, so I started to watch more closely. Between some pins I saw random values changing between maybe 15 and 100 mV. I made better connections to the battery connector so I wasn’t touching anything. There was still too big a variation, so I started looking with a scope.
What I saw was hum – but only if the scope was connected certain ways. If the scope ground were on pins 4 or 5, I saw hum on all the other pins. But if the scope ground were on any other pin, 4 and 5 were quiet. That was just weird. The battery is in a plastic case, sitting on a formica/plywood bench completely isolated. Nothing was referenced to anything.
Well, except capacitively. I now suspect that 4 and 5 are the thermistor, electrically isolated from everything else. The bulk of the battery – the cells and connected electronics – were large enough to be capacitively much more connected to the noisy electrical environment than the little wires to the thermistor. If I connected scope ground to the flimsy thermistor, the rest of the battery made a good antenna to pick up hum. The other way round, the thermistor was mostly cap coupled to the battery – which was then the ground reference. That was what I was seeing with the DVM, too. An interesting lesson in hum.
Bits!
The really serendipitous news was that the scope let me see that there was occasionally some much more organized noise. I finally found a way to look at it, and found a half-second burst of clearly digital signals maybe every 30 seconds. I’d read there was I2C or something as a data mechanism between the battery and the laptop. Could the battery be polling the laptop and looking for a reply to turn its power pins on? Hmm. When powered off, the lappy has no power to run anything to answer the battery. Maybe it just needs a loopback – 2 pins shorted – so it hears its own data coming back (or maybe stops hearing it come back). Randomly shorting pins on my only good battery didn’t sound like a very good idea. Someone had suggested using a 100 ohm resistor when trying to loop pins back. That should be low enough to allow digital signals to work while probably not blowing anything out if misconnected. But which pins?
OK – 1,2 are almost certainly one side of the battery. Since most other pins showed small (maybe 5-8mV) negative voltage when referenced to 1,2, I guessed those two were battery plus. 4,5 were probably the thermistor, so not of interest here. Web articles indicated battery terminals were usually at opposite ends of the connector. And there was ~400 ohms between 7 (likely battery minus) and pin 3. And pin 6 was the one with the data pulses. The pulses were positive going with respect to all other pins (except 4,5). If 1,2 really was the plus side, the only way to see more positive signals would be if the power switch (a mosfet?) were disconnecting the plus terminal and it was weakly connected to ground. So I tried 100 ohms from 6 to 3. And I got 15.6V between 1,2 and 7!
Is it real – can I draw current? Hmm – 15V and 1K is 15mA. With my voltmeter between 1,2 and 7 I tried an LED and 1K across the meter leads. It lit (brightly)! OK, 100 ohms would give 150mA. Here’s a fat 47 ohm resistor lying on the bench. 300mA is a reasonable test, so I put that resistor across the meter leads. The resistor got hot and the meter dropped a few mV. I can draw current! OK – is battery minus on 3 or 7? With the meter on (1,2) and 3, I put the 47 ohms between 1,2 and 7. The voltage between (1,2) and 3 dropped only the same few mV. 7 is definitely battery minus.
Ahh – the 400 ohms is probably the load for the loopback test. Pin 6 is really a digital input, being driven through a moderately large resistor by the actual pulse output. Maybe that 400 ohms is what we “short out” the data signal with to ground when a 0 ohm loopback is between 6 and 3. Emboldened by that science, I shorted 3 and 6. No smoke, and I still got power. Woot!
Battery test
 With ends of a suitable size wire bent to make comfortable contacts in pins 3 and 6 and the wire taped down, I made up some contacts for 1 and 7 out of 20 ga wire and connected it to my discharge
  tester. A 40 ohm load gave me 350mA, and I left it overnight. It gave 1365 mA-hr quitting at 14.07V, although I set the discharger for 12.4V. It was clearly at least at the beginning of the knee. Looks like the over-discharge protector kicked in. Anyway, that’s pretty low capacity for a nominally 4800 mA-hr battery.
Can I charge it?
Although I don’t really need to charge this battery through my faked contacts, I would guess I could do so. Balance charging Li-ion cells is de riguer, and I figured with all those contacts, that balancing would be done by the charger in the lappy. But now that I know pretty much what all the pins do, and there aren’t any at the cell-connection voltages, I’m pretty confident the balancing is done by the circuitry in the battery.
So I set my programmable charger for 4S and 0.7A – well under 1C – and fired it up. It charged for a few hours, but while the charger is set for 4.2V/cell, or 16.8V, it showed a circuit disconnect at about 15.6V. Looks like the overcharge protector kicked in. That’s an average of 3.9V/cell (pair).
Either the protection circuit is way conservative, or it’s reacting to a bad cell pair, or it’s implementing planned obsolescence. I’ve read that some manufacturers program the (protection circuit of the) battery to disconnect permanently – read fail – after so much time or so many recharges or something, forcing users to buy new batteries (or do without), with the implication of whether the battery has any useful capacity or not.
Do I rebuild it?
It looks like my anectodal observations of decreasing battery life (based largely on how long I can edit square dance music sitting in the back of Ed’s van on the way to a dance weekend) are borne out by the measured low capacity of the Dell battery.
I can get a replacement on Ebay for under $25 – with a 2 year warranty (which is longer than the laptop is likely to be in daily service). Yeah, the ones from legit dealers are more like $85, but at this point in the laptop’s life cycle, cheap is appropriate.
Or I can rebuild it from cells from the batteries from Bob. They may not be new (or matched, since they’d come from multiple batteries), but they show twice the capacity of the old battery. I can probably just drop in the first 6 of the 8 cells without doing anything but unsoldering the wires, and I have a tab welder for the last pair. And if something bad happens or I get in over my head, I can have a new battery in a few days for 25 bucks.
Or I can limp along with the old one, possibly using that as part of the process of deciding when to get a new laptop. I’ll post here what I decide to do.

That little brown wire on the far left, what is it ? Ive got one on my laptop battery im rewiring. is it a temperature sensor of some sort?
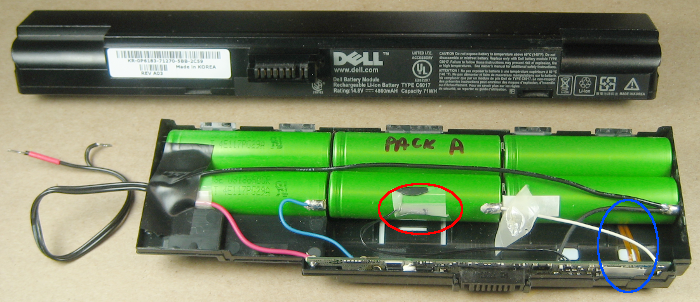
I’m not sure which wires you’re referring to. If you mean the two on thin flexible substrate at the far right (blue circle), I’m not sure. I believe the thermal sensor is a small bead taped to a center cell, with thin black wires (red circle).


If you mean the brownish looking wire on the left of this pic (red circle), that’s just a chunk of copper wire I stuck in the Pin 1 slot so I could get a clip lead on it.
Sorry I can’t be of more help!
Jim
Thank you for sharing this information. It was very useful and interesting.