Wow – the little Sansa recorders have caused significant changes and clarifications to the plan for my square dance recorders. I’m going to end up with almost everything I’ve asked for. The new plan:
- The only supported recorder will be the Sansa (Clip or Clip+), and it will be built into the device. This simplifies issues of supporting multiple battery configurations, uses cheaper recorders and provides more storage and more features. I never dreamed of giving up my old Iriver recorders, but I think they’re all gonna go on Ebay and get a couple of bucks back.
- I’ll use an 850mA-hr LiPo cell (from Spark Fun). That will run recorder and preamp for much more than a full day of recording. Since the Sansas originally had LiPos, they also have a USB-powered charger built in. It will take longer to charge the 850mA-hr cell than the original 290mA-hr cell, but it won’t hurt the cell and I can afford the recharge time.
- Since the Sansa already has a battery level indicator for the correct battery chemistry, using that saves all the hassles of putting in my own. That means no Tiny85, no CMOS switches, and no push button! That’s a very significant simplification of the device, with no real loss of functionality.
- The open source RockBox software gives me the valuable addition of time stamps on files, as well as very good flexibility on the start/stop trigger. And (for changing a #define) it even lets the device start in active recording mode when turned on. This reduces the chance for operator error and gets it a step closer to an appliance I can hand someone else to take to a weekend. I’ve already recompiled a private version with a few tweaks to make it fit my needs even better.
- Since there’s 2V DC on the mic input – which comes out of the Sansa – I _think_ I can use that on the gate of a low voltage MOSFET to turn power on/off for the preamp automatically based on whether the Sansa is on/off. For a $0.60 transistor, it eliminates not only the power switch on the preamp, but also another source of operator error. That gets the device another step closer to being appliance. I’ll know for sure when the transistors get here in a few days.
Remaining open issues:
- I determined earlier that I really needed 5V to get the best dynamic range out of the SSM2167s. I need to revisit that and see if – perhaps by recalibrating the 3914 to use a smaller range – I can get away with the 3.6V from the LiPo.
- Using a MOSFET as an automatic power switch for the preamp needs to be tested. According to the specs it should work – but “the test is the test”.
- The audio level in the recorded files is quite low. At -31dB, it’s about 10dB lower than I’d like. While I can kick it back up during post processing, I should be able to avoid that extra step if I can just get the Sansa to record the right level in the first place. And since the recording software is open source, I should be able to make it do that. That one’s work in progress.
Updates to follow…
Update 11/7/11: The MOSFETs arrived. How to connect to a SOT-23 
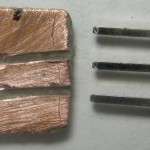
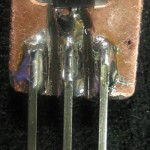
 package to test it? Make a breakout from a scrap of copper clad and a Dremel. Made it, hooked it up with an LED and a resistor to draw ~20mA – much more than the preamp draws. Turned on the Sansa and the LED lit. It works! That 2V is definitely enough to turn on the MOSFET.
Connection for the quick test was dead simple: Gate to the Sansa mic lead with +2V on it when the Sansa’s powered up, Source to ground and Drain to provide low-side switched power to the load. Implementing that on the PCB will be a little more interesting, since lots of stuff goes to ground. I guess I need to actually switch ground to the 2167 and 3914 and make sure nothing funny happens. Pops from switching LEDs in the display impressed on the ground connection to the mic level input could be a problem. Maybe just a big cap across D,S?
The low recording level is a little more interesting. I found a thread on the Rockbox Flyspray bug track tool that describes exactly the problem I’m seeing. Somebody said he’d made changes that should fix it. But in the load I just compiled (based on late enough code that it would certainly contain his fix) the “integer overflow clipping” that forces me to use a low level in is much worse than in the stable build I first installed. Very much work in progress. I’ve posted my interest in helping on Flyspray and hope to start some more discussion. I’m sure there’s more to follow.
Update 2/11/12: Various bits of progress since the last post. I’m just in the process of cleaning up one of the Sansa prototypes for Les.
Code
After several back-and-forths in this Flyspray task, we got a patch for RockBox that seems to fix everything. While ultimately I should use a released build, for now, because I want to get a recorder to Les, I’m just building from a private code tree based on rb31180 with the patch at end bottom of the Flyspray task about rolled in. The build machine is Jimsdellmini running Ubuntu 10.04.3 LTS. All the code is in ~jim/rockbox. The code tree for Les’ box is under rb31180, with build directories for ClipV1, ClipV2, and Clip+.
To build (takes several minutes):
– get a version (svn co -r<xxx> svn://<yyy> <local dest dir>
– cd <local dest>
– mkdir build
– find . -name “*p[yl]” -exec chmod +x {} \; ? not tested
– cd build
– ../tools/configure
– (specify target)
– make
– make zip
Ugh – those instructions – which I got from the Rockbox developer’s page – are no longer correct. They’ve moved from svn to git since I last sucked down any code. I’ll do battle with that later – I have a code tree that builds for now.
Hardware
I’m setting Les up with one of the two prototypes I used with great success at Heartland in Oct 2011 (the one with the red LED block). I decided to cheap out and put one of the 2GB Clip (V1) devices in rather than the shiny new 4GB Clip+ that was in it. The custom 3 pin plugs are interchangeable. I’ve made a couple of “productization” mods for Les’ device.
While a bare PCB doesn’t phase me at all, I made a cover out of clear clamshell packaging to cover both the PCB and the battery. It also covers the pots for setting the LED range which really shouldn’t be touched. Since the Tiny85 I was planning to use for a battery monitor was never used, I removed the 6 pin 0.1″ programming header. To make it all a little more self-contained, I cut a notch so the input pigtail cable can be curled up inside, on top of the battery, for transport/storage. (The final, smaller cases won’t have enough room to do that, so I thought I’d at least take advantage of it for his.) I also epoxied a small block on the back of the Sansa and hot-melted it to the PCB for a fairly permanent mounting for the recorder.
—-
Damn WordPress lost my latest updates. I’ve been keeping this open in the editor (which seems to be a very bad idea) as things are changing frequently and I put stuff in and take it back out / update it as things change. This time(being afraid of Microsoft rebooting my machine WITHOUT MY PERMISSION) I put some last updates in and hit Update, thinking I was safe. Wrong. Apparently it logged me out, though it kept my editor open. Everything I’d put in since whenever it timed me out was lost. Damn.
—-
Rats!
I recorded with Les’ candidate (which I thought was golden) and my perfect white recorder in parallel at Chitown. Les’ showed several places where the recording cut out, though the white recorder had music! It almost has to be running afoul of the noise gate, but I really thought I’d set the level correctly. Ugh – more calibration needed. And I was hoping to have it sent to him by now.

Pingback: @#$%^& Wordpress ate my post! | Jim's Projects