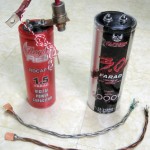
The new “Volfenhag” capacitor for the battery tab welder arrived. Here is it with the old crummy red Pyramid “1.5F” cap. Doing a discharge test with a resistor, voltmeter and a stopwatch to find RC, it measured at 1.2F. Not the 3F it’s rated at, but a better percentage than the old cap.
- Caps, cables, SCR
- Electrode blanks
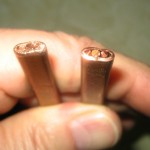
The blanks for the electrodes are pieces of 0.25″ copper tubing with three #14 (maybe 12?) wires stuffed in and smashed flat. I’ll grind the ends to a point, which will essentially be just the center wire.
I braided some pretty flexible cables from maybe 18 ga lamp cord. I’ll probably cover them with heat shrink. If I could get some nice surgical rubber tubing, that would work well.
Remaining is to make some copper straps to parallel the caps, connect the big honking SCR and cables, connect the cables to the sharpened electrodes, hook some kind of switch up to the SCR gate, and try it out!


I stumbled on your page while checking out your hack for the SD600 then noticed your battery welder project which I too am studying up on to make. I think I will jump ahead of my abilities and go straight for a microcontroller type welder so I can really fine tune a dual pulse system for those A123’s
Great idea on the photo of the copper tubing enveloping the cable. I’ve seen the copper tubing being smashed flat but not with additional stranded cable inside. Now I’m thinking maybe one could really clean the inside of the end of the tubing and clean the stranded copper ends to match, then apply some flux and try to melt/solder it all together with some good conductive solder. Or maybe an inductive heater to melt it all together as a solid copper terminal? (don’t know much about induction yet….copper may not have the resistance to heat up?) Or heck I might just shoot for an ultrasonic welder project to solidify the copper terminals. just kidding
Thanks for the blog and happy project times!
Tony