
Wet socks told me about the water on the floor around the drain pipe from the kitchen and the laundry tubs, near the water softener. It took moving a kitty litter bucket full of long scrap, mopping up the water, and toweling the floor dry 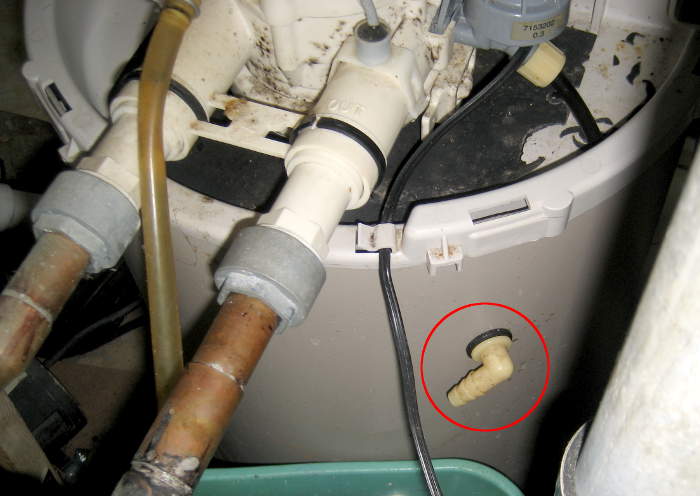 before I found the leak. It was coming from a brine tank overflow hose fitting I didn’t know about (or more likely, had long since forgotten about) on our Kenmore Micro Max 625.348460 softener. Shouldn’t ever be needed, so was never connected.
It produced a juicy drop maybe every 5 seconds. I put a container under it, and the wet floor symptom was fixed in the short term.
In the only slightly longer term, I plugged the softener transformer back in and ran a 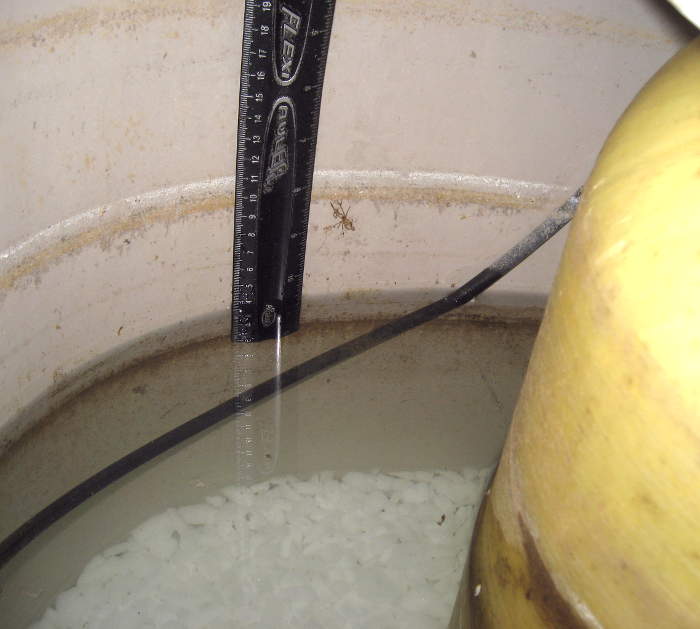 recharge cycle. The water level was noticeably lower after that, as expected. Interestingly, there were two definite scum rings inside the tank. After the recharge cycle, water was at the lower one. The upper one – 10 cm higher – was at the overflow fitting level, and clearly water had been at that level for some time (over the years).
But while I had the tank open to check the water level, I heard a regular drip. Checked the overflow fitting, and it was dry (and the water level was way below it anyway). When I put my head back into the tank, I could see ripples in the water with each drop. Craning my neck a little, I found the source: the upper part of the softener (valves, timer, etc). OK – maybe it’s slow enough to not overflow before the next recharge.
But now what?
I discussed the drivers and options with Lauren. The main driver was reducing soap scum in the tub and lime deposits various places (including the humidifier pads). Less dry skin and maybe nicer hair are additional plusses. We get lake Michigan water, and while even softer (than lake) water does give the desired results, most people around here don’t bother with softeners.
a) We could join them. The softener has been out of salt a lot of the time, (or unplugged) so if we just dumped and bypassed it, we’d see little change. Free is a plus, but not a big concern here.
b) We could get a new softener (and be more faithful keeping it full of salt). I couldn’t find a drop in replacement, so some copper piping would need to be done to match the new inlet/outlet configuration. Not a complete show stopper, but I’d much rather have a drop in. Yeah, I could contribute to the economy and hire a plumber to do it, but that’s a little embarrassing.
c) I could fix up the existing one. Whatever the leaky part is should be fixable. I’m sure its 15 year old resin tank is shot, but Sears Parts Direct doesn’t have the part. I couldn’t find it in a quick search, either. So a proper rebuild is probably out.
d) We could pass on a softener and get an electromagnetic descaler. Those seem to have gone from “Snake oil!” to “Well yeah, they do reduce scale buildup, as they claim (except the ones that incorrectly claim to be a softener), but they don’t soften the water or get rid of the calcium and magnesium.” So that might help a little, but probably won’t stop the soap scum.
e) We could switch from bar soap to “shower gel” or liquid “body wash”. Those seem to be detergent based rather than fatty soap based, and so apparently greatly reduce soap scum. Of course the detergent is said to be less friendly to your skin.
f) Oh yeah – we could squeegee the walls and tub and dry them off with a towel after each shower like some people somehow manage to recommend with a straight face. Does anybody actually do that? C’mon – I’m not a slob, but that’s just crazy talk.
Too many choices. No decision was made. (Surprise!)
The leak
 Checking a few hours later, I found the water level a couple of inches higher. Rats. I pulled the top off the unit (a couple of plastic spring clips) and could hear drips there, too. There was a
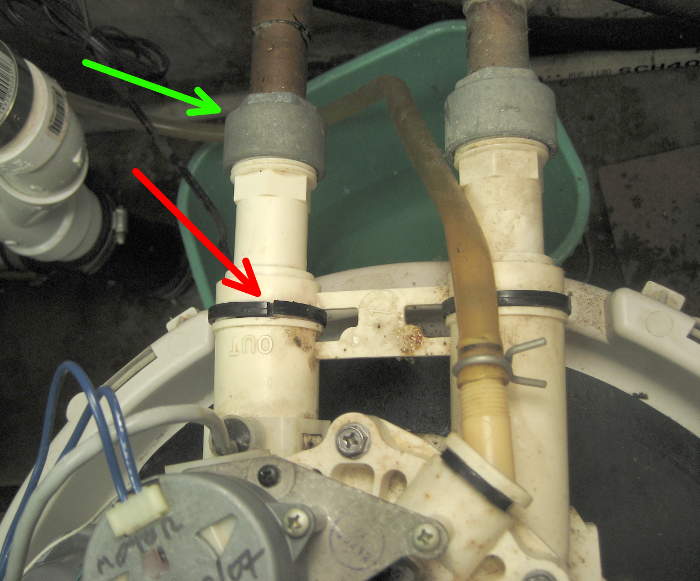
 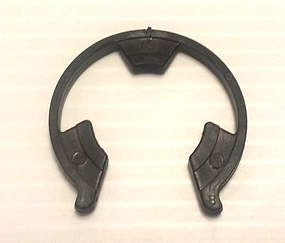 steady drip from the outlet connector. That connection is a push-in plastic tube with an O-ring, held in with a big nominally finger-friendly black plastic circlip (red arrow).
Water was dripping from the bottom where the black clip went thru the outside housing to engage a slot in the push-in tube. I used the shutoff and bypass valves 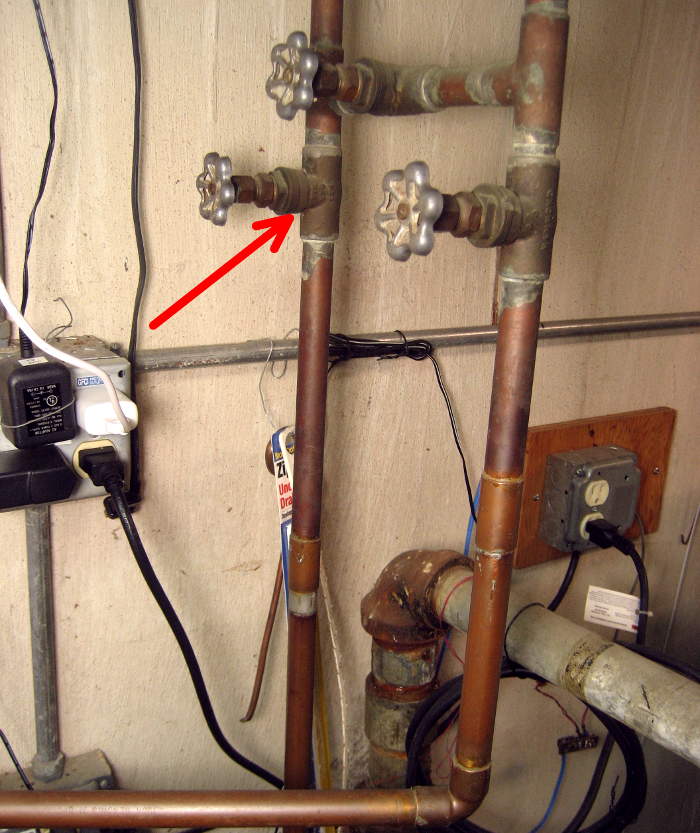 conveniently provided, and tried to get the connection apart. Unfortunately, the black clip broke when I tried to remove it. The silver/gray part (green) threads onto the plastic push-in pipe, pulling a raised collar on a special copper stub up against an O-ring. I took that apart first, but was dismayed at how much water was coming out of the “turned off” copper pipe. I put my thumb over the end, and water very promptly sprayed out. The valve on that outlet pipe (arrow) doesn’t seal well, even after being tightened with a pliers on the hand wheel. Boo. Fortunately, I’d put a big bucket under there.
The obvious thing to do was replace the O-ring on the push-in tube. Sears didn’t have the 0900535 part, but did have a sub STD302213 pack of 5 for 5 bucks. Fine – but nobody within 50 miles has it. I found them (pack of 50?) at McMaster Carr, and I was just about to put an order in there anyway, so that would work. But before I pulled the trigger on that, I thought I should at least look at the old one.
With the copper pipe disconnected, the rest of the black clip came out easily, and the push-in pipe also pulled out easily. Its O-ring looked fine (though that doesn’t mean much) so I decided to give it a chance. I wiped down that pipe and the housing it fit into, smeared them all generously with waterproof silicone grease and put it all back together. If anything, the original leak was worse.
The fix
I manhandled the softener unit to alter the alignment of that push-in tube, and with the whole thing leaning back, the drip stopped! I leaned it back and forced a piece of 1×2 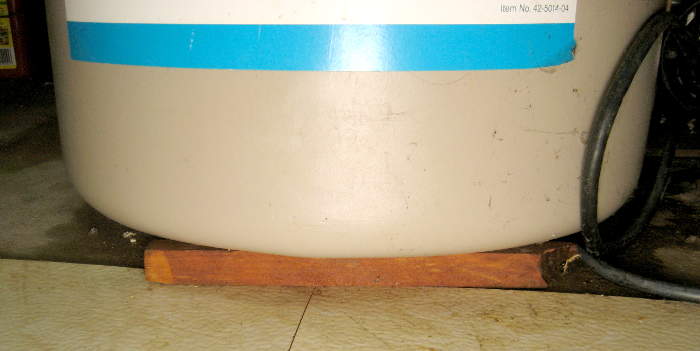 under the front edge. No drip! I cleaned and dried out under where the drip was, and a couple of hours later it was still dry. Success! Well, OK – kind of half-assed, redneck success, but it will buy us some time to decide what we want to do long term. During which time I can walk in that part of the basement without any wet sock surprises.
Soap scum update
11/19/19: Not relevant to the leak, but since I mentioned it in the driver analysis, here’s a comment on body wash vs soap. We switched from the white Dial bar soap we’d used for years (OK, decades) to some liquid body wash, and I’m delighted and amazed at the difference it made. It’s maybe a little less convenient, but also less messy for no soap dish. But the near absence of soap scum in the tub was the real win. Yay!
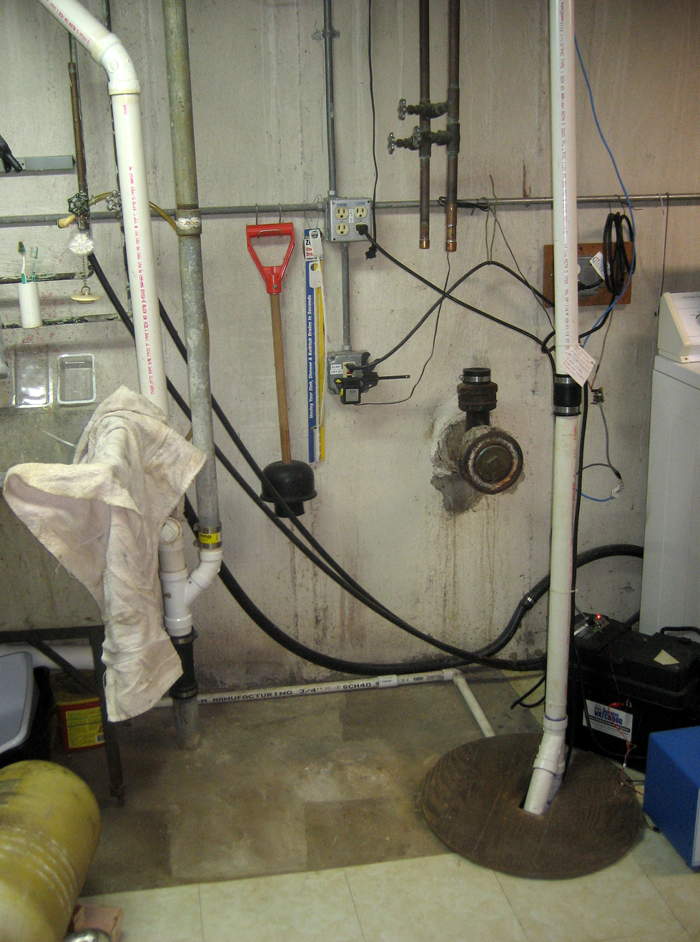
Water softener removal
12/21/19: Another leak yesterday – in combination with the scum relief from switching to body wash! – made the decision easy to finally get rid of the softener. The bypass valves allowed me to manage the leak by essentially removing the softener from the water path. But the valves still leaked, and I was somehow going to have to seal the pipes if I wanted to remove the softener. On the bright side, Laur reported moderately improved water flow after I opened the bypass valve so water didn’t have to filter thru the softener.
“Managing the leak” also included using a fountain pump (from the “Emergency Watering” story) to pump out the tank into the laundry sink. Worked well.
How to seal it off?
Of course the main question is how to seal the pipes off.
First plan was 1″ pipe plugs in the galvanized fitting between the copper and plastic of the softener. That was before I realized it was a union. I suppose there might have been a way  to modify the plug to seal against the rubber ring, but that made it a lot less attractive.
Then I considered trying to hack the plastic pipe parts, hoping they had a standard cross section and I could find a cap to glue on. Wasn’t sure if they were ABS or PVC. Didn’t even get as far as checking if the same glue worked. That would of course have left even more ugly pipe hanging around.
The right solution
I finally had to admit that the right way was to cut the copper pipes below the valves and 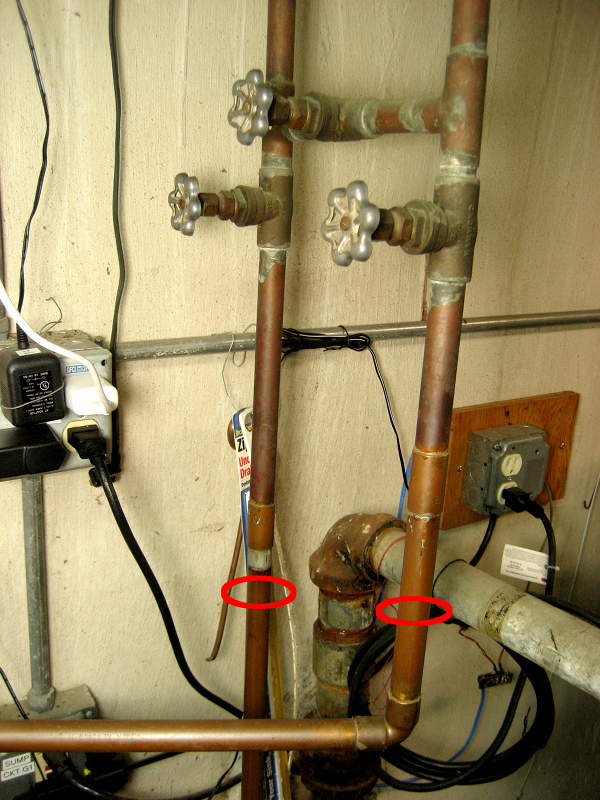 cap them. It would get rid of a bunch of ugly and useless piping. (Though a bunch would remain.) And c’mon, it’s just sweating a couple of 3/4″ caps on! Unfortunately, this project only reinforced my embarrassing reluctance to do copper plumbing.
When I pulled the connections off the softener, it became clear how poorly those shutoffs sealed. There was no way I could solder with that water coming out. And I couldn’t have glued anything on those plastic pipes even if I could have found caps and glue.
Solder time
I’d set up as well as I could to do the soldering. I had abrasive cloth band for cleaning the pipe, as well as a wire brush M + F cleaner. I had fresh name brand “self tinning” flux, propane torch (with MAPP as backup) and of course two new 3/4″ caps.
I shut off water with the Water Cop, and opened the laundry faucet, but it kept coming out. Yeah the pressure tank, but this just kept going. Shut off the less old manual valve – kept going. Opened upstairs sink valve. Eventually it slowed to a trickle. I think by that time I’d cut the pipes off. The front one didn’t drip at all; the back dripped a lot. (I suspect the incomplete shutoff by the Water Cop is directly due to internal cam timing changes I made. I’ll include that in the Water Cop writeup.)
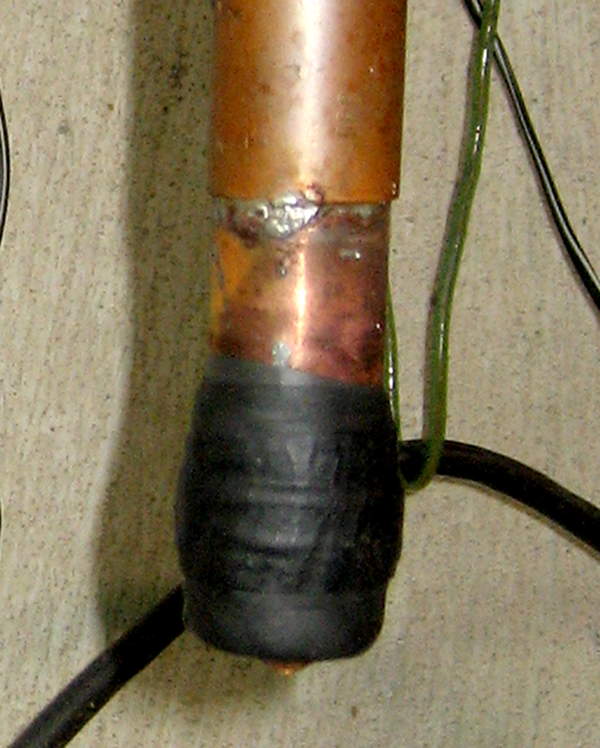
I started on the front one. Did all the steps. Noticed flux and even solder seemed to spurt out of the joint. Let it cool naturally and moved on to the back one.
Opened the back valve, got lots of water. Eventually that slowed and nearly stopped. I cleaned the pipe and cap and fluxed them both. I ran a paper towel on a stick up to mop up as much water from inside the pipe as I could. Soldered the cap on without apparent problem.
 When I turned the water back on, the back cap stayed dry, but the front cap leaked actively – a fat drop/second. HD was closed. Called Ed; he sympathized, said it happens.
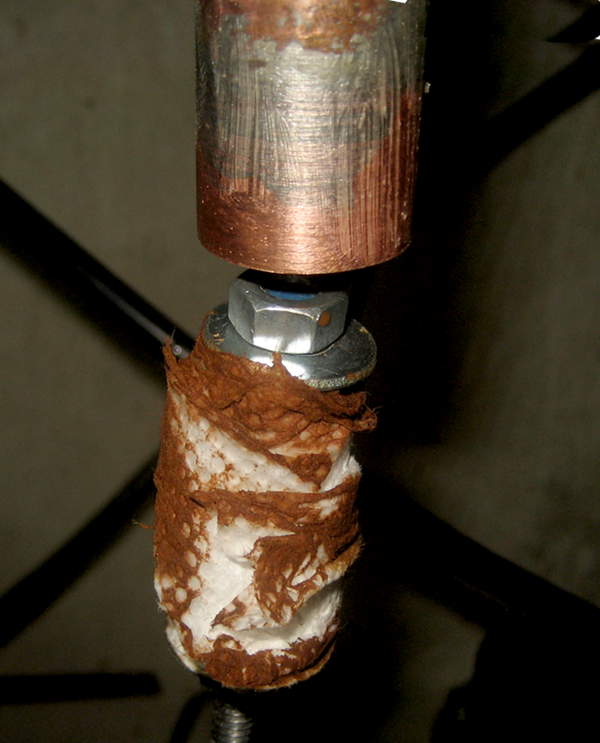
 With nothing to lose, tried self sealing rubber tape. Complete fail. If I had to try that again, I’d stretch good solid layers on above and below, then several layers (for pressure) over the leaky place. But I’d still not have a lot of hope.
With fat drops falling 4′ into a pan, there was some splashing, so I tied a string to the pipe, squeezed the cut off rubber around it to guide the water to the string, and at least stopped the splash (and noise).
Probable fatal error
The flux and solder spurting out of the front joint were telltale. I’m pretty sure I had the valve 10″ away cranked shut tight. Air (and steam from any water there) pressurized the pipe and blew solder out. Maybe on cooldown sucked it in, too.
Takeaway: Don’t do that. Yeah, I should have been able to figure that out. Hindsight and all. Lots of reading after the fact said any water will cause the joint to leak. But it’s an edge case to seal the end of a short, sealed pipe, so I never came across it in my research.
The next plan
I’ll go get another cap (or 2?) in the morning. I’ll shut off the water again (grumble), and admit it will take longer than I want to drain. I guess I should drill the bottom of the cap to let it drain.
Then I’ll heat it and pull the cap off. I’ll try to wipe as much solder off the pipe as I can, then let it cool. Refit, clean, flux, yada yada. I suppose there’s a chance the cap will try to fall off. I suppose some coat hanger wire pushing it up would be in order.
WITH THE VALVE OPEN I’ll run paper towel up to dry as much as I can – probably twice. Resolder, turn water back on, hope for a seal.
Do it
12/21/19: Got 2 new caps. Drilled the old cap. Usual 1/4″ bit just didn’t work. Looks like 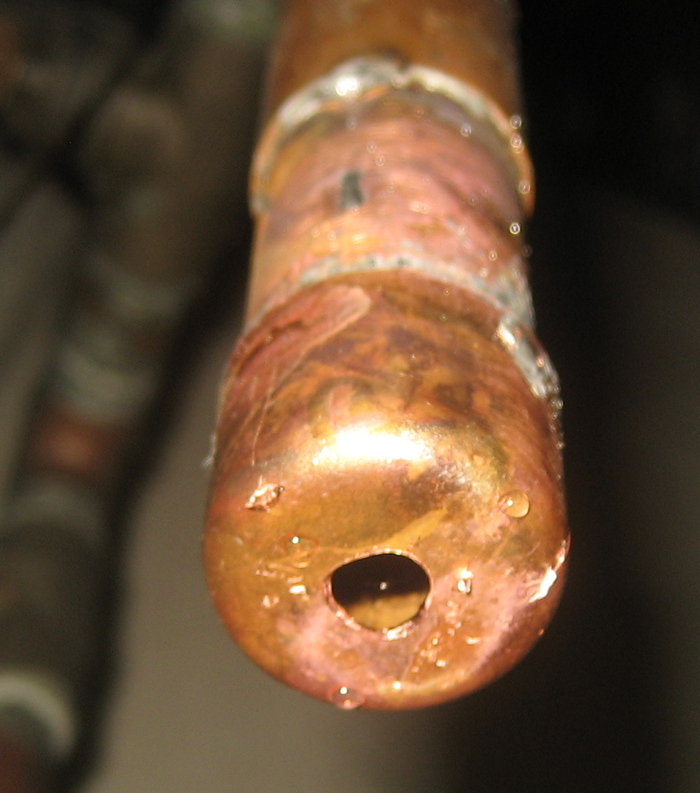 I’d reground it. Left it out to regrind again. Boo me. New bit worked fine on the copper (duh). Opened the valve, got lots more water. Drilling the cap was essential.
After most water out, reheated. Cap came off with no problem, but it showed the problem. Huge areas of no solder.  I’m pretty sure some of that was hot air blowing the (flux and) solder out, but some might have been just not using enough solder. Boo me again.
While the pipe was hot, I wiped the soldered end off, hoping the new cap would fit over the solder. It did, arguably even too loosely. I’ll use even more solder given that.
 I wrapped some paper towel around some all-thread with washers to make sure it was both pushed in and pulled out successfully and dried the inside of the pipe as best I could. Worked fine.
 With the loose cap, it was essential to have a way to hold it on/up. Some coat hanger wire did an admirable job.
 The second solder job seems to have worked. Whew.
Getting rid of the carcass
The softener came apart easily – some plastic clips and one plastic screw. The covers, electronics, valve assembly, and even the o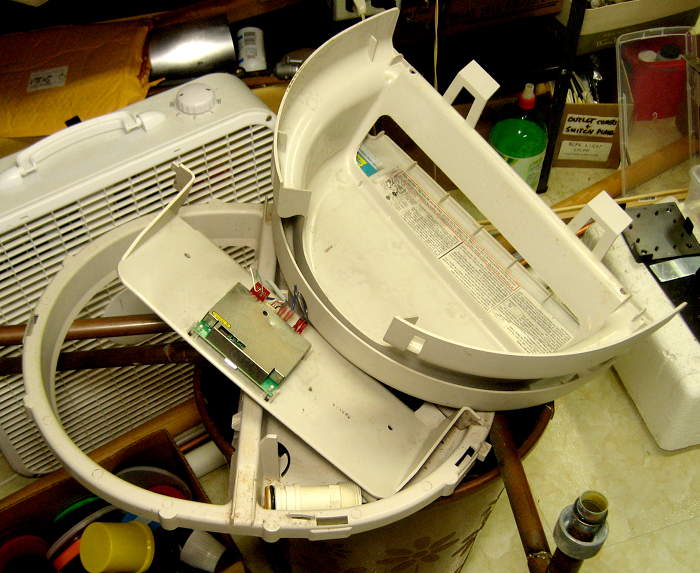 utside tank were simple junk to the landfill. The big tank even fit in the garbage can without cutting it up.
 The problem is the resin tank. In addition to being awkward to handle due to its shape, it weights about 65 lbs. That’s over the limit for several refuse pickup categories. I’d hoped it was largely full of water, but even inverted in the laundry sink, little water came out.
Disposal options:
• Call our waste handler to get a quote for a special pickup. Phone num on Elmhurst web site under refuse. I think that’s the ‘official’ solution. It’s always an option in any case.
• Put a refuse sticker on it and see if the garbage man will take it. This is probably the first thing to try.
• If that fails, stash it away until spring cleanup and see if they take it.
• If that fails, cut the fiberglass tank in half, put in parts garbage over a couple of weeks. This is a messy job with all the resin inside. Saw YouTube of a guy doing it with a chain saw. Or just call the refuse people.
Hmm – hard to believe it’s not full of water. Maybe should start by drilling a hole and see if it drains any. That’s not too messy, it’s nice weather (for Dec) and there’s always duct tape.