
Driven by both my desire to be able to 3D print stuff for myself and desperation at needing to be able to do reasonable 3D printing demos for the schools and libraries that are asking us to do them, I decided to jump into Workshop 88’s old Makerbot Cupcake printer. Many thanks to Bill Paulson for shepherding me through my first prints (and repairs).
This post has 2 main parts: The first is some details about the Cupcake for (me or) whoever needs to work on it. That’s a mix of just factual stuff about the hardware and some history behind how some of it came to be.
The other part – probably much longer and less organized – is my history of making peace with the beast, fixing it, maybe some successes. Here we go.
W88 Cupcake Details and Background
History
We bought the Cupcake kit from Makerbot for maybe $575 on a near end-of-life Father’s day sale in <some year>. Various people put it together, and we got it running.
Early in its life, we took it to an OSMOCES event. Due to a misunderstanding of how the table legs worked (!?), it fell from table height to the floor. It suffered some cracks, but still worked.
 Electronics
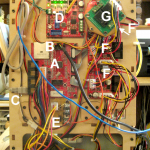
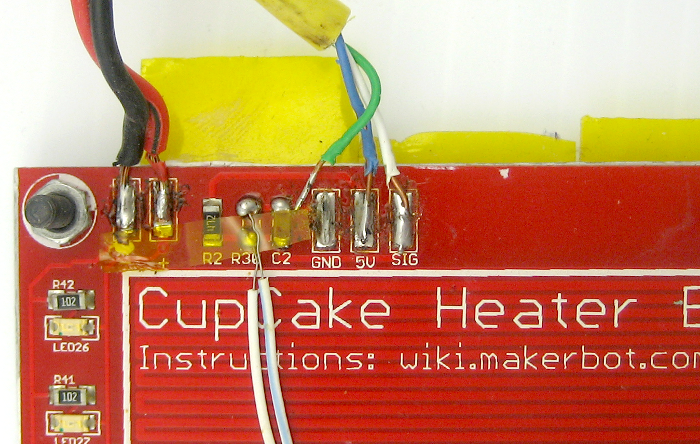
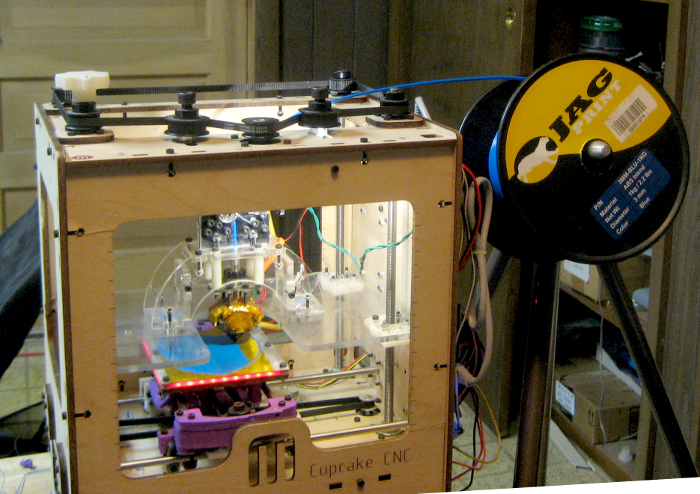
The brains of the printer is a RepRap V1.2 Sanguino motherboard (A). It has its own power switch (not visible under the ATX power cable) which is rarely turned off, but is helpful to know about for when it is. The board talks to the PC via an FTDI USB cable plugged into a 6 pin serial header (B). (The chip must be in the slightly extended USB plug.) We run replicatorg v40 software on the PC, but there’s another package from Makerbot that should also work. This is all the “Gen 3” electronics, and the mother board seems to be running 3.0 “firmware”. There is a later version, but since it was said to only contain new code for stepper extruders – which we don’t have (yet) – there was no reason to upgrade. I think later firmware may also support acceleration – alleged to dramatically reduce the noise and vibration the bot see from its X and Y steppers, so it may still be helpful.
The motherboard was set up to talk to other controller boards both via TTL over ribbon cable and via RS485 over Cat5/RJ45 cables that are NOT ETHERNET! The only 485 link on ours (C) is to the V2.2 Extruder Controller board (D). That board provides several things for the extruder:
- A thermistor input for controlling the hot end temperature.
- FET-switched DC to the extruder heater.
- FET-switched DC to the Heated Build Platform.
- A thermistor input for controlling the temperature of the HBP.
- H-bridge output to run the DC extruder motor.
Unfortunately, the combination of the H-bridge and the DC motor often fails. We (Bill, I think) implemented a published hack using a beefy MOSFET on a bit of perfboard (E) to control the motor. That hack board also gets power directly from one of the power supply’s 12V DC connectors – a much better source than the extruder controller – which gets power for both heaters and the motor over the Cat5 cable! The hack board still uses the H-bridge output from the extruder controller, but with virtually no current draw to run the MOSFET. That hack failed ~3/14, and Bill replaced the MOSFET, returning the extruder to operation. There’s currently a blue LED across the 12V leads to the extruder motor so we can see when it’s getting power.
While the Extruder Controller does provide power directly to the Heated Build Platform, the large current to the extruder hot end heater was judged too much for that board to supply. So the FET-switched 12V that would go to the heater goes to an added-on dual relay board (G), which again gets power directly from the power supply, and noisily connects and disconnects that power to the heater. There’s currently a red LED across the power leads to the heater for a less subtle indication of whether the heater’s on than the slightly different clicks from the relay when it makes and breaks. Its second relay is not (yet) used. There’s also an LED on the Extruder Controller board for each of its FET-switched power outputs. That controller board has one unused FET-switched DC channel, one unused H-bridge, and I think an unused thermistor input (A7).
The motherboard’s non-RS485 connections go via short 10-conductor ribbon cables to the 3 Makerbot V2.3 stepper controller boards (F) (one hidden by the heater relay board (G)). The RJ45 RS485 connectors on those boards are unused. The stepper controller boards get power directly from familiar 5/12V “disk drive” power connectors from the power supply, and have wires running directly to the X, Y, and Z stepper motors.
That about covers the imposing mish-mosh of electronics on the side of the bot.
Extruder
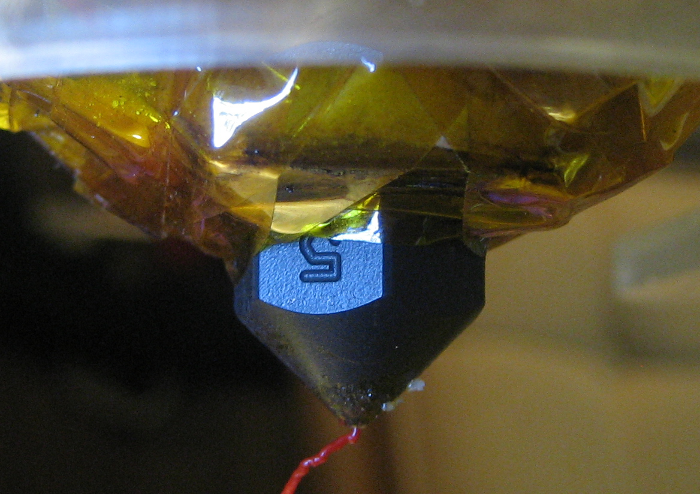
The extruder is a MK5. This clunker uses a geared down DC motor with a hobbed drive wheel to push the 3mm filament into the hot end. A delrin block forces the filament against the drive wheel, adding friction and requiring a thumbscrew to be properly tightened. (The setting is “very tight”.)
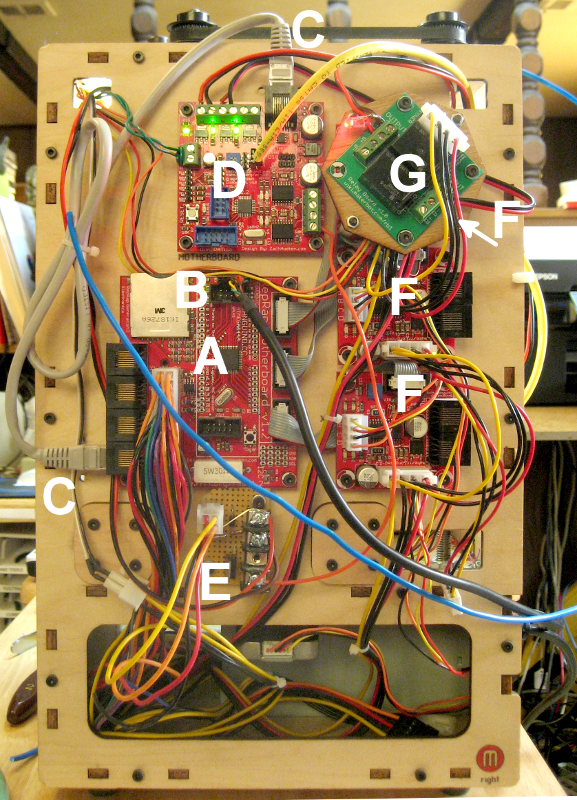
 It looks like the nozzle is 0.5mm. The diameter of freely extruded filament is about 0.65mm. Hmm – looks like I should wipe the nozzle off more often.
This combo fails a lot – stopping feeding either by stripping the filament or the delrin block being too loose or motor failing or failure of the original H-bridge on the controller board. All the cool kids have long since replaced them with stepper extruders. The steppers can reverse and suck the filament back out of the hot end, essentially cutting off the flow of molten plastic almost instantly – and restarting it just as quickly. This provides dramatically fewer “strings” of filament in places where they shouldn’t be. In addition, it provides much better control of the filament feed rate. The word on the ‘net is that a stepper extruder is the best upgrade you can do for a Cupcake.
The DC motor provides quite poor speed regulation, and although it can nominally be controlled via PWM, most people just run it at full speed (PWM value 255) or stopped. I haven’t found whether the original extruder controller would ever try to run the DC motor backwards to get better stop/start control, but the MOSFET hack only allows it to run forward.
 A major limitation is the thumbscrew/delrin block that holds the filament against the drive wheel. It has virtually no ability to adapt to variations in filament thickness. I guess the designers always used perfect filament. Completely in agreement with a comment by Jim H, I’ve tried hard to figure how simply to insert a spring in series between the thumbscrew and where the delrin block touches the filament. A leaf spring? A block of crushproof rubber of the same cross section as the block? The location of the nut in the current setup doesn’t leave much room to work with. Maybe plates on front/back of the whole thing extending off to the right so the nut could be relocated much farther out? That would give a lot more room to play, but would be a hassle. Then maybe nut in the same place but supported by a spring instead of those 2 bolts? Hmm – the nut’s got to resist torque, too. There are spring loaded parts on Thingiverse – even for the DC motor, I think – to do what we want. But by the time we do all that, it wouldn’t be much more trouble to build a (spring loaded) stepper drive.
It doesn’t make sense to put much more money into this printer, especially since we’re ordering a new Kossel kit. But it looks like Bill has some steppers and Pololu controllers, and had even started printing a mounting for a stepper extruder. He’s buried in this year’s Thotcon badges right now, but I’ll investigate whether I can parlay those parts into a stepper extruder before the next kit comes in in a few months.
Jim’s Adventures and Lessons
Aside from tightening some loose idlers on the Z-axis belt and taking the top part of the extruder apart to clear out a filament jam, the first real repair I made to the Cupcake was on 4/3/14 when the HBP stopped heating (and lighting). The replicatorg control panel showed its temperature as 1024 C. If it were actually that hot, it would make sense that the heater wasn’t on, but that seemed unlikely. While Makerbot has removed a lot of the support info for Cupcake from its web site (Boo!), I was able to find a schematic of the HBP, and verified that 3 wires with +5, Gnd, and signal went to a voltage divider on the platform consisting of a 4.7K resistor and the thermistor. An ohmmeter on the end of that cable that went to the A6 connector on the Extruder Controller showed 4.7K between 2 leads, with the other open.
 I took the HBP off and opened it up. Sure enough, the ground wire had come unsoldered. I was a little surprised – I expected the failure to be a wire fatigued and broken from the constant movement of the platform. After I soldered the wire back, I added a little strain relief as protection from the failure I expected. It worked fine when I put it back together.
Don’t print small
While trying to find something I could print and hand out at a session at Addison Public Library, Jim H suggested (3D) printing on paper or cardboard. The idea of printing up an array – maybe 3×3 on the 10cm x 10cm print bed – of small cards with some minimal 3D printing seemed like a great fit. Some googling found that others had succeeded in having prints stick to paper.
So I made up a little “3D” in inkscape, imported to my new friend tinkercad and exported a .stl ready to print. I made it pretty small – 1.5 x 1.5 cm – so I could print a bunch in one round. The results were terrible. I’d had similar problems with other small prints. I think it stays too warm and mushy and it’s too unsolid to provide a good base for higher layers. Maybe without a heated platform? Anyway, small prints seem pretty well doomed, at least on the Cupcake.
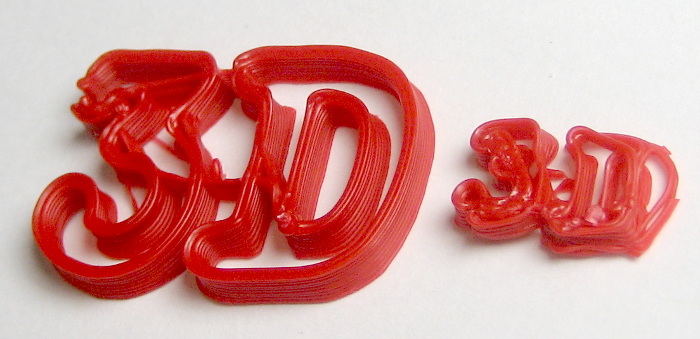 So I made it bigger – 3 x 3 cm. That was much better. Unfortunately, that shot my idea of printing a whole bunch at once. Once there was anything to make the card a little more interesting, I wasn’t going to be able to print more than maybe 2 in one shot.
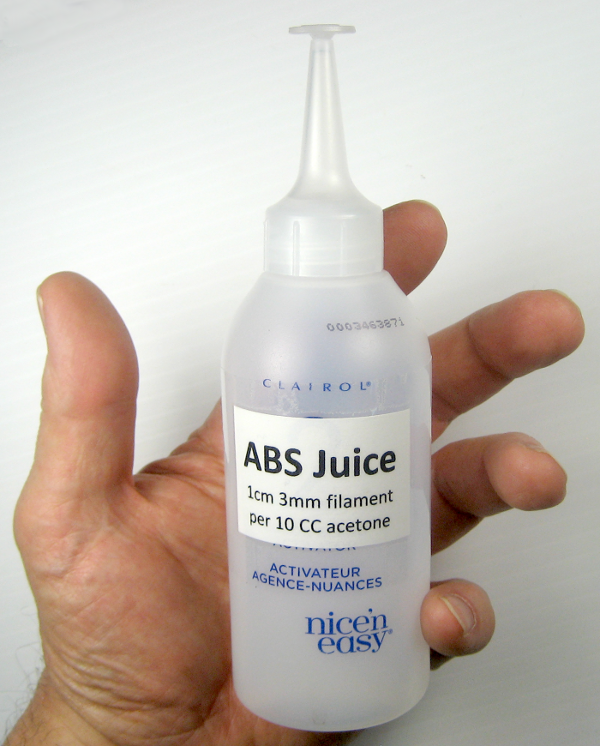 The first print on paper just didn’t stick at all. But when I swabbed the paper with “ABS juice” first, it stuck pretty well. I’d made up some ABS juice – bits of ABS scrap dissolved in acetone – after reading rave reviews from almost everyone who’d tried it. I guess it left a thin layer of ABS on the paper that let the printing grab hold.
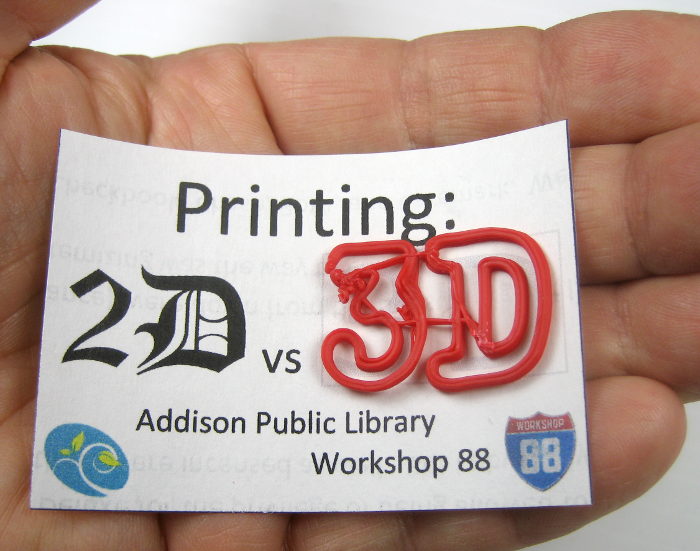 Unfortunately, while the bottom layer did adhere to the paper, the curling forces of the ABS shrinking as it cooled were way too much for the paper to resist. (I’m sure even the 110lb card stock I stock would be no match for it.) So in curling, the ABS lifted some from the paper. It was still fairly well attached, but clearly not completely bonded. I could make a much nicer handout by printing on the Kapton-covered bed to get flat prints, then gluing them on the paper. But that’s just too inappropriate for the task. I’m not sure what I’ll do. But it was a really neat idea!
Hmm – I think PLA is supposed to shrink a lot less. I’m not a fan of it, as it’s much weaker than ABS, and for most of what I’d print, the mechanical strength is important. But for a thin throw-away demo on paper, it might be fine. Guess I’ll have to try to beg some on the W88 list. Boo.
W88 logo
I’ve been working on a good .svg of various flavors of the Workshop 88 logos for quite a while, first inspired by wanting to carve it on the Shapeoko. But I’ve finally gotten something decent, and now that I’ve found I can import to tinkercad (thanks, Andrew!), I’ve tried to 3D print it.
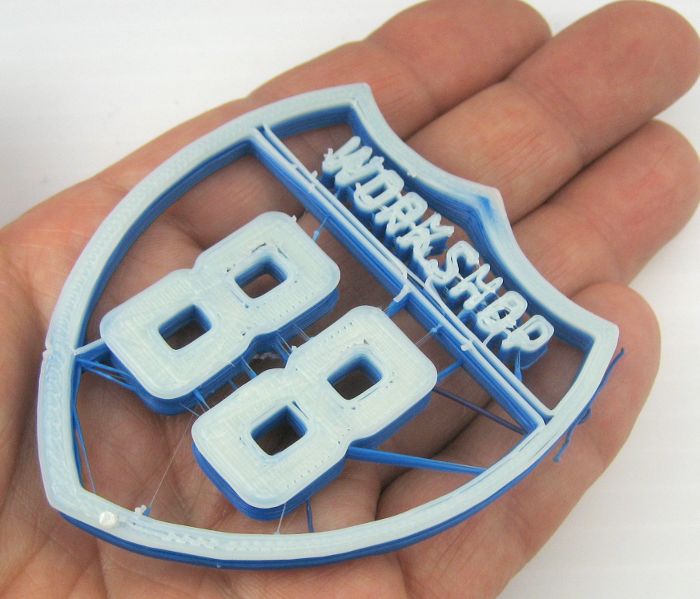 The first attempt wasn’t too bad. I happened to run out of filament near the end, and switched colors – a nice touch. But it’s supposed to have a background, and have the letters attached by more than strings that shouldn’t be there in the first place.
Unfortunately, tinkercad has precious few tools, and nothing that can capture an existing shape (like the overall outline of the shield). Back to inkscape to add the bottom. Then import to tinkercad, tweak, save as .stl. 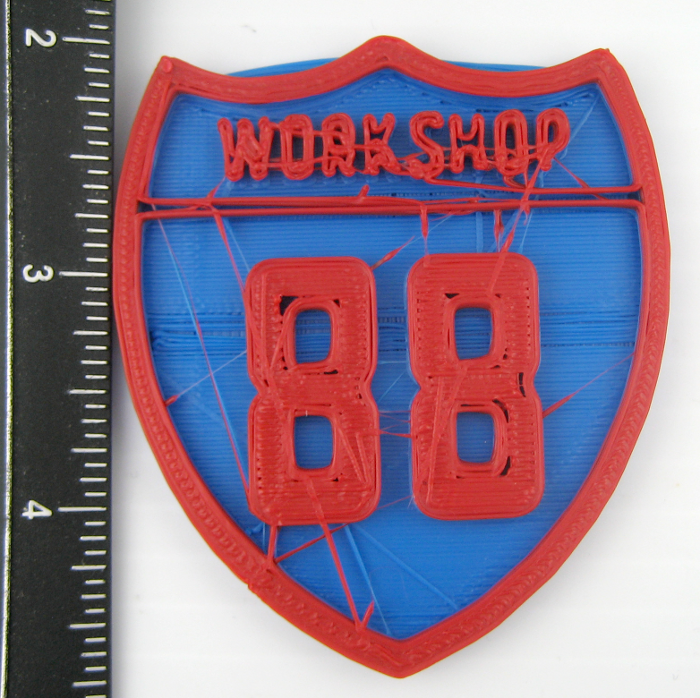
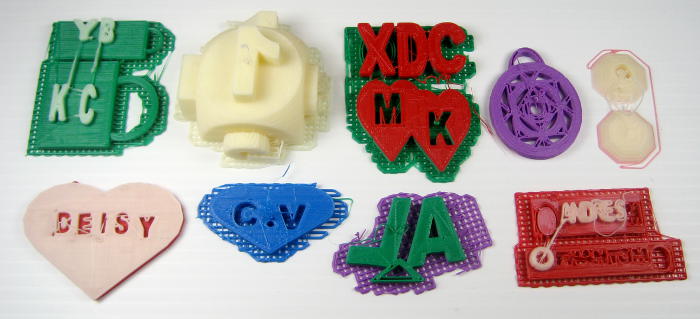
 But it does give me something I can print. This time I changed colors on purpose, very slightly before the bottom layer was done so most of the top layer would be the new color. Here it is before and after about 10 minutes with an Xacto knife.
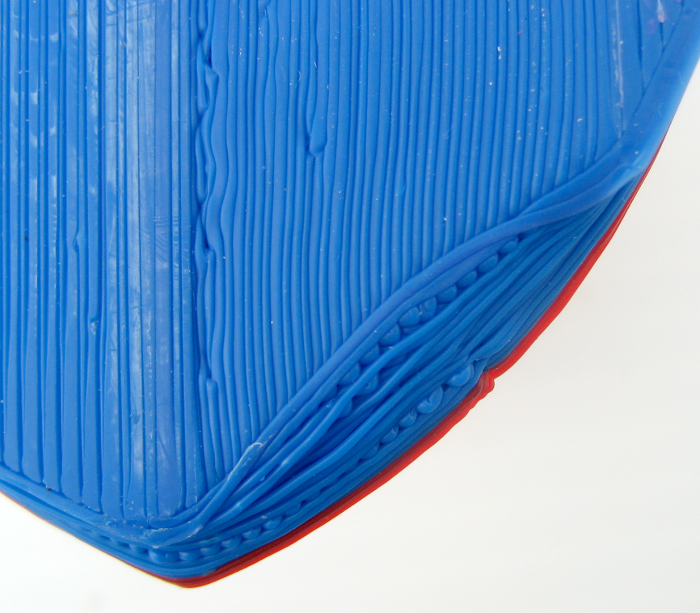
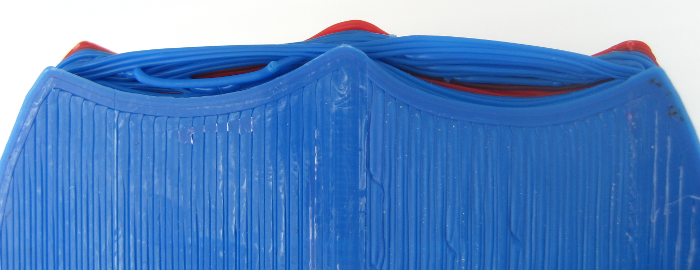 Even besides the strings, the print was far from perfect. It lifted up in one corner. (I might have mashed that down repeatedly with the spatula as it was printing.) And for reasons mysterious to me it screwed up across the top, starting and finishing nicely, but messed up in the middle. Mystery. Update: Bill suggests, and I believe, that the problem across the top was that the errant layers just didn’t stick to the layers below. The natural tendency of the stretchy filament is to take the shortest path between places it’s tacked down to, and I expect that’s what’s happening here. My best guess would be to decrease layer height so each layer is better smushed to the prior, allowing it to stick. And the weird thing near the bottom was probably due to bad adhesion to the platform in that section (missing kapton, I think). The stretchy thing explains the path. As the extruder tried and tried to put the filament in the right place, it eventually got better. I like the stretchy explanation.
I still haven’t gotten a formula for how fast the filament moves or even the time between say when filament enters at the top and when the new color is printing clean. I really need those if I’m going to try to make good multi-color-via-multiple-layer prints. Someday.
Update 4/4/14: I did some actual tests at the space last night. At full speed (from the control panel, extruding into space) it took 50.8 sec to suck in 2″ of filament, for a filament consumption rate of 2.36″/min. Feeding a new color in, it took 2:50 between the time the old color disappeared into the opening at the top and when the new color was pretty completely in the output stream. That’s 150 seconds of all-old color plus 20 seconds during which the color fades from first to the second. I note that even after it’s all new color coming out, if the feed stops (print done), head stays hot, and then flow restarts minutes later, there’s a short burst – a few seconds, fading – of the original color again.
Update 4/7/14: 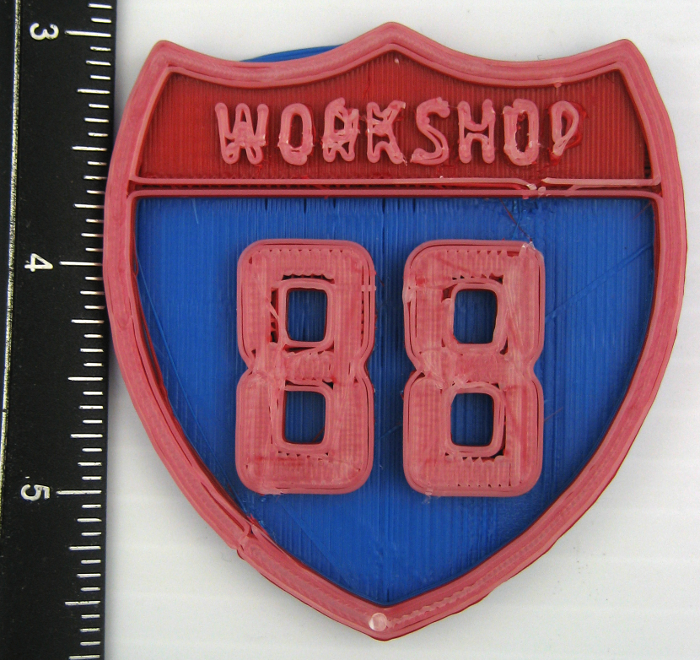 I played with the slicing config some more, and while it’s not perfect, I think I’ve improved it. I added another layer to the logo to get an actual red, white and blue print. Figuring what the red layer needed to look like was slightly more challenging than I expected. But how do I know when to change the filament? I came close, but not quite a cigar. If I had started the white just a little earlier – one more layer of white – it would have been pretty good. But I didn’t, and it wasn’t.
The “WORKSHOP” letters are just below what the filament size resolution can reproduce decently. But now that I’m this close, I’m willing to make it bigger. If I fill the whole print bed, the 6.5cm object becomes nearly 10. That can only help the fidelity of the letters. For the record, let’s go thru the whole process of making it bigger and figuring out when to change colors.
Back in tinkercad, I took the logo above and stretched it to 9.8cm tall. I reduced the just-increased height to 7mm. (The first one was 5.) In Design, did Download for 3D Printing -> STL. I opened that file (w88logorwb3.stl) in repg. Apparently I’d clicked Download before it was quite done with the size change, as it was the old size. Redownloaded as w88logorwb4.stl. Bigger.
 Unfortunately, our build platform isn’t actually 10cm x 10cm, due to screws holding the platform together. Looks like I have barely 8.5cm clear side to side. Resized in tinkercad to 8.9 x 8.33 x 0.7, downloaded as w88logorwb5.stl, opened in repg, generated gcode, opened gcode in 3DGenius.
OK. Looking at the layers, the last blue is layer 5. That layer takes 217 seconds. If I want half of the 150 seconds of all-old color on that layer, I need to start about 142/217=2/3 of the way thru that layer, or after ~2:22 into that layer. The first layer prints vertical lines, then horiz, vert, horiz, vert, then horizontal layer 5. I have to keep track of that to know when to switch to red. The total time for layers 0-5 is 1676 seconds, so I’d expect the change to occur after about 1600, or 26:40. At 2.36″/min, I’ll need ~63″ of blue.
Red is layers 6-12. The last 3 layers print the top area with vertical, horizontal, vertical lines. Layer 12 takes 139 seconds, so again if half the old color is on that layer, I need to change just about 1 minute into that layer. Total time for red is 712 sec, so I’ll need ~28″ of red. Assuming the 3DGenius times are right, that should happen just about 37:36 into the print. Yeah, right. I’ll try to run a timer and see when it actually happens.
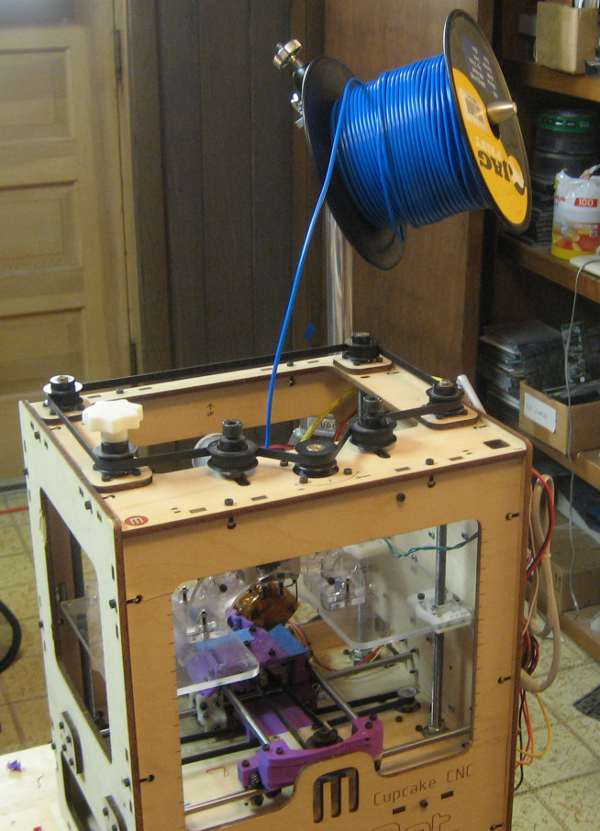 White is layers 13-18, for 814+75 sec, so I’ll need ~35″ of white. I guess I better set up a spool holder. Here’s a crude one using a tripod.
Back to finding when to change colors. If you turn on “Analyze” in the slicing profile, repg pops up a nice screen that lets you look at each layer of the print. From that and the knowledge of how I’d created the object, I could see what layer each color could start at. And while it did give line numbers from the gcode file, there was no time information. I needed to know where 2:50 before the color change was in the print.
I found an online gcode visualizer called 3DGenius here that lets you upload gcode and provides a similar layer by layer view, but also provides time for each layer. Stepping thru the model, I recorded the time for each layer.
Bigger W88 logo and extruder stuff
Took about 5 tries to get it started, for various hardware and operator issues. Screwed up ~19 min in (layer 1) and stopped feeding. Retightened thumbscrew, got it started again. Same again next layer. Maybe the thickness of the blue varies a lot? Stopped again. Paused print, pulled filament out, cut off, reinserted, restarted – seems to be extruding! Added maybe a minute to the build. Failed again soon; gave up and stopped the print.
Cleaned it all off, started fresh. Failed a few minutes in. Tightened screw, got it going again. Failed again. Gave up.
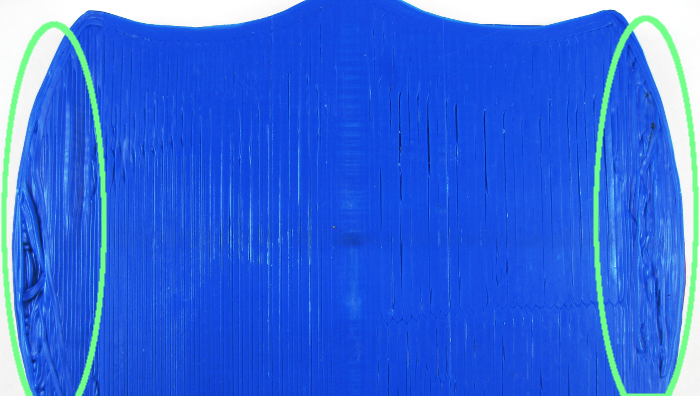
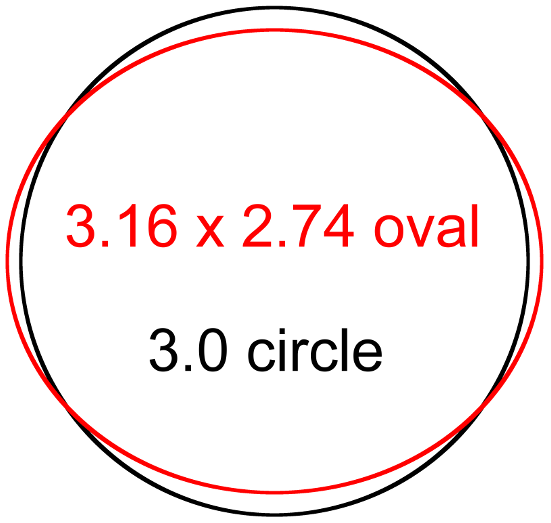 Read up on bad filament. Amazon reviewers of the JAG blue stuff we have uniformly gave it 1 or 2 stars. Main complaints were off size and embedded air. Made 10 pairs of measurements on the blue stuff maybe 4-8″ apart, at 90º to check roundness. It’s pretty bad. Mean inside-outside of spool curve was 2.74mm, std dev .05mm. Side to side mean 3.16mm, std dev .042. That’s pretty oval for a delivery mechanism with a thumbscrew for diameter adjustment and no spring to adapt to variations.
 OK – I can see that the dumb thumbscrew set for one way would be pretty bad the other. I had set the spool up kind of at the corner, so if it twisted, maybe it went from fatways to skinnyways. So I cleaned up, moved the spool exactly to one side, so it should always feed the skinny way, and tried again. Failed just the same way.
Thinking about it, I’ve loosened the thumbscrew and pulled the filament out a few times now. When it’s not extruding despite tightening the thumbscrew, it’s very hard to pull out, even to the point that I’m even a little concerned about breaking something. When I pull it out when it’s working (like to change colors) it pulls out easily.
But uniformly, whenever I put a new filament in and push it down by hand into the hot end, it will start extruding with only moderate pressure on the filament. That says the nozzle isn’t clogged – but somehow the whole extruder was when it wasn’t feeding. So maybe the filament gets soft above the actual heating chamber, gets fat (or bends) and runs against the sides of the tube, and won’t move much.
I don’t know exactly what the design thinking was for this hot end, but there has to be some kind of thermal brinksmanship:
- When the cold filament goes into the top of the stainless steel tube, it’s clearly in the state we see when we handle it. It’s quite stiff against lengthwise compression, and slides freely in the tube.
- In the heating chamber, the filament material is very much melted, and while viscous, can easily be squirted out the nozzle.
- Exactly where is the transition between the two? It has to be somewhat spread out vertically in the tube.
If the bottom of the tube is too hot, the filament can get gooey too early. So is the problem that the tube (which has a little dinky heat sink ring on it) too hot? Would cooling it help?
Thingiverse has several fan shrouds for the common 40mm fans – which won’t quite fit between the 35mm spaced dinos. (Is that the right word?) So others must have wanted to cool the tube. OK, we’re desperate – let’s install a fan.
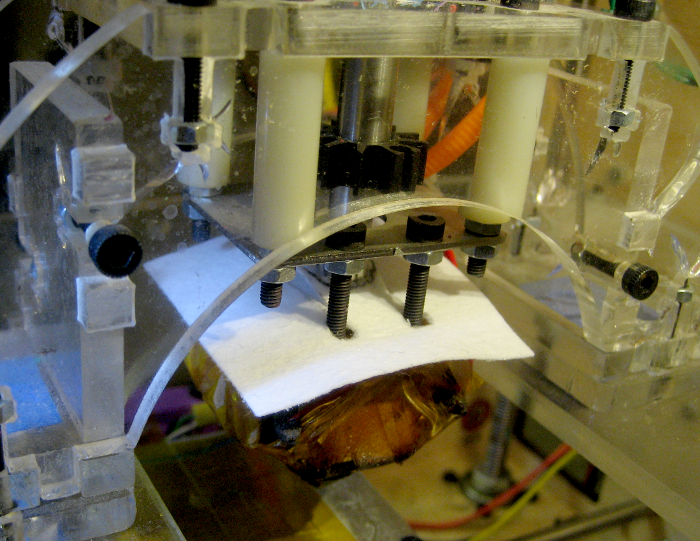
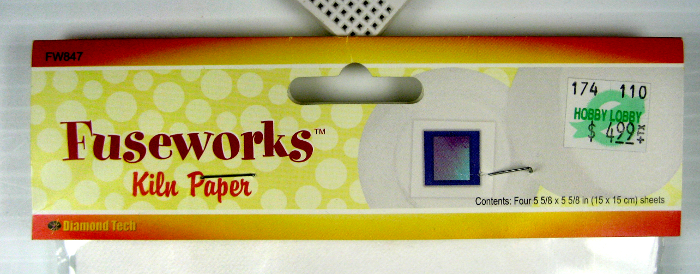 Because of vertical pieces of structural plastic blocking crosswise air flow, I decided to blow air from front to back across the tube, but didn’t want to cool the actual hot end. The dino blocked most of where I wanted air to go, but had enough open that it felt like I could get at least some air on the tube – including on the hottest part. I had some ceramic kiln paper and fashioned a little protective pad to keep the airflow away from the hot end.
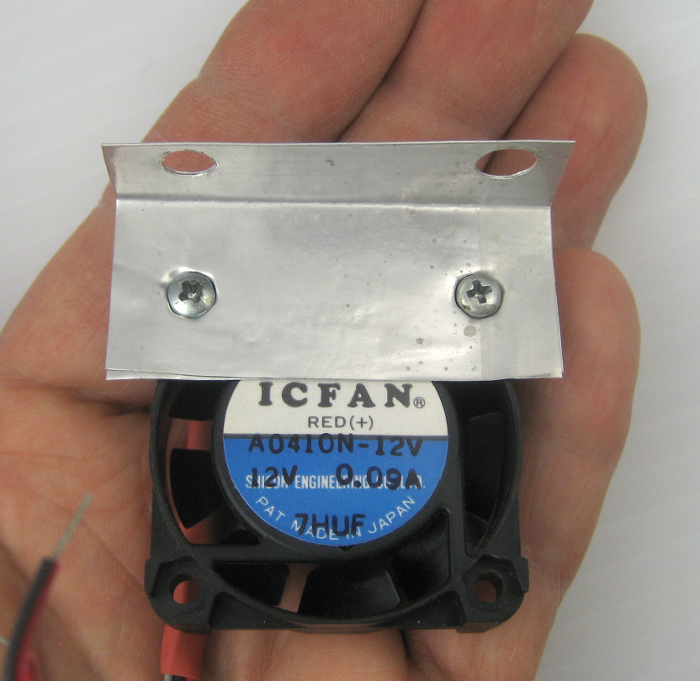 I found a 12V 90mA 40mm fan in the junk box and made up a little bracket for it from two thicknesses of the 0.009″ heavy aluminum foil from a catered-in lunch tray that just fit over two screws on a
 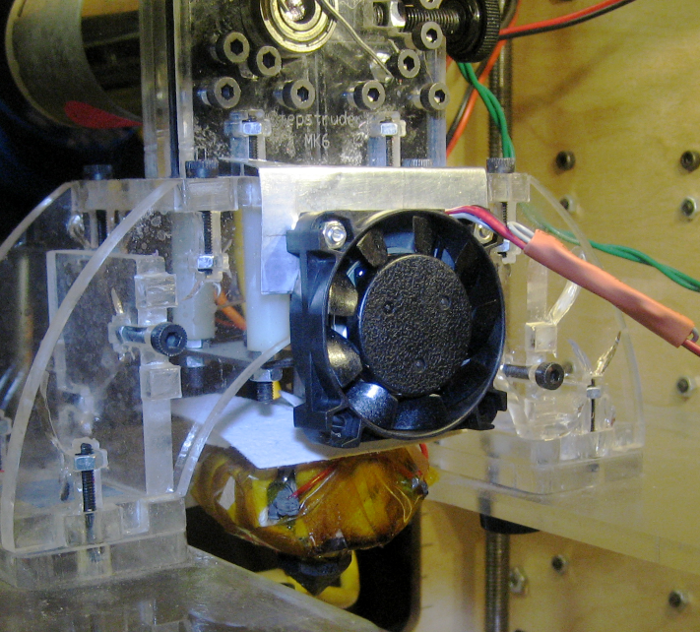 horizontal plate. The only air flow is from the lower third of the fan, but I hoped that would be enough. After all, the original design didn’t have a fan at all!
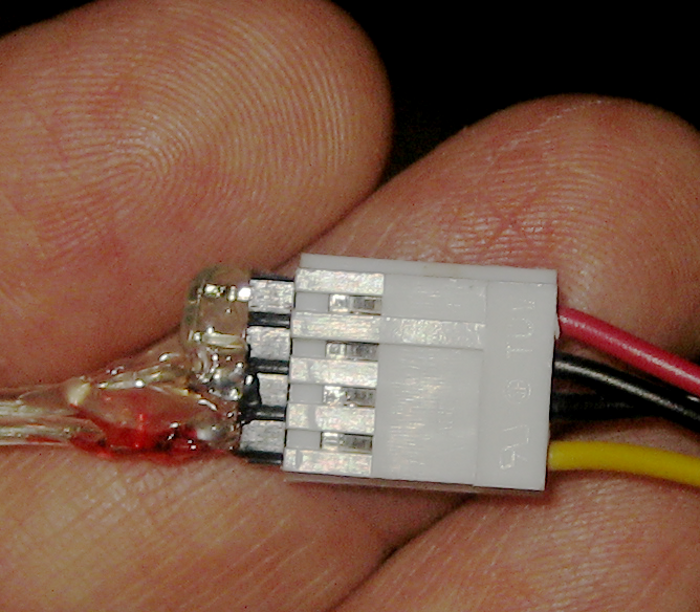 Continuing that logic, I figured just the gentle breeze from running the 12V fan on 5V would be sufficient. There was a free 5/12V disk connector with 0.1″ sockets, so I made one of my usual hot melt-insulated male connectors for the fan, using 2 adjacent pins for 5V (red) and ground. I tried another print, and while it might have held out a little longer, it still stopped extruding about 10 minutes in. Damn.
Thankfully, the symmetry of the disk connector provided a plan B: By flipping the male around, it got 12V instead of 5 (as shown in the picture). The fan makes a lot more noise, but is still running completely within its voltage spec. (Although blocking much of its airflow may not be.)
One last try. It failed, but I paused the print, pulled the filament out, cut it off, stuck it back in, restarted – and it started extruding again. I smushed the little lump where the head sat while I was changing filament with the spatula. A couple more restarts, but it got all the way through the blue layer! Maybe the red isn’t as finicky. And the red worked and didn’t jam! And neither did the white! I got a print!
 There were a couple of places where it stopped printing before I noticed, so there are moderate gaps in some layers. I only had enough kapton tape for 3 stripes instead of 4, so the edges lifted a little, despite applying several layers of ABS juice to the naked aluminum plate. There were a few of the strings stretched across the top outside like in the first one. But it worked!

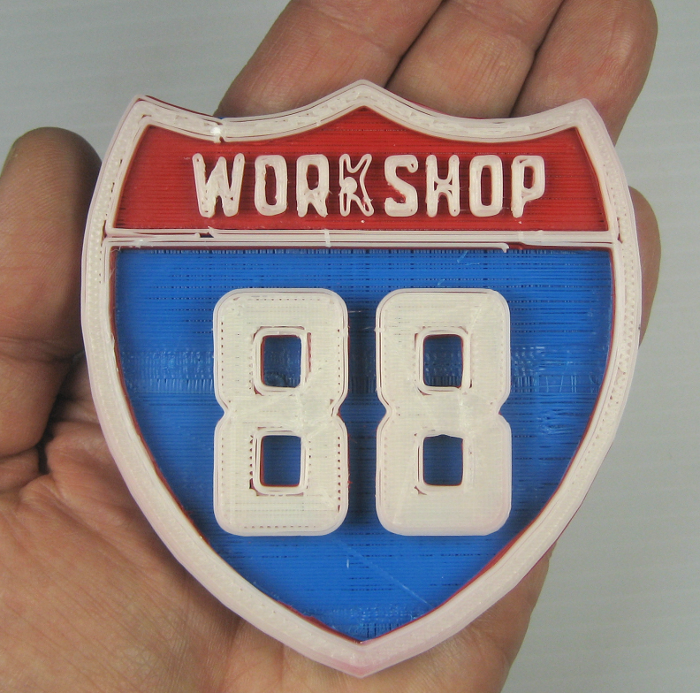 Here’s before and after some quality time with an Xacto knife. As hoped, the letters are a little wider and look better. I guess the ‘K’ was just the victim of digitization.
I promised wouldn’t spam the email list with any more updates on this, so I’ll just post the nicer picture on the W88 blog with a link here.
Extruder collected thoughts
As of 4/8/14, here’s a summary of what I think about the extruder (with additional musings on the Cupcake proper).
- The number one problem I see is the non-particulate clogging of the hot end where (I think) the filament above the melting chamber gets soft enough or sticky enough to stick/jam in the tube. This only seems to happen after ~10 minutes of extruding.
- As long as #1 persists, it’s not worth putting much energy into the printer.
- A stepper probably won’t help the #1 problem.
- I fear there may be contamination in the tube that eventually gets hot enough to slow down the fresh filament. That’s just a theory, and would require tearing the hot end apart to clean/check it out. That’s a fair amount of work, but it’s the only way to fix it (if that’s indeed the problem) short of replacing the hot end – an expensive fix for an old printer that’s about to be superseded.
- I think the fan helps the #1 problem, but clearly doesn’t eliminate it.
- I suspect the many people who claim a stepper extruder is the best thing you can do for a Cupcake are right.
- Problem #1 notwithstanding, I’m tempted to consider somehow spring loading the delrin block to remove filament variation problems from the situation.
- I’d be tempted to continue the work Bill started on a Wade’s stepper extruder – taking advantage of his prints, his stepper and his Pololu stepper controller. The “ugly cable hack” sounds pretty easy and is free. But #1 stands staunchly in the way.
- The blue filament is clearly out of spec. Its ovalness is bad, but if fed at a suitable angle (so the pinch wheel always sees the same (narrow) dimension) it’s probably not a very big problem. I’m pretty curious whether it has a particular thermal problem and other colors/suppliers are better.
- I’ve ordered some 5cm PET tape for the build platform. It’s alleged to be a little better than kapton, and 2 strips would cover the bed.
- ABS juice (1 cm 3mm filament in 10cc acetone) really is a big help making prints stick.
- The little work platform out the back makes re-taping the HBP easier.
- If we keep prints short, the Cupcake is probably still useful as a beater to drag out to demos, though it certainly doesn’t show what current printers can do.
- Maybe we haul the Cupcake plus a box full of sample of high quality prints. We have a box of some on loan from James – thanks!
Beeper
In hopes of someday being able to provide audible indication of when to change filament color, I added a small noisemaker to the bot. (I couldn’t find a way to display an indication on the repg screen. M01 displays, but stops the print!) After digging thru the code a 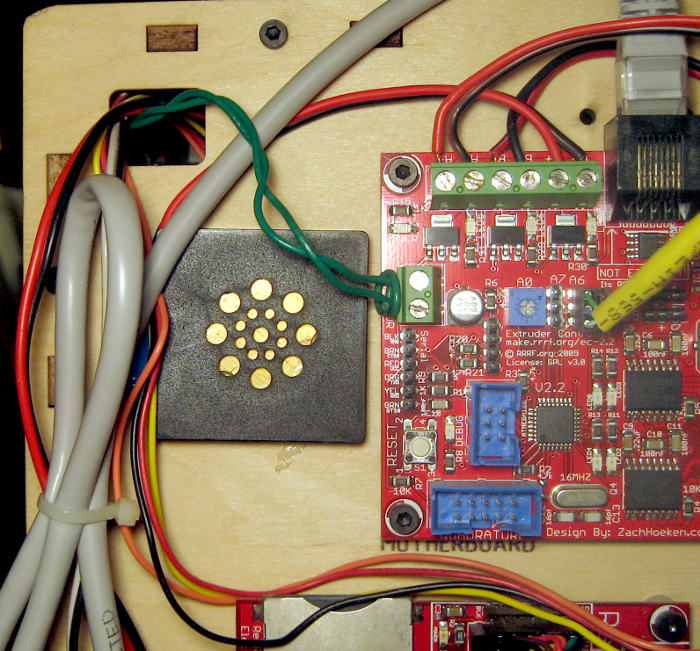 lot, I discovered that M106/M107 gcode commands will make it thru the maze of software and hardware and control Channel C on the extruder controller board. I added one of the square piezo buzzers from the space with a 100uF cap across it to that output.
(There was moderate false hope with M70/M71 for a while, but those print messages on the bot – assuming the bot hw/sw support it. Obviously, there’s no display on a Cupcake, so that can’t work. But it made very clear the distinction between something happening in repg and on the bot.)
I don’t want to delay the print with much time between the M106 (on) and M107 (off) codes, so the cap allows even a short on time to give a reasonable decaying noise. Now if I can just get a method of finding where to insert those codes…
Update 4/8/14: Still no way to find where to insert the codes. I did try to insert some at a random place or 2, but don’t remember hearing the beeper (though I wasn’t intently standing there listening for it). Either it didn’t actually work or the machine makes so much noise it drowned the beeper out.
Opening the gcode up in 3DGenius provides enough information for you to figure out about where you might put the warnings, but only by line number. You still need to open the gcode in an editor with line numbers and re-save it. The skeinlayer feature under Analyze in repg probably also provides enough information.
While changing colors on the fly by cutting off the old filament and pushing the new in (hard) until it catches in the drive wheel pretty much works, if you push very hard you’re likely to crash the extruder head into the print, possibly doing damage. An alternative is to pause the print, loosen the thumbscrew, pull out the old filament, insert the new, push it down (all the way into the melt chamber, but not too hard), retighten the screw and unpause the print. There will be some combination of a gap in the extrusion while it restarts plus a little lump of drizzle where the head parked. Flattening the lump out with the spatula is pretty workable, and a small gap isn’t a big deal, either.
USB cable clamp
Since the Cupcake is getting moved a lot these days – home, space, gigs – I’m a little more aware of the cabling. The power cable is fine, but the FTDI USB cable isn’t.
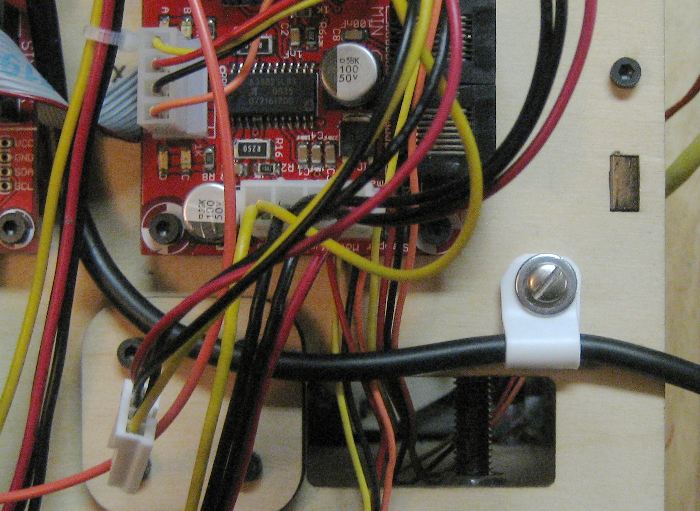 There wasn’t one the right size in the junk box, but this cable clamp bent from a sheet of ~50 mil white HDPE scavenged from a large bottle looks almost like the real thing! And now I’m a lot more comfortable that the USB cable isn’t going to do something bad in transport. I’ll probably replace the 6-32 with one of the black hex M3 screws the cool kids use when it gets back to the space.
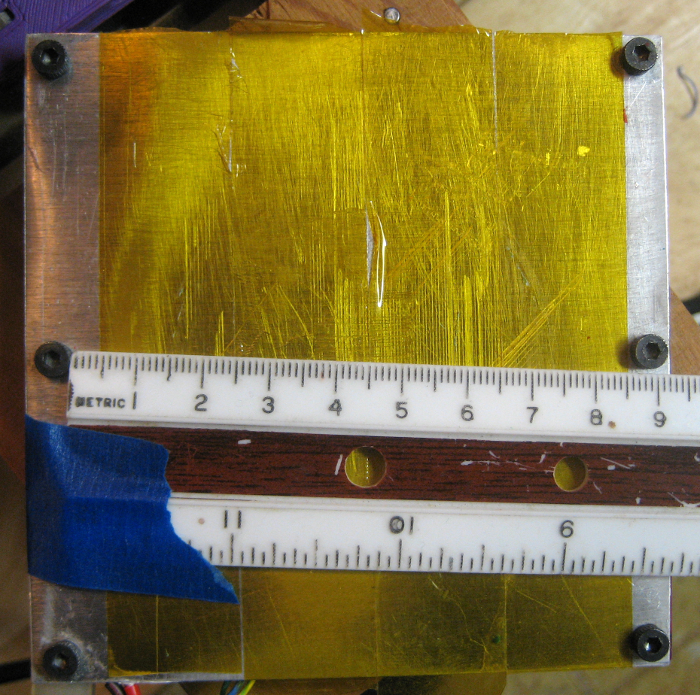
HBP tape replacement support platform
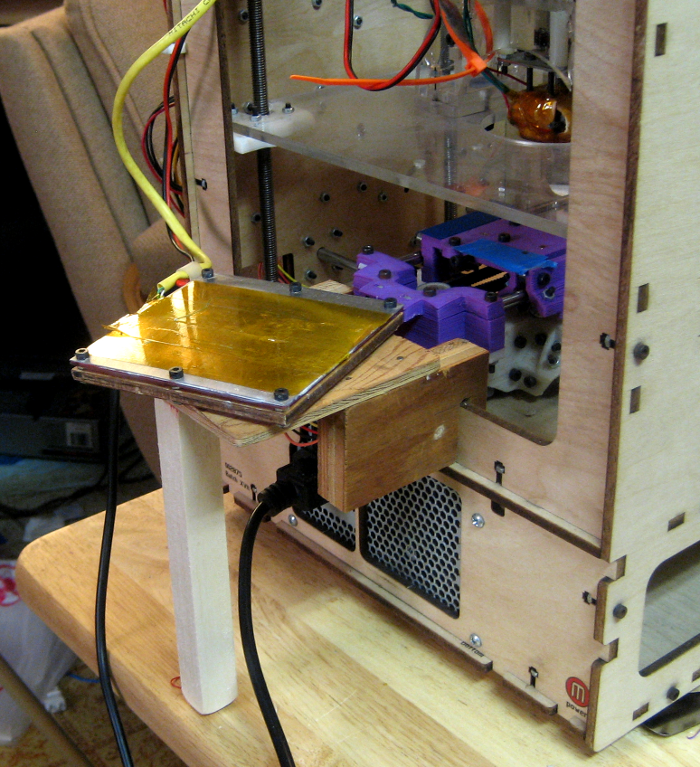 During a recent print attempt, the filament stopped extruding, and I pushed it down into the extruder to try to get it started again. Unfortunately that crashed the nozzle into the HBP and scraped some of the kapton tape off, and I had to replace the tape again. Since it’s awkward to work on the HBP because the heater and thermistor wires are short, I made up a crude support platform to make it a little more convenient. It seems to work OK.
Tip: To restart a stuck/stripped filament, don’t push it down. The Z platform isn’t rigid enough to resist that force, and you’ll damage the print or the build platform. Since the problem is usually a stripped spot in the filament, just turn the filament so a fresh place is exposed to the hobbed shaft.
Addison library printer demo
I agreed to do a 3D printer demo for Liz Lynch at the Addison Public Library on April 30, 2014. Negotiations for the gig were interesting: I expected to go in, dump some printed samples out to look at, have the printer running, let kids gather round and ooh and aah while I explained some about what it was doing, do maybe a 15 minute talk on CNC/3D printing, then hang around with another print and answer questions. Liz said that was a great start, but she’d also like to teach the kids a 3D design program, have them design their own objects, then print them. Me: In 2 hours? No way!
Andrew responded to a query on the W88 list that I should look at Tinkercad. Some other discussions ensued, but it fit perfectly, we used it at Addison, and it worked out about perfectly. My “No way!” was completely wrong.
Unfortunately, when I got there, I couldn’t get the printer working right. In a failure I’ve never seen before or since, right after replicatorg did a little test extrusion and was told to continue, the head went down a little, then UP, not back to the print bed! Of course when it started printing in the air, I aborted. After several cycles of that, including a PC reboot and power cycle of the printer with no improvement and already being 15 minutes into the session, I gave up.
Adding insult to injury, the slides I’d done for the talk didn’t make it on to my laptop, so I didn’t have those, either. Not an auspicious start.
I did a little impromptu talk about 3D printing, pointing to the dead printer and holding up printed samples. Then we showed the kids tinkercad. While Liz proctored, I played with the printer. The first object different from the one I planned to have printing when they walked in worked fine. If I’d changed objects, I could have had it running long ago. Ugh.
The kids did great, and banged out their various creative objects. We got one printed and failed trying to squeeze in a second before we had to go. At least the kids got to see the printer in action and ask some questions. Feeling guilty that the talk had gone so poorly (printer malfunction, no slides, but they still paid W88), I agreed to print all the kids’ things at home. Liz went thru all their accounts, made their objects public, and sent me the usernames.
 That was an adventure, too. I finally gave my self permission to make executive decisions and modify (copies of) their objects for easier printing. I kept some notes while I was printing the kids’ objects, and gave Liz a paper copy when I dropped them off. For reference, here’s a pdf.
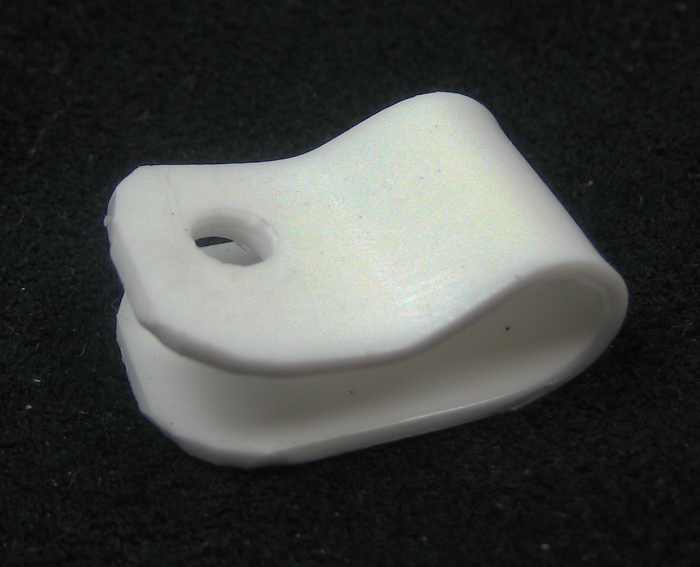
The printer behaved pretty well, jamming only twice. I decided to try the “support” mechanism in replicatorg with an object with impossible overhangs (the white one). Seemed to work pretty well, adding one more arrow to my quiver.
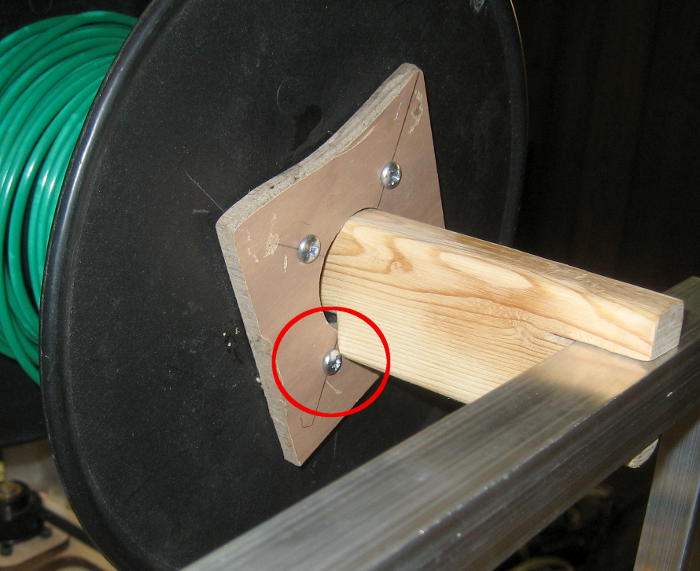 The most interesting glitch was when part way into a print it started extruding above the print surface, but wasn’t jammed. After various considerations, my best guess is that a repair I made to the broken green filament spool got hung up on the new spool holder. Screw heads on a bit of scrap I screwed into the spool both for reinforcement and to hold things in place while the epoxy cured might have caught on the spool support/carrying handle and stopped the spool. The extruder motor then might have caused the whole Z axis to climb up the immobilized filament. Cool.
Facing that big print job I tuned replicatorg up some more, including finding where the “preheat” values were so I can keep the bed and head hot after a print with one click instead of entering 2 temperatures in the control panel screen. I think I found all the start and end gcode, and changed default temperatures and added a “go up 1.5cm after print is done” bit. It’s coming along.
Lots more to be added…
Unencumbered as I am by any facts, I suggest a spring under that thumbscrew so it can float a bit.
I agree completely. I added a picture to the Extruder section near the top to help encumber you with details. I guess a couple of plates front/back – acrylic? aluminum? – to make a new mounting support for the nut wouldn’t be too hard. The idea of a spring around the thumbscrew supporting the nut to some new solid place provided by the new plates might be pretty workable.
You could work a piece of aluminum angle under the two screws on far right top and near bottom, remove the two screws at the right of the nut assuming they are not necessary to keep the nut captured. If holding the nut is a problem replace with a modified T nut. Spring would then have half inch or so room between the nut and the aluminum angle. Youd have to find a spring with the right tension. Ace Hardware has a pretty good spring selection.
Yeah, Stepper extruder is a *big* win. I run a “Wade’s Geared Extruder” with the 3G5D cable hack (it’s really just a wire harness).
And then, consider installing the Sailfish firmware (see Thingiverse). Because it uses acceleration, you can massively increase the speed of the printer. Travel speeds can be 2-3 times stock, and print speeds can be around 2 times stock, depending on how smooth and reliable your axis are. The increase in speed turns those laborious print jobs into much more manageable timeframes…prints with a lot of travel can be done in close to 1/3 the time.
Fieldwork is looking for users of 3D Printers to participate in a paid market research study. We are scheduling one hour interviews offsite on Tuesday, February 24th thru Thursday, February 26th. We have morning, afternoon and evening times available. We are compensating individuals $125.00 CASH as a thank you. There are NO sales involved, this is strictly for market research purposes as our client is trying to build a better mouse trap (3D Printer). If you are interested, please contact me at your earliest convenience @ 847-413-9040 or email me @ fayep@schaumburg.fieldwork.com. In addition, we are offering a $50.00 referral fee for anyone that qualifies and completes the one hour interview.