
Well, that’s not quite right. They’re not dance shoes until after the hacking. Whatever.
I wore cowboy boots for the first many years of my square dance history. Given the usual western theme, I liked how they looked. But more importantly, the leather soles danced well. The slip between the sole and nice wooden floors made it easy to move in them. Sometimes a little too slippery, but I manged to not get hurt.
But after a lot of dancing, my feet hurt. I had thin rubber insoles in the boots, but mostly there was just hard leather between my feet and the floor. To be more comfortable for hours of dancing my feet wanted a lot more cushion under them. Like all that high tech stuff in sneakers (or running shoes, or cross trainers). And as we were starting to dance more advanced levels, funny clothes were no longer the norm, so sneakers were acceptable fashion. But the rubber soles of those comfy shoes were way too sticky to dance in. What to do?
 The shoes that started it were some black leather “dress” sneakers. Comfy, not too ugly. They just needed the suedy dance leather soles Lauren’s dance shoes had. After a small fiasco at a local shoe shop (the guy didn’t have the right material, so he put regular leather on and spray painted it gray so it would look like dance leather!) I needed to find a better place. When I took them to a high end cobbler and moccasin shop in Villa Park and explained what I wanted, they grumbled about the lumpy tread on the shoes saying they’d have to grind it off, but said they’d give it a shot. The chrome tanned leather half soles they put on were great. They gave just the right amount of slip for both square and round dancing – and my feet loved the comfort of the shoes. But while the cobbler shop did excellent work, I wasn’t thrilled with the high end prices. I bet I could do that myself.
There was discussion over whether to do the whole sole or just the front. I went with half soles in part because of the price at the high end shop. They worked out fine for me, and I’ve done only half soles on all the shoes I’ve done since.
 Google found the leather for me. Brettun’s Village has ~9″ x 11″ scraps of chrome tanned leather in a couple of colors for $12 each with free shipping. I’ve ordered the stuff from them a couple of times, and it’s exactly what I need. One piece is usually enough for 2 pairs of my shoes. Daintier feet might get more. I can’t see any difference between the two sides of the stuff, making layout a little easier.
Putting a new sole on
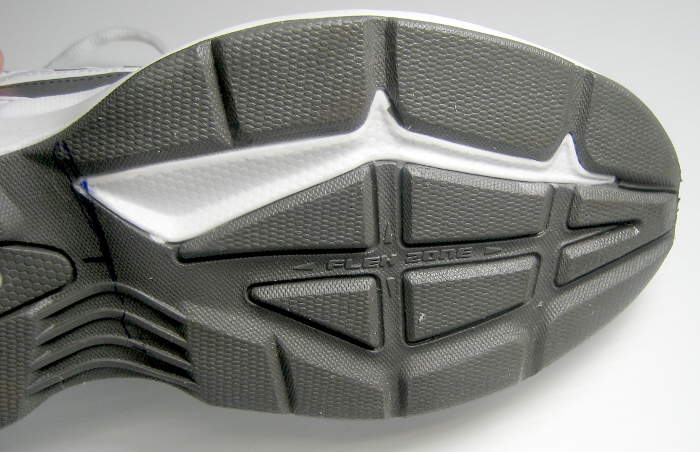
 The ideal shoe for this would have an original sole that is fairly smooth. The more extreme/aggressive the tread, the less there is to glue to. Here’s the latest pair I’ve done. It’s not bad, though I was concerned about the grooves across the sole.
 I decided to try to fill in the low places with something, and ended up with some fast drying caulk. This was what I used. I don’t claim it’s ideal; it’s just what followed me home after staring at the caulk display at HD or Walmart or someplace until I couldn’t stand it any more. I did my usual quick wipe off with alcohol
 before I put the caulk on, and I tried to get it more or less even with the rest of the sole. While it worked out OK, I’m not convinced it really helps much. The low places are a fairly low percentage of the sole area, and I’d guess if they weren’t filled all that would happen is that the new sole would press into the low places a little and essentially never wear there. Between that valid argument for not filling and the fact that I sometimes over engineer things, I have no idea whether I’ll try filling again with the next pair I do.
 Once you have the leather and target shoes (with the tread filled or not), the next step is figuring out what to cut out. I usually put the shoe on the leather and trace around it, although you could make a paper pattern first. When you’re cutting out the first pair of soles, it’s pretty obvious how to lay them out. When you’re working with the leftovers from previous pairs, the fitting can be more challenging. Make the leather larger than the shoe – it’s easy to cut away the excess after the glue dries. But don’t go more than maybe 1/4″ larger all around. It wastes leather and will be harder to clamp down in the curvy parts. If there are very curvy places, you’ll want
  almost no excess so it’s easier to fit/clamp.
The leather cuts nicely with heavy scissors. Then it’s time to glue.
 The definitive glue of choice is Shoe Goo. It was originally recommended by a good guy at a shoe repair shop, and most of the reviews I’ve read about it are raves. I was uncertain what to use on the first pair I did, so I used this on one shoe and Gorilla Glue on the other. Both worked well, but I had more confidence in the SG. I also tried to use the foaming/expanding nature of GG to fill in low places in those shoes. It’s not a great choice for filling, since the cured expanded foam isn’t resilient: Once you crush the cell walls, they stay crushed. That’s why I went with caulk this time.
As near as I can tell the stuff is all made by Eclectic Products (with a bit of interesting history), but is sold by multiple vendors including Penguin Products, Sof Shoe, and probably others. It’s part of the Goop family of adhesives, again marketed in various flavors, apparently with no or little difference in formulations. Anyway, I think if it says Shoe Goo and mentions Eclectic somewhere in the small print on the back, you’ve got the right stuff.
Common sizes are 3.7 oz and 1 oz. Judging from the dent I put in a new 3.7 oz tube with the latest shoes, you could probably get away with 1 oz, though it might be tight. If I had to scrimp, I’d be stingy over most of the middle of the sole, but generous around the edges. If you have glue left in the tube, putting vaseline on the threads before you put the cap back on is a very good idea.
As is my custom, I wiped the soles off thoroughly with alcohol just before gluing to get rid of any last traces of oil.
 Shoe Goo is available in clear and black, but I’ve only used the clear. It skins over and dries pretty quickly, so you need to work fast on something as big as a shoe sole. While it’s not a contact adhesive, I’d be tempted to put it on both surfaces, especially to get the sueded leather nice and wet. But the working time is short enough that I don’t want to take the time to smear it on the leather as well as the shoe. Apply it pretty liberally, and have a piece of cardboard or something with a stiff edge handy to distribute it fairly uniformly all over. Get the leather on as quickly as you can (taking enough time that you don’t initially put it on upside down!) and press it very firmly onto the shoe. I think I used a rubber mallet on the first pair. I didn’t this time, though it’s probably a good technique.
(Reading that back now, maybe the ideal way would be to put the glue on the leather rather than the shoe as I’ve always done. I’ll have to consider that next time.)
 Have clamping materials all ready to go. Rubber bands work well for most of the sole. Tape is useful too. I was startled at how poorly masking tape stuck to the leather uppers on the latest pair, so testing is a good idea. I used duct tape on the second shoe. That stuck well to the uppers, but left some reside on the sole. It went away pretty quickly, but I could detect it the first time I danced in them.
I usually let them dry for 24 hours if I can. The volatiles are kind of smelly, so I get in less  trouble if I leave them outside. Once dry, take off the rubber bands and tape, get out an Xacto knife with a new blade and trim off the excess. You’ll probably find some excess glue you’ll want to get rid of too.
 I’m aware of a habit of tapping the tip of my shoe to mark the beat of the music when it’s not quite time to move yet. To reduce the chance of that action peeling up the very front edge of the sole, I chose to continue the leather all the way up the nose of the shoe. That curves in 3 dimensions and was awkward to fit. Other might choose to end the leather lower, and other shoes might dictate a different approach.
Failure modes
The two most likely failures I’m aware of are edges peeling and just wearing out the leather. With the glues I’ve used along with being careful to glue generously at the edges, clamp firmly, and let them dry well, I’ve never actually had any peeling edges at all. But that’s a pretty obvious possibility.
The failure I didn’t really see coming was just wearing out the new sole. I abuse these shoes a lot more than most folks do with their good dance shoes. I almost always just wear the shoes to the dance, walking on concrete sidewalks, gravel, blacktop etc in the snow or rain between the car and the dance rather than carrying them and changing inside. Then I wear them home, often with a stop at a restaurant on the way. The initial decision to do that was in part to understand how well the glue would hold up.
They’ve held up great to that abuse. While most of the miles I put on these shoes are on the dance floor, I’m sure the harsh outdoor exposure has abraded them down some extra. The first problem showed up after maybe three years. The sole had worn through on one edge of one shoe. At that point, the possibility loomed of part of the sole peeling back in the middle of the sole, both making a thick place (doubled material) and exposing part of the original sticky rubber in a place that bore a lot of weight. Those were a recipe for a dramatic change in the behavior of a trusted shoe, possibly resulting in an accident. Not good.
 The shoes were otherwise fine, so I just put new half soles over the old ones on both shoes. I didn’t want to just put a patch over the worn place, fearing that the exposed edges might peel and cause a problem. I got another year or so out of them before the same place wore through again. This time the rest of the shoe was wearing out, so I started over with a new pair. I could probably get a couple more weekends out of them, so I won’t throw them out yet. 🙂
I considered putting an extra layer under that spot as I made up the new shoes, but as the outer layer wore through, again there would be the possibility of the edges of that outer layer peeling back and causing trouble. The one bit of tuning I could (and did) do was to choose the thickest piece of leather I had for that problem left shoe.
Overall I’m very pleased with these new soles. They dance very well, even – surprisingly – on carpet. Given the right leather and glue, it’s not a very hard project, and is one I’d happily recommend to friends.
Update 9/9/15: The next pair
 My good dance shoes (in the pictures above; now just 3 years old) had a quarter-sized hole in the middle of the right sole. After the WI*PAC weekend in Wisconsin, that hole progressed to a ripped out section that made the shoes essentially undanceable. While not in terrible shape, there were some holes in the inside, so I decided to get (and sole) new shoes rather than putting a new sole on the bad one. (On further examination, there’s a place on the edge of the other sole that’s worn thru as well – so the replacement was a good idea.)
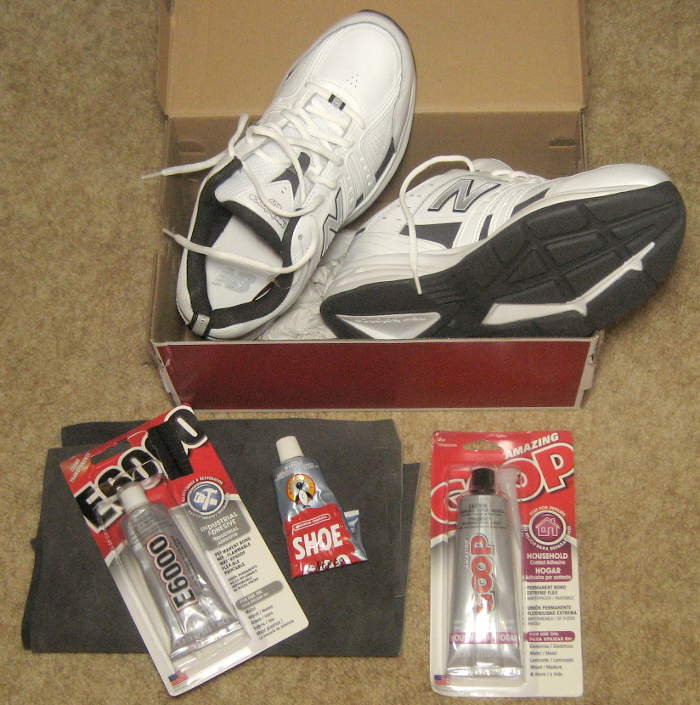 I’d just gotten some E6000, since that was all I could find at the Walmart in Wisconsin, to glue down some peeling edges and to help a friend with some soles that were coming loose. I discovered I also had an unopened tube of Goop when I got home. I remain convinced it’s all about the same stuff. The Shoe Goo was marked “opened 9/11/12”, so must have been the tube I did the last shoes with. I tried it, and it would probably have worked, but it was a little dried out, so I used the new E6000.
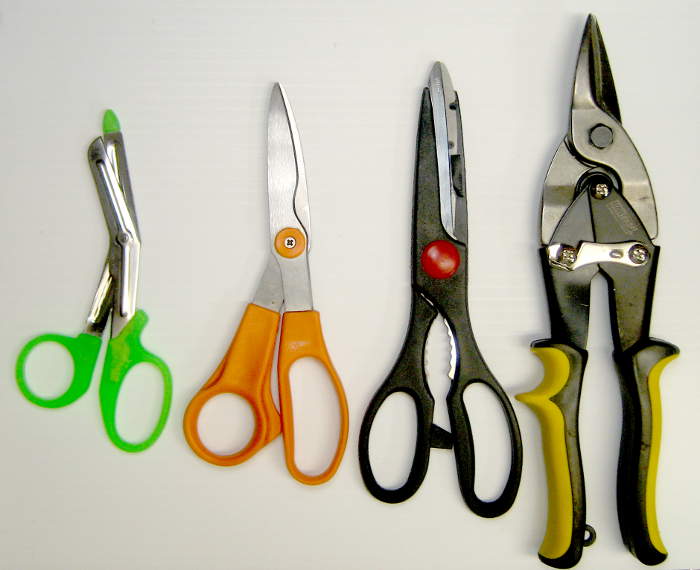 While cutting the leather, I did a quickie cutting test with a straight cut aviation snips, a pair of standard HF scissors, the kitchen Fiskars, and some little cheap stamped scissors maybe from Electronic Goldmine. To my surprise, the little green ones cut best. The HF scissors were next, but only a little better than the Fiskars. The snips didn’t work here at all.
 The tread on the new shoes was much less flat
 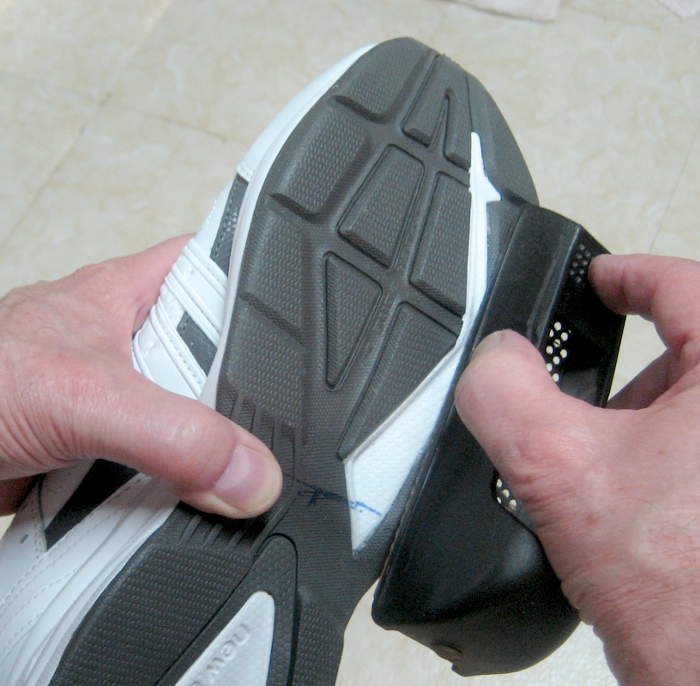 than I would have liked. I didn’t try to fill it, partly to see how it would fare (and partly because I need the shoes for a dance tomorrow and didn’t have time for another step). I did take a Surform to the edges a little to increase surface area and rough it up a bit.
Despite comments above, I decided again to apply the glue to the 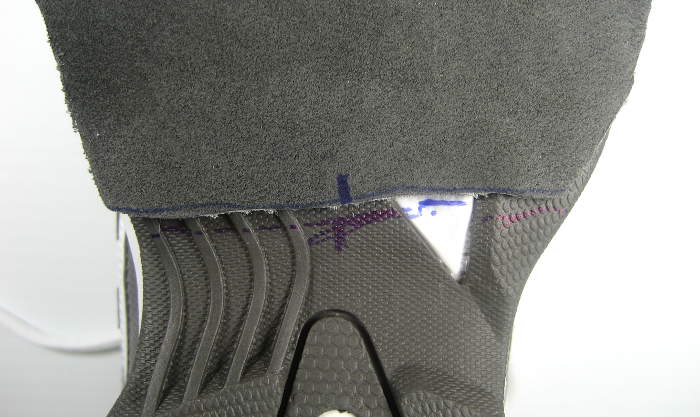 shoe rather than the leather. While dry fitting and practicing with the shoe and leather, I found that marking where the end of the leather hit the shoe sole, along with a center mark, made it much easier to not screw up while laying the leather on the glued-up sole. That’s a nice trick.
 I used lots of rubber bands again, and that looks like they will hold quite well. I did tape the end of the leather (away from the toe) to the sole, but otherwise didn’t feel tape helped much. I taped the edges on the first shoe, but didn’t bother on the second. I assume they’ll be fine, but if not, I’ll post more details here.
Other comments: I checked the Brettuns Village link above, and it was still good and the chrome tanned splits were still $12.
I continue to be pleasantly surprised how well these shoes (at least the 3 year old ones!) perform both on wood floors and on carpet. I suspect the latter is because the soles are so beat up and polished that they’re more like regular leather than the suede-y surface they started with.
The slight peeling at the edges that caused me to get some glue at the weekend was not a functional problem at all. There were 2 areas maybe an inch in diameter that I wouldn’t have noticed except I was examining the shoes closely due to the hole in the sole. I did slather some E6000 in with a scrap of cardboard, and that completely fixed the non-problem.
I weighed the E6000 tube before and after gluing the second shoe. What felt like a suitably generous amount of glue turned out to be just about 1/3 oz. That’s a little further evidence that a 1 oz tube should work for one pair of soles.
Update 2/27/16: At Hearts In Motion 2/19/16 I noticed that my good dance shoes felt like they or the floor were quite sticky. They didn’t glide like they’re supposed to. When I looked closely at the soles, there was a very noticeable layer of gummy crud on all the surfaces that touched the floor. I scraped it off after the weekend with a watch case back popper, and got quite a pile of detritus. Still no idea what it was or where I picked it up, but the shoes dance much better now. This is the first time I’ve seen anything like that.
I carry my dance shoes and change at the dance most of the time now. I’ve seen enough evidence that Shoe Goo holds up to most anything that I don’t need to continue the experiment. If I can get an extra year or 2 before I have to do the next pair of shoes, I’m all for it. But I wonder whether all the walking on rough sidewalks to and from dances and restaurants afterward wore off any previous contaminations before I noticed them.
And another pair
1/25/18: Time for another pair of dance shoes. This time I pulled some slightly worn shoes out of what turned out to be a surprisingly large collection hiding in the back of the closet. I really need to pur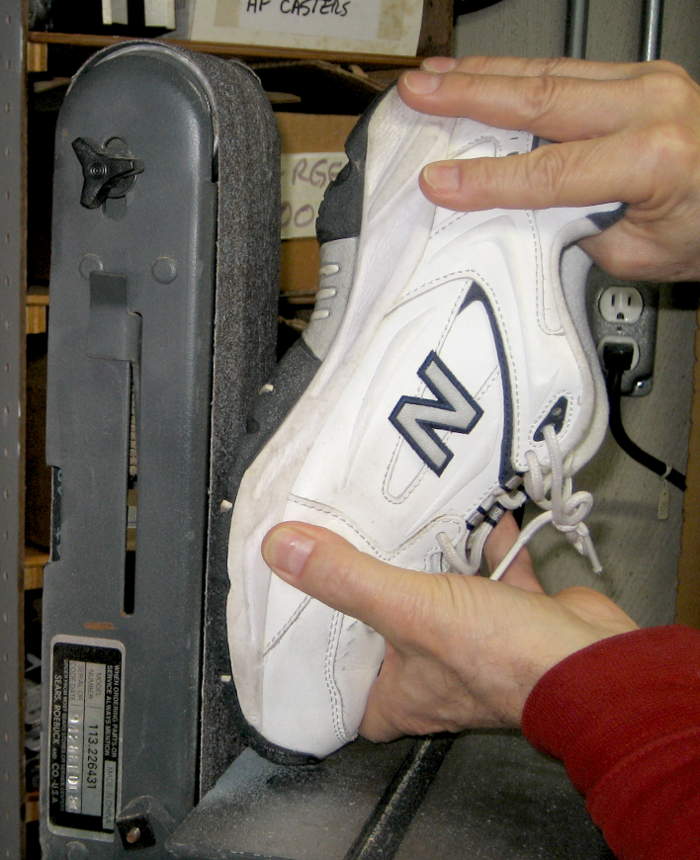 ge that mess of shoes.
This time, looking to both smooth parts of the tread and provide a clean 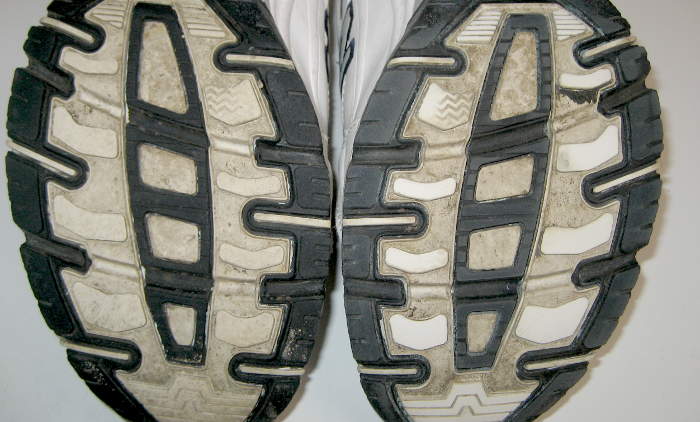 surface to glue to, I took them to the belt sander. You can see the difference between sanded and unsanded.
 With the stupid mistakes of the past slowly convincing me to be more conservative to reduce future mistakes, I marked the sole pieces.
I couldn’t remember whether I had any Shoe Goo left, so bought a new tube. When I found an old one, I decided to use the fresh stuff, as best results outweighed the value of the data point of whether the old glue would have been OK.
Shoes continue to be carried and changed at the dance. I’m not sure whether to be embarrassed about the HF bag that seems to have ended up with that duty or not.
Another Goop Repair
 5/26/18: Unrelated to dance shoes, one of the soles of the old, should-have-been-thrown-away sneakers I wear for dirty work in the garden started to come off (and I almost tripped over it). I’d recently done a pass of throwing out all the old “might-be-useful-someday” sneakers, and my good ones weren’t due to be retired yet, so I thought I should try to glue the soles back on.
 I first gave both surfaces a nice scrub with a toothbrush and alcohol, then applied Goop. I first tried a tube labelled “opened 8/15” which seemed semi liquid from squeezing the outside, but was way too gummy when it started to come out. I used the tube marked as “opened 1/18”, and it seemed fine. There were in fact maybe 4 places the soles were coming off as I looked more closely, so (alcohol scrubbed and) glued ’em all.
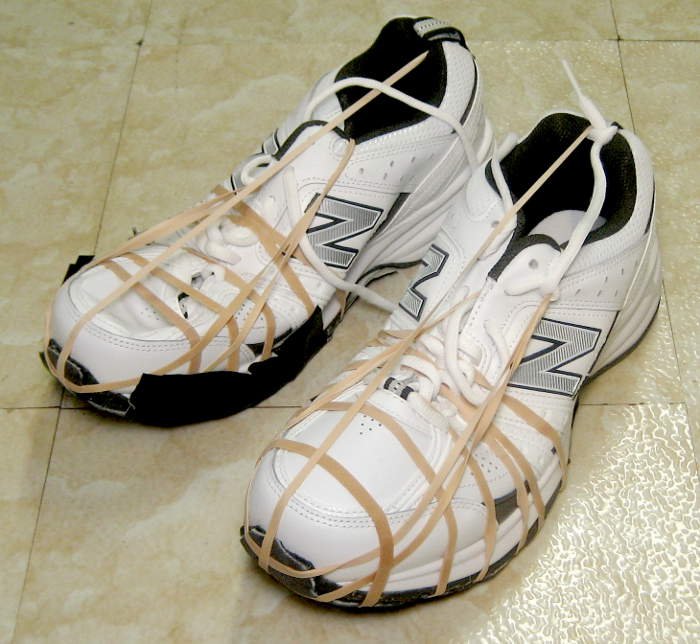
 I used the usual rubber band clamping protocol, and it felt quite adequate. I did slightly improve the technique, though: There’s no requirement that the tension in the rubber band be constant all the way around, and when it’s going over rubber corners, it’s pretty easy to make the section stretched across/holding together a glued joint noticeably higher tension than the rest (and thus clamping better). That seems pretty valid, and I did it as much as I could. You can see the width of the band reflecting the tension in the pic.
Pingback: Dance shoes,with what you have. – Fugawee