
Here are the latest repairs of my dear old Craftsman leaf vacuum. (Original notes here.) But more importantly, here are also the details of what I learned reverse engineering the no-longer-available bag! I tried to include enough info for someone motivated to make his own bag from scratch.
REPAIRS
 A rip in the seam between the bag and the canvas back that I’d repaired before gave way. This time, thanks to the bag being
  fairly clean, I was able to sew a denim patch in. It’s machine stitched to the bag, and hand sewn with 30# green Spiderwire fishing line (from the Drawbot) (doubled). Should hold for a while.
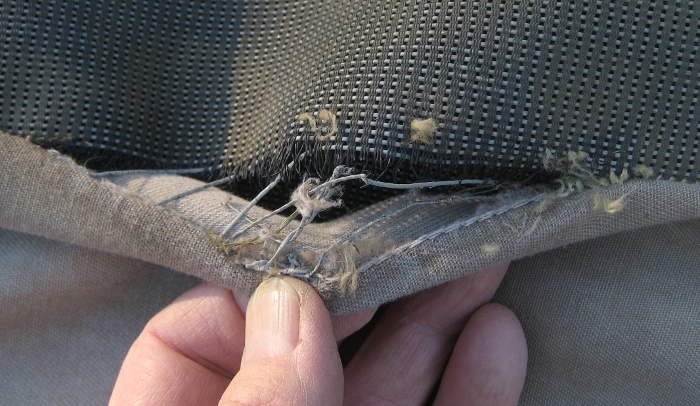
The other hole was more interesting. The outside front corner of the plastic elbow/chute from the machine is most subject to wear from rocks and other debris being blown straight at it. I’ve repaired that corner several times, finally with some sheet steel.  But that same corner of the canvas tube going to the bag also gets blasted.
When I took it apart to reverse engineer plans for the bag, I noticed an unexpected worn away section of the inside layer of the “cuff” that attaches to the elbow. It was only when I looked at fixing the hole that I realized what had happened: The debris blast had completely worn away the inside of the cuff – and then blew out a hole in the seam between the cuff and the tube!
 Again thanks to the bag being clean, I was able to sew another denim patch over both the worn cuff and the hole. Several lines
 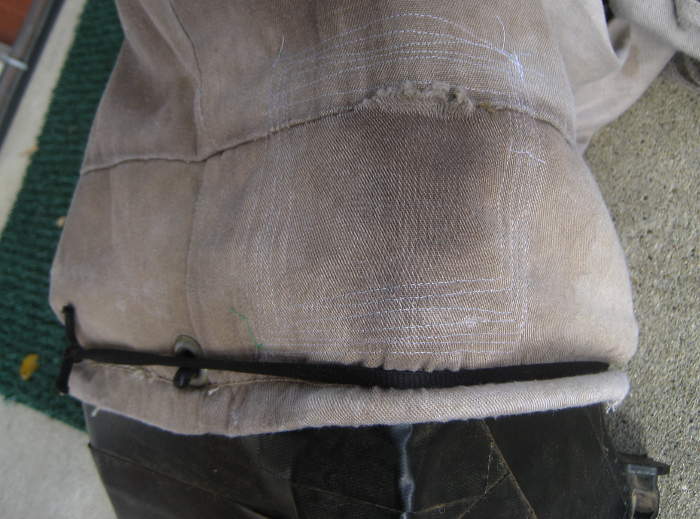 of machine stitching should make it completely functional. Fortunately, neat/pretty were not on the requirement spec. 🙂
BAG PLANS
Earlier in October (2018) I took the bag off, took reasonable pics, emptied most of the leaf dust out of the ripped hem of the cuff, and put it in the washer/dryer. Cleaned up the dryer afterward (tho not well enough). 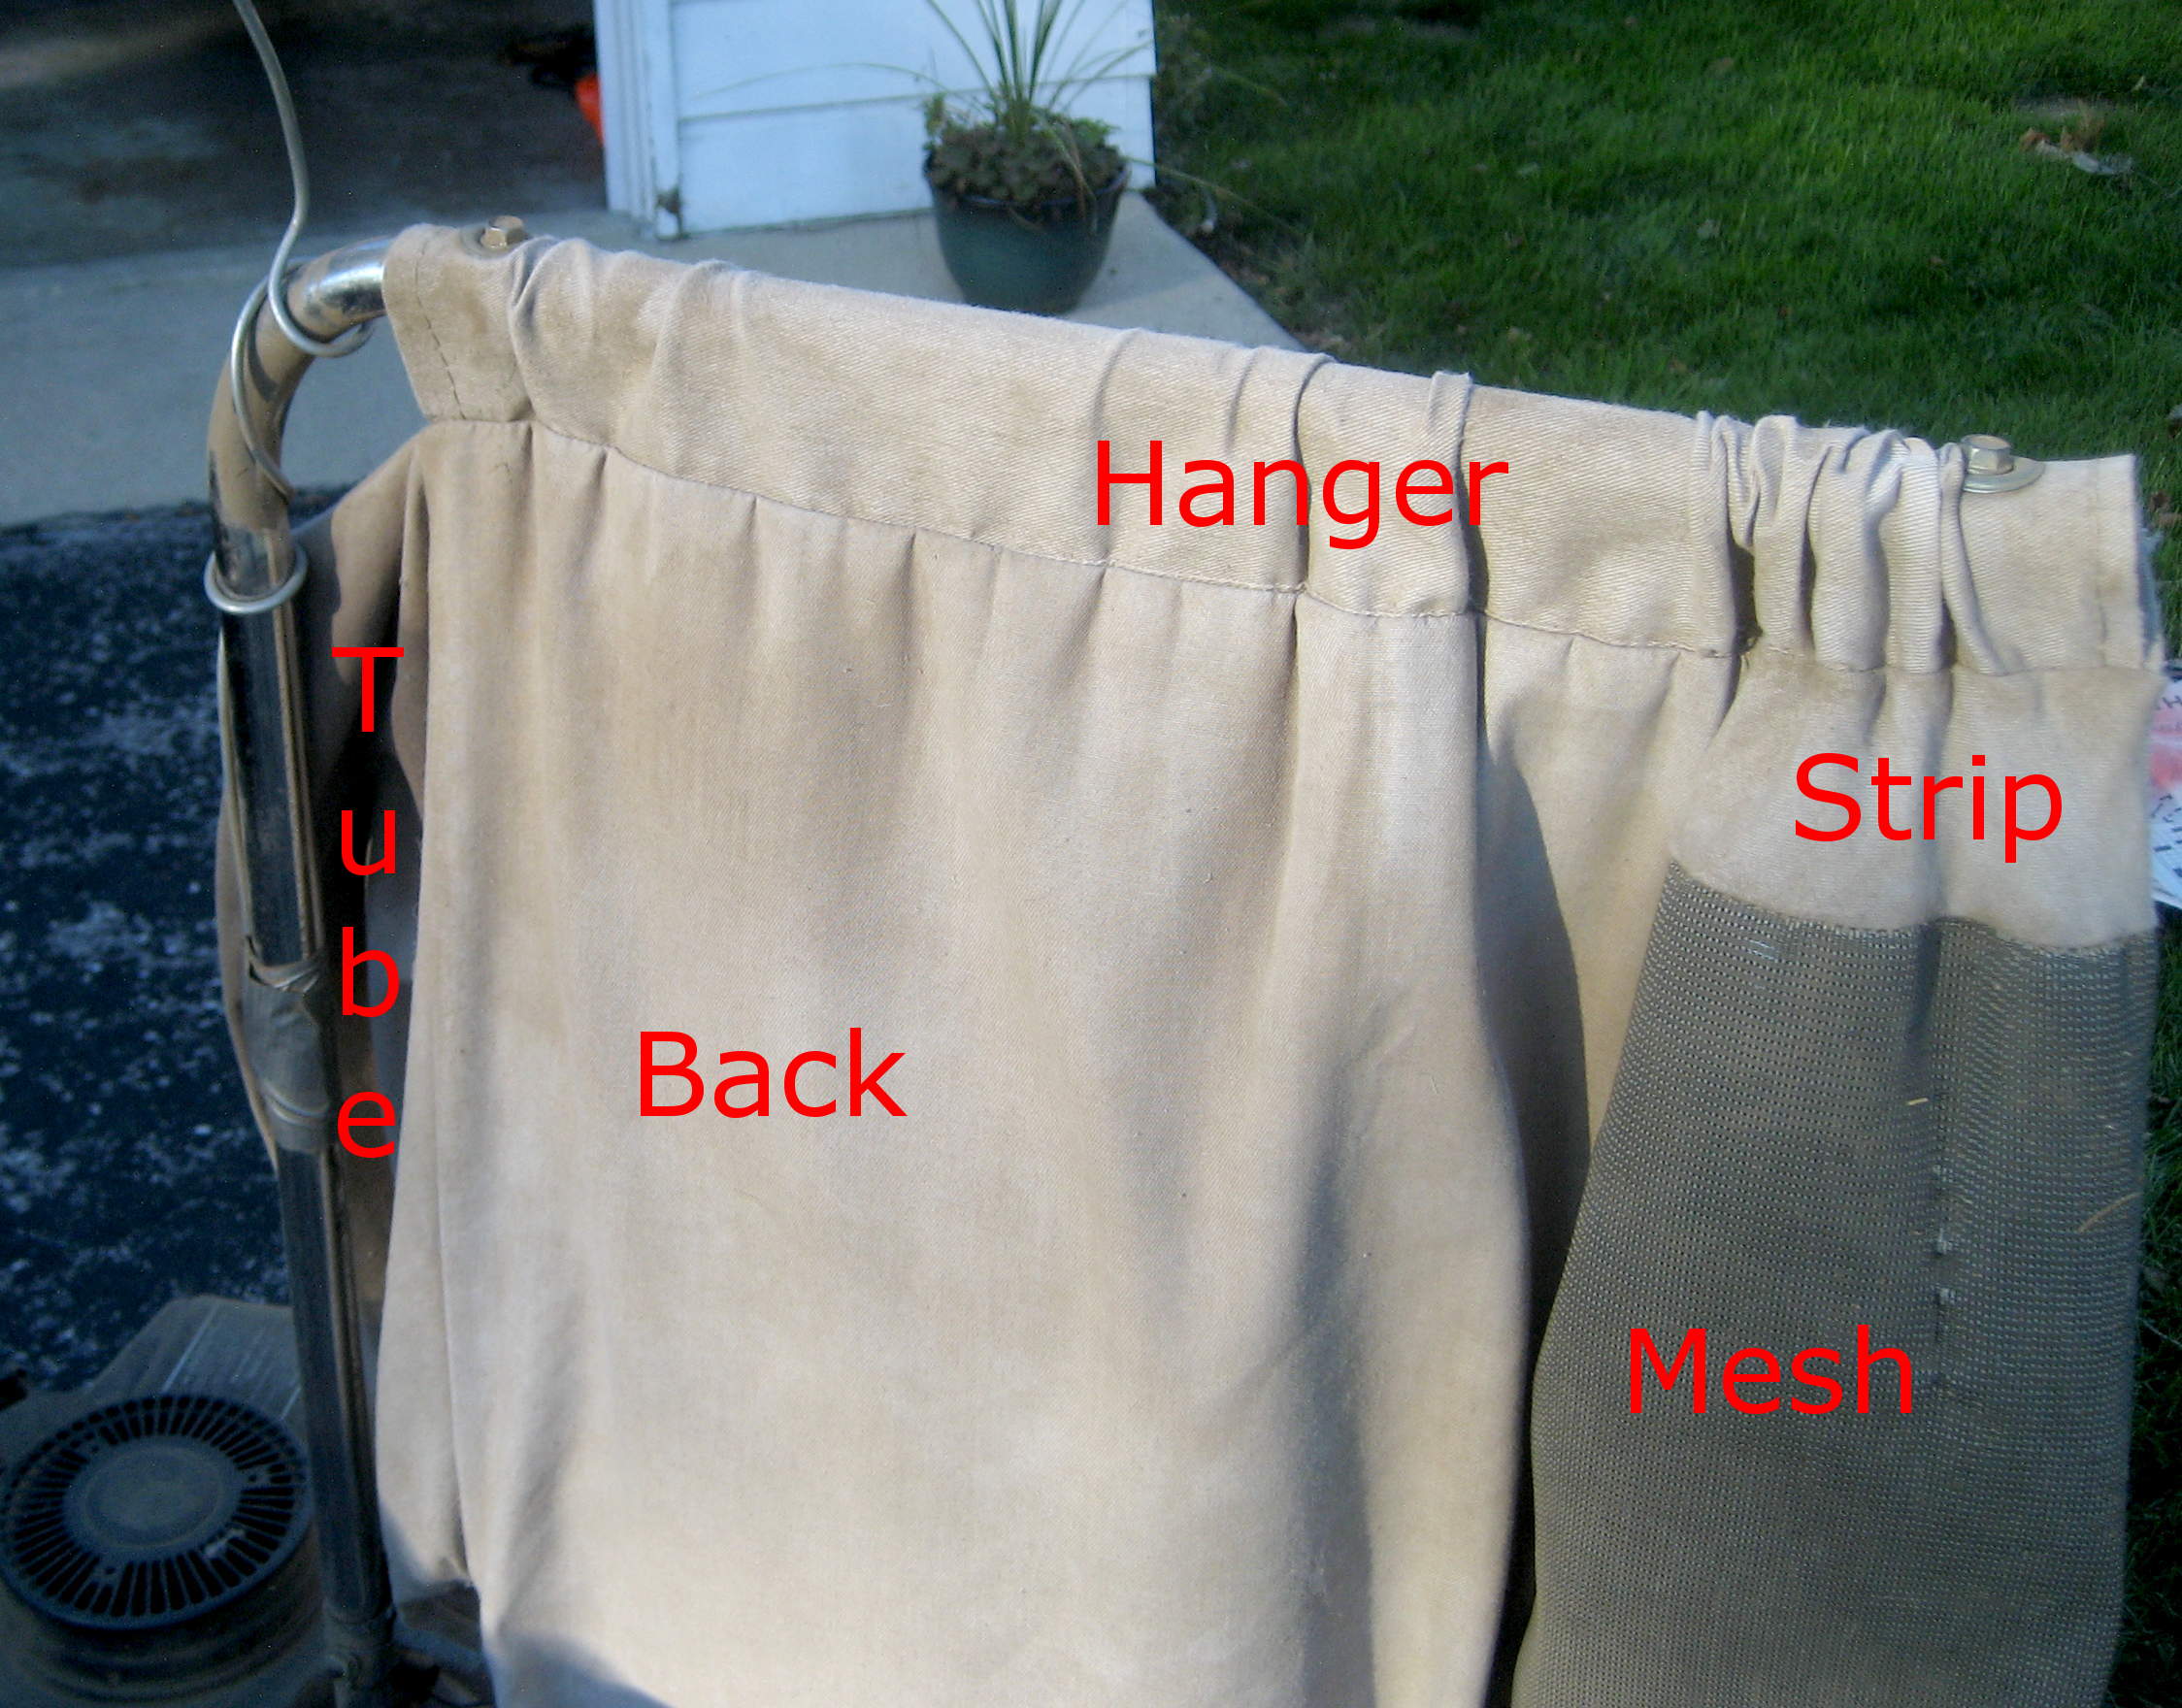 With the bag clean enough to handle, I got out a tape and made a lot of measurements and notes, many with the bag turned inside out. Here are the parts and their dimensions. There are a bunch of labelled pictures here that I hope will help understanding the layout and assembling the bag.
 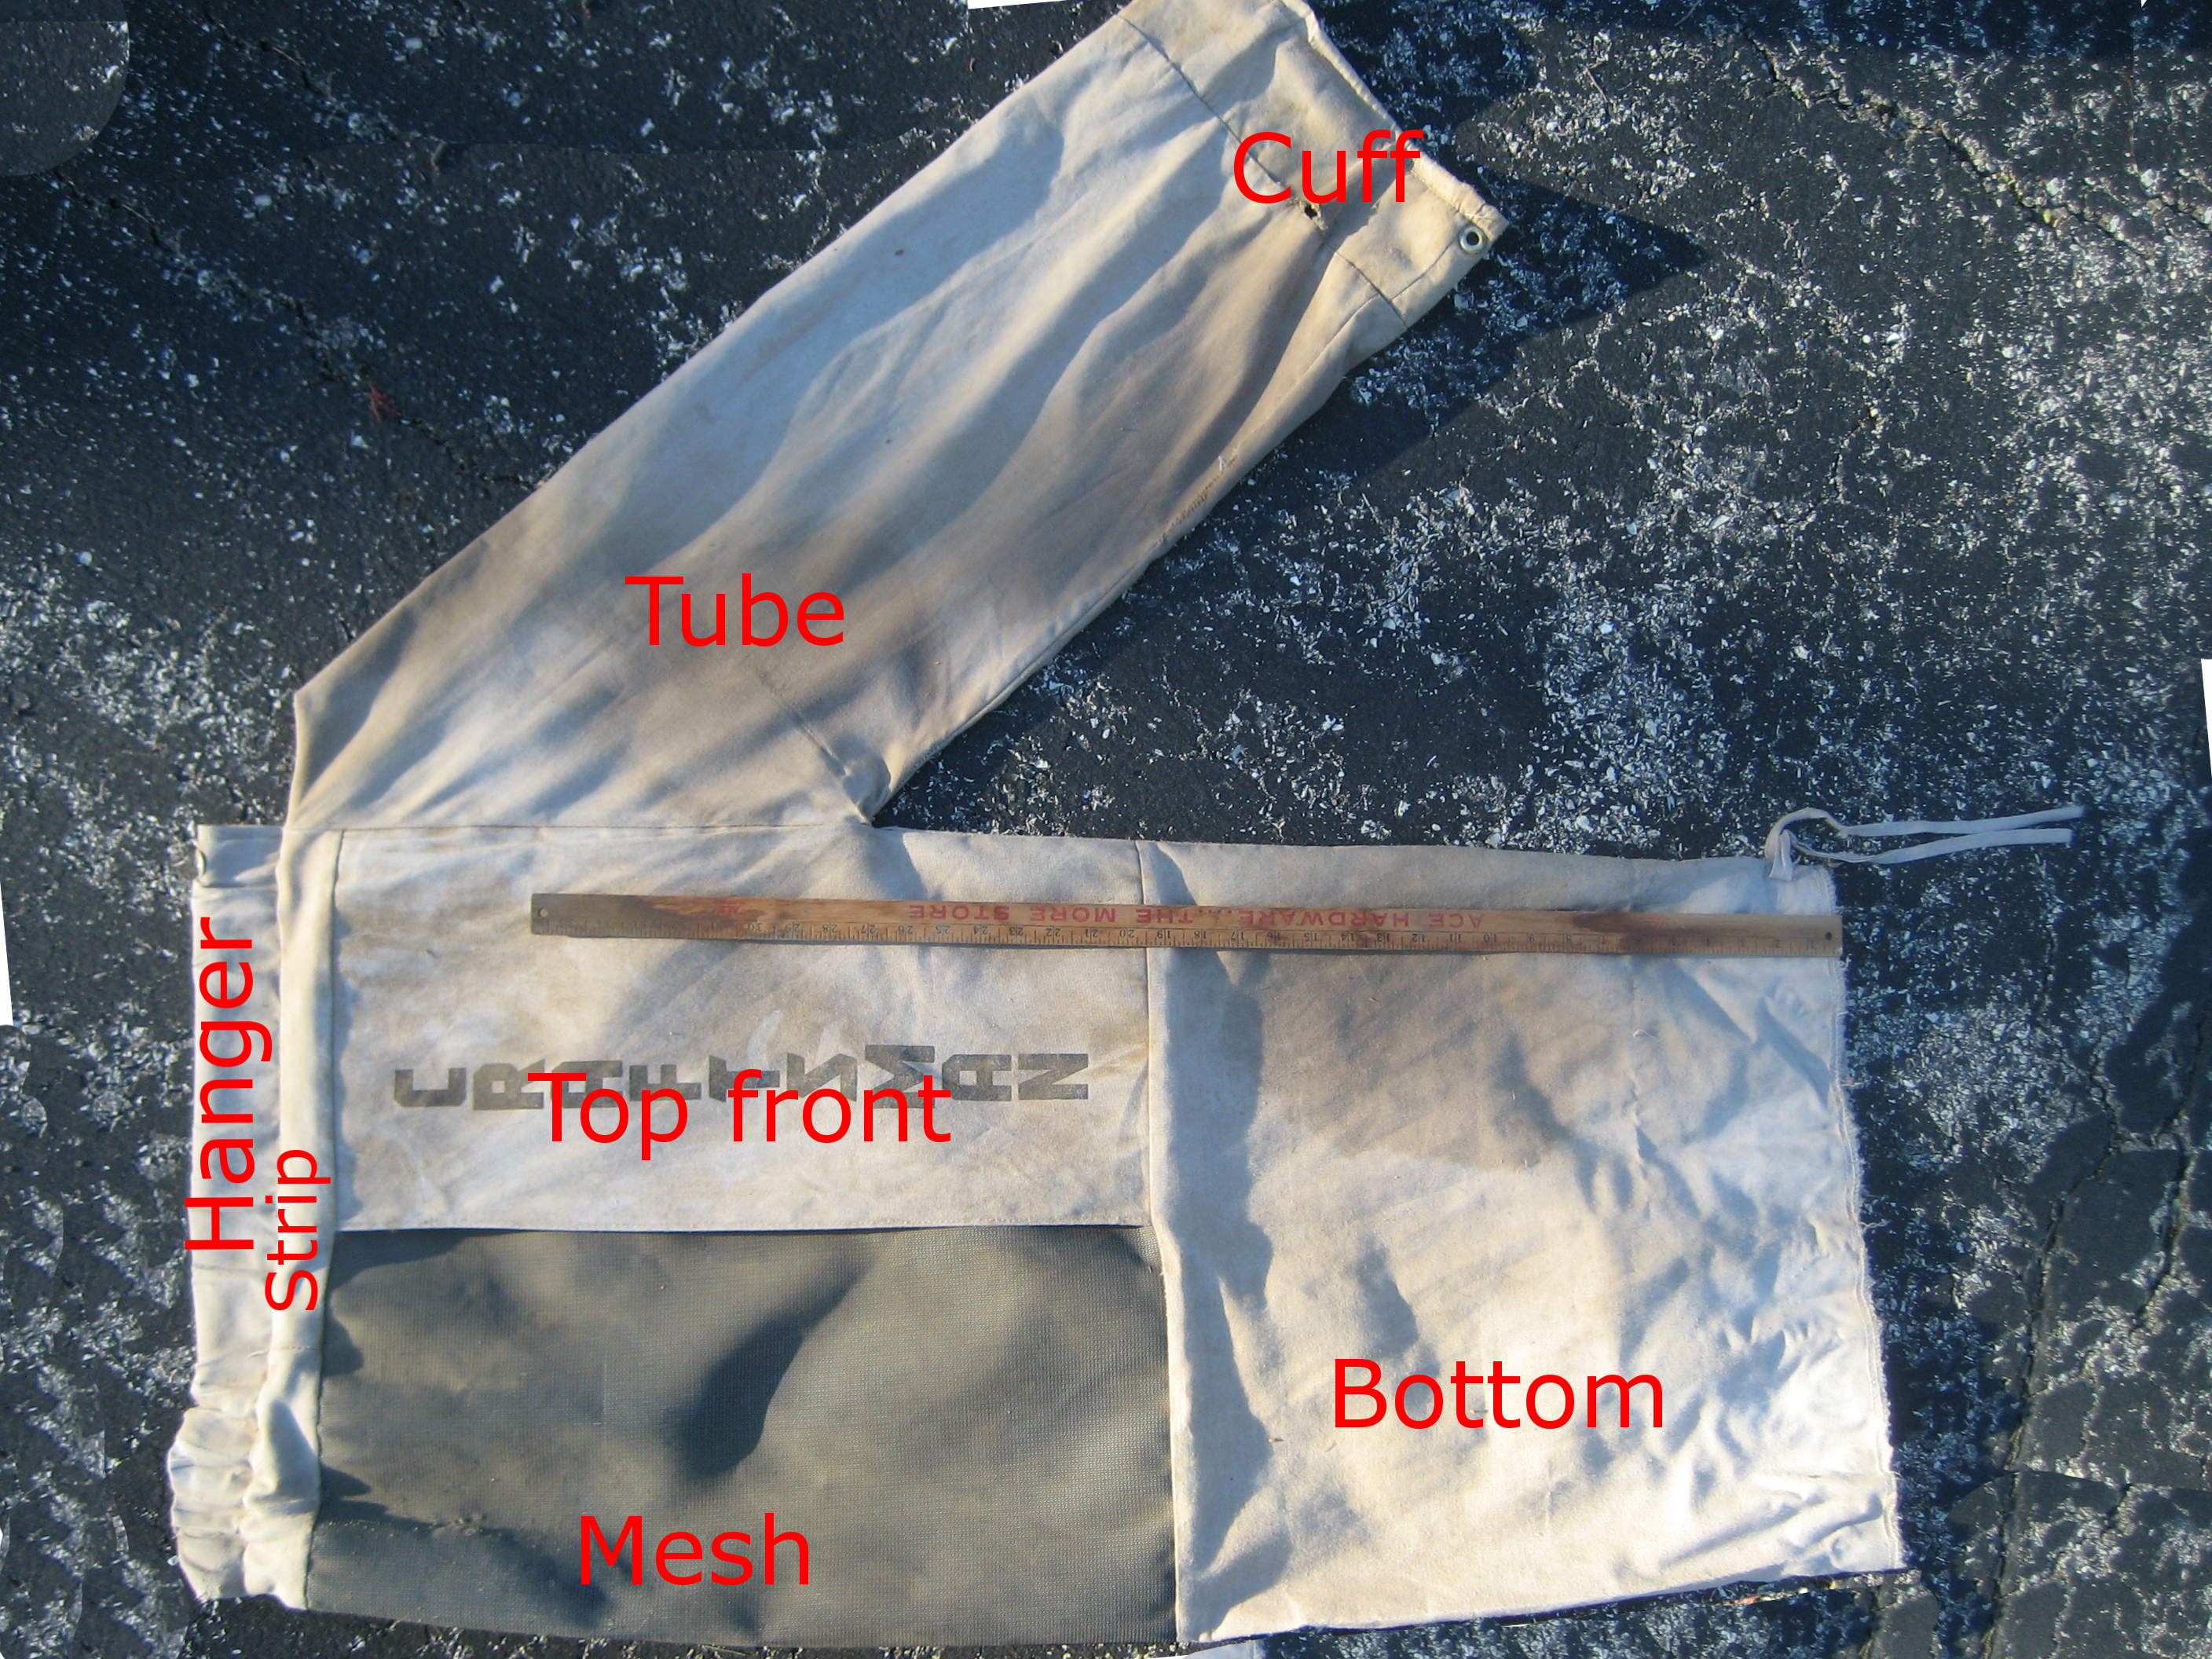 https://photos.google.com/album/AF1QipNVASnblol2QxQhhWQ1O0q92KjiiZ4tfUkhjTkt
I named the parts for reference. The names made sense to me.
 Hanger
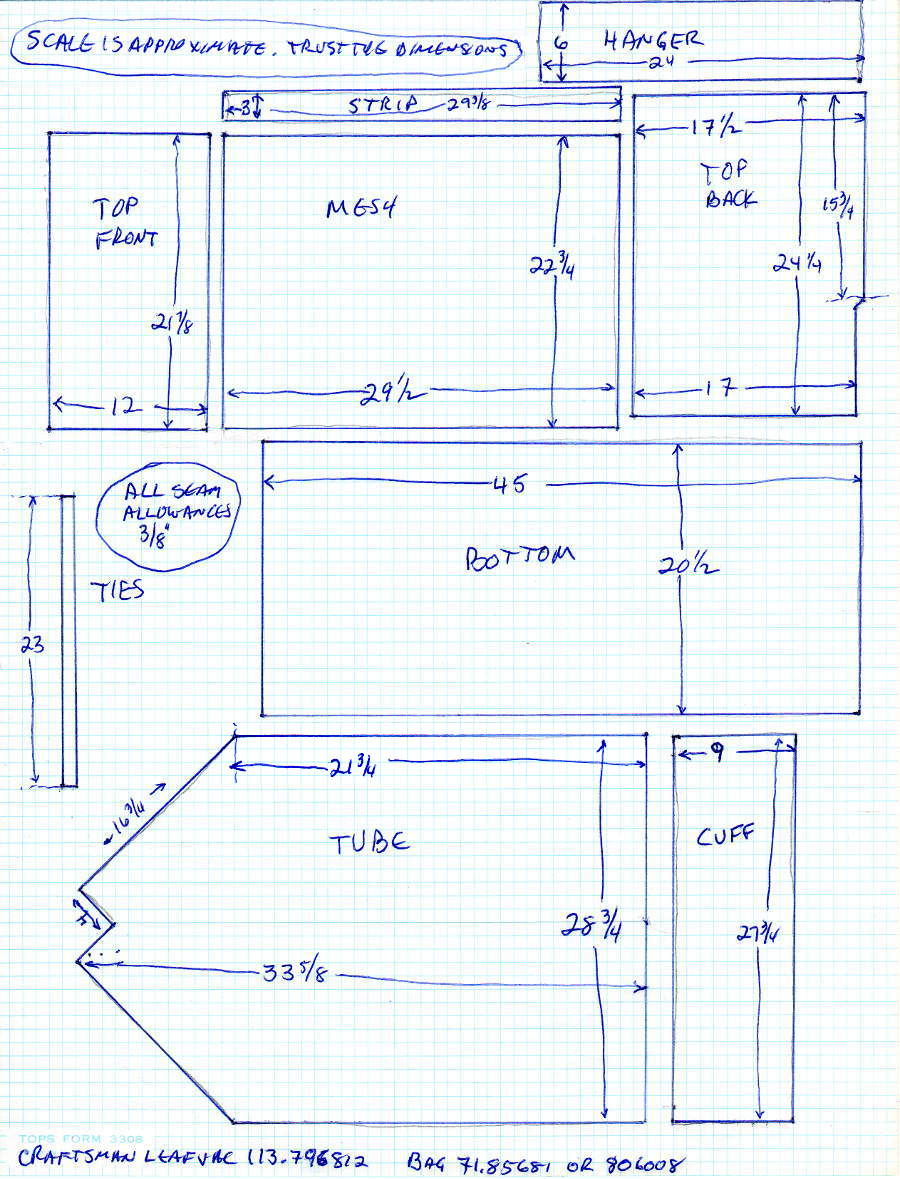
This is the (cloth) tube thru which the 1″ chromed steel bag support tube goes. The bag is held on with a couple of fat self tapping screws thru grommets. The hanger runs the entire width of the bag (~22.5″). Dimensions not very critical as long as the support tube fits.
Bottom
This is just the bottom canvas bag the leaves fall into, ultimately supporting the weight of the leaves. The cloth tie that holds it closed is wonderfully low tech and very effective. Again, dimensions not too critical, as long as it doesn’t drag on the ground. With a little finagling, it might be enlarged some.
Ties
A single soft cloth strap 3/4″ wide. It’s sewn to the bottom in its middle. About perfect.
Mesh
This is the critical part that the exhaust air exits thru (while holding most of the leaves inside!). The manufacturer seemed to realize it was fragile, and took 2 steps to make life easier on it (says Jim).
The first is saving it from supporting the weight of the full bag of leaves. The back piece directly connects/supports the bottom from the hanger. But since the mesh goes all the way across the front (as well as part way across the back), more than half the weight of the bag would have to be supported by the mesh. That is avoided by the front piece, which from a load bearing view is effectively in parallel with the mesh. It covers the mesh, but since it’s not attached at its rear edge, still allows air to flow fairly freely. Being attached to both the hanger and the bottom, it supports the bag weight across much of the front.
The second is making the top seam of the mesh as clean as possible, and not being bent by being in a complex seam. That’s my guess of why the strip is provided. It runs the whole width of the mesh. Or I’m just wrong.
Again, Phifertex exterior furniture web material seems like it might work. If you’re going to make a bag, I have a sample.
Strip
As described above, it’s the way the mesh is interfaced with the rest of the top of the bag. On my bag, the strip is pieced, though I can’t see any reason for that. I listed it as a single piece.
Top front
Again, I think the goal of this piece (besides a place to plaster a big Craftsman logo) is to help support the bottom of the bag. It certainly redirects the exhaust air flow, but makes it closer to the operator, so I’m guessing that’s not its goal. Note that while it goes part way across the front, the mesh goes all the way across.
Top back
Pretty obvious. Goes most of the way across the back; the rest of the back is mesh.
Tube
Note that all angles are 45 or 90. The 4″ edges are seamed together; that seam ends up just horizontal when the bag is complete and installed. The parallel 21.75″ sides are also seamed together, making what is sort of like a sleeve. The two 16.75″ diagonals now are the opening that attaches to the “armhole”, one to the top of the top front vertical edge, the other to the top back vertical edge. I expect the ends of those seams will be about the physically toughest places to sew (lots of layers and funny angles).
The 28.75″ bottom of the tube may need to be fudged. It looks like the tube itself on mine is a little wider, and was finessed down to fit around the cuff. A seamstress familiar with fitting cuffs might be helpful here.
Cuff
The end of the inlet tube part of the bag (the “cuff”) is connected to the machine’s plastic elbow chute with a hook on the chute and a grommet on the tube. It used to have a drawstring, or maybe an elastic band to cinch the tube bottom around a generous shoulder on the chute, but that i s long since gone. It looks like I put some 1/4″ vinyl tubing in the casing to give it some body and tied a heavy string around above that and below the shoulder on the chute. That seems to have worked well, as I don’t recall ever having problems with it coming off. Of course the chute remains on the bag at all times, including while emptying and during storage.
It looks like its 9″ edges were seamed together, then that cylinder rolled half inside itself (hard to put in words). The long folded edge will become part of a casing for elastic or something to hold it to the elbow’s shoulder. A line of stitching 3/4″ from the fold completes the casing.
Now for the hard part: The circumference of the top of the cuff – away from the fold – must match the circumference of the bottom of the tube for them to fit to be seamed together. You’ll almost certainly have to adjust something here. Good luck.
Comments
I’ve wanted to make this info available for several years. Sadly, now that I’ve finally gotten around to it, I’m afraid anybody who needed it to make a bag has found other solutions. And sturdy as these machines are, I’m sure there are fewer around than ever before. If anybody actually makes a bag from this info, it would be great to hear about it, just so I won’t feel so much like I’ve wasted my time. Thanks.
Pingback: Leaf vacuum repairs | Jim's Projects
Hi Jim. My name is George and I live in NW Indiana. I have one of these Craftsman leaf vacs. After a few repairs the bag is in decent shape but the engine (a 3.5 HP Tecumseh) is just about shot. I just wondered if you had any knowledge of what replacement engine I could use. Thanks
Hi George,
Sorry, no specific ideas. I’d expect, though, that any small engine repair place (lawnmowers, snow blowers, jet skis) should be able to get the engine back in shape – an engine’s an engine. I suppose you could try Craigslist looking for an old machine to scavenge the engine from, though that has its own problems.
I hate to mention this, as I’m not at all sure of my plans, but a vague possibility is my machine. It’s still running fine (at least it was when I last used it a few months ago), but for the first time in our lives we got a lawn service this year. They’re supposed to do the leaves as well. If that works out well, and if we get spoiled/old enough continue to hire that work out, I guess that means I won’t need my machine any more. (And I suppose the same goes for the lawn mower. What a crazy idea!)
It would be great to reclaim the space in the garage those machines take up. (Might need to keep the snow blower – that’s a little different.) If I did that, I’d be looking for a new home for those things. I’m in Elmhurst, just west of Chicago, so transportation isn’t a terrible problem. I guess I’m saying this as much to get the juices flowing in my head as yours. But it might be a possibility.
Good luck!
Jim
Hi, nice info.
I cut the fiberglass screen that was old out of the original bag. I cut new black fiberglass screen from Home Depot to a larger size. I got a hot glue gun and used that to attach the new screen to the bag (washed it in cold water and air dry first). Holds up well.
For the inlet I use a flat bungee strap to keep it attached to the plastic elbow.
Nice fixes! If you have any pics, I’d be glad to add them here.
Jim