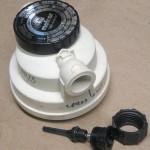
Against the common recommendations, I leave the hoses (and the high side of the manifolds feeding various watering systems) in my yard under pressure all the time. While it’s convenient to pick up the hose and spray, if a hose bursts or a valve fails open there’s the possibility of some kind of flooding.
To limit the damage such failures can produce, I keep a flow-based watering “timer” in series with the main sillcock. Set its knob for say 1000 gal, and its paddle wheel driven guts will shut the water off after that much has flowed – whether that takes a few hours or a few weeks. Having to crank the knob up once a week is a small price for the insurance it provides.
The shutoffs I’ve been using are white Melnor devices. The current one (apparently from ~2006) is marked Time-a-matic. There’s also a version in green plastic called a model 101 FlowMeter and a black one branded for Ace hardware, maybe called Flowmaster. There’s another (newer?) black one (possibly also a model 101?) with a cylindrical body whose axis parallels the water flow. Maybe redesigned to address flaws with the old one?
I’ve made a number of repairs to the couple of instances of this device I’ve owned. There have been a couple of cracks in the large lower cover with 8 screws. I have no idea how these happen – they’ve never been allowed to freeze with water in them. Epoxy on the inside fixed those cracks.
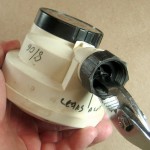
The female input connector often leaks, and the leak in this one made it completely unusable. (According to reviews at Amazon this is a very common complaint, usually referred to as a serious design flaw.) I had clearly had problems with this one, as there’s a blob of white marine epoxy over the screw hole (visible in the picture on the right). But despite obviously having had it apart, I had no recollection at all how the connector was attached.
Just before going out to buy yet another one, I took one more look. Putting an air gun nozzle between the connector and the body, I could see the copious spray of water was  coming out
  between the body and the black connector part that went into the body. Encouraged, I figured out how to remove the connector: It’s just screwed in. And while I’m sure Melnor has a special three-pronged wrench, pliers unscrew it nicely. Aha – the screw keeps it from unscrewing. The only reason I can imagine for making it that way is so it can be disassembled to fix the valve (the long black spring-loaded thing). I’m all for making things repairable, but not if it introduces bad leaks.
And since I’m unlikely to put much energy into fixing the valve in this $15 device, I’ll bet epoxying the threads will be a fully acceptable leak fix. (Hmm, although it might be nice to wipe crud off the small O-ring on the valve if that leaked a little. Oh well – it’s all done now!)
I suppose for future reference, leaks like this could be addressed by unscrewing the screw, unscrewing the connector, putting a turn of teflon tape on, screwing it back in so the holes in the male threads and in the body line up and replacing the screw. Leaks around the screw itself might require something like a gasket under the screw head or some kind of thread sealer. Or use lots of teflon tape, epoxy over the screw hole and screw it back in. Lots of tape because otherwise it’s possible to screw it in so far the female hose ring isn’t free to turn any more. Or I suppose you could file away part of the fat outside ring on the body.

Are you sure you didn’t let it freeze?
Since you’ve had those apart, I’ll issue a challenge. What the world (Naperville anyway) needs is a water meter with a little generator hooked to that paddle wheel. Generator will charge a super capacitor to a point where the meter reading can be spit out over a Zigbee radio to the existing Smart Meter network. Can it work?
I think the leak is caused by cracked O-ring that is on the valve stem. I just took apart mine, and thank you for discovering that threaded joint. Sealing the thread as you suggest is only a partial fix as it might be cumbersome and not lasting long.
I have to correct myself. Replacing the O-ring doesn’t cure the problem. Water is still leaking trough that threaded joint. Aparently, the manufacturer is using some adhesive to seal the joint, which after a while shrinks and allows the water to pass through the joint. Using the teflon tape, to fix it, doesn’t appear to be an effective solution – will try to use an adhesive.
Quite some time ago (probably about the 2006 time you show) my husband purchased a couple of these devices. While “tidying up the garage” after his death I found one and would like to use it. While it has never been used, it is not in the box and and looks like it has been outdoors. Clearly I will likely have to do some of the “repairs” you indicate here. But before I do that, I need to know how to use it and I have no instructions on how to set or use. I’ve tried Melnor site but can’t seem to find the right model. Also, my husband planned to used them to control hoses with sprinklers on them. Is that the right application? Thanks for your help.
Sorry for the slow reply. Yes, controlling hoses with sprinklers is just what these were designed for.
I put a .pdf of (the English portion of) the instructions here: http://jimlaurwilliams.org/wordpress/wp-content/uploads/2012/05/MelnorTime-A-Matic101-128.pdf I hope that helps!
Jim
Jim, and everybody,
These valves should be emptied before the winter months… this way the remains won’t freeze up the valve.
~Ben
You’re absolutely right, Ben. I guess I was too subtle in referring to that when I said “they’ve never been allowed to freeze with water in them”.
Thanks for the reminder.
So glad I found this! I had one of these break at the bib connector, and I just put it away for awhile, I bought a new orbit water timer that was just a spring timer, I was excited because it seemed simpler to just use *time* to time the water–and it worked for a while, but recently it started leaking while closed. I went into the shop and dug up this old melnor water timer, which I had taken apart some time ago, the same way you did. I went to the local HW store with it, and they didn’t have a universal female connector to replace the existing one. I bought one of those female end hose repair kits, cut the piece off, and… it didn’t fit, hole was too small. So I whittled it wider with a utility knife, put it on, used the plier method to screw it back together, and… it sprayed water all over me. I found your page on the internet, and it reminded me that that hole at the top needed a screw. Not it works! Hooray! Thanks for leaving this page up!
Hi Pete,
Nice fix! Glad if any of my stuff helped.
Cheers!
Jim
My Melnor 3100 (2-zone) will not open to water. The timer and settings all work fine.
Have set the time and it goes on and off but will not open to water. Has new batteries,