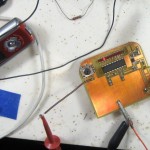
 A dance weekend finally inspired me to actually get the first model of the “final” design put together. It’s almost all SMT (including a thru hole 3914 with its legs bent under), so I soldered most of the components on the reflow hotplate. There was a little solder wick cleanup of the 0.5mm pitch 2167 AGC IC, but it was otherwise pretty good. Custom prepping the parts – particularly the LEDs and the 3914 – took long enough that making several will be more of a task than I’d like. The fixed resistors for the 3914 hi and low reference voltages hit quite close to the design targets. I’m glad I laid out the board for 2 resistors in series for each so I could get close to ideal resistances.
 I’ve watched 3914 LEDs from a 2167 averaging cap and listened to the AGC behavior enough that running an audio source into the device, connecting the output to an amp and speakers and playing with the levels gives me a very good idea of how well it works. Here’s a pic of the first bench test of the electronics – and it works!
There had been a problem with record level in the Sansa, but I finally got a version of the Rockbox software with the problems resolved and changed several defaults to fit my picture of the ideal device. It comes up recording MP3 at 96Kb/sec 44.1KHz, creating reasonable filenames, and boots up directly to recording mode. It has threshold levels and timeouts all set up for the intended recording, and even shows a custom logo on boot. I’ve built the code for Clip V1 and V2 as well as for Clip+. That covers the models I find on Ebay. The build machine is my Dell Mini9 netbook running Ubuntu 10.4.
Putting the firmware on is usually very straightforward, but I did brick one device trying to install Rockbox. I might have to hack a JTAG connection in to get that one back. Fortunately I have a few spares from a purchase binge on Ebay.
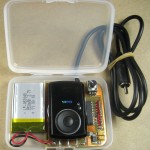
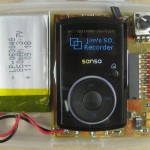
 Here’s a closeup of the device. While the electronics work fine, there were two mechanical issues I failed to anticipate. First, the input level control obscures access to the headphone jack in the upper right corner. Rotating the level control 90° and moving the recorder as low as I possibly can might make it accessible, but I’m not sure.
Second, and more critical, the Sansa sits so low in the box that any normal USB cable is very uncomfortably jammed against the battery. I have room in the box for the recorder to sit higher, so I remounted it (after I’d soldered it down and used way too much hot melt holding the recorder to the PCB). MUCH better. One other minor mechanical hack was to carve away the slide switch on the side so I could hook a fingernail under it to turn it on and off more easily.
Using some solid #20 (or so) wire on the little PCB inside the Sansa for the external connections (V+, gnd, mic lead) works very well. Easy to bend and to solder to the PCB.
I used some of my new Great Planes servo tape to mount both the PCB and the battery to the bottom of the case. When I had to remove the PCB (to separate the excessive hot melt to raise the recorder) the servo tape held very well, but did finally release cleanly as advertised. Nice stuff.
I had the first failure with the internal mods to a Sansa. The input line just didn’t work. It didn’t have the expected 2.5V I need to turn on the MOSFET that powers the electronics, and didn’t even seem to work for recording. I took it all back apart and all the soldering of the mic lead looked fine. That was on a nice Clip+, making it useless for this purpose. Maybe I can rework it into the bench audio source I’ve wanted for a long time.
I applied the mods to another Sansa, and it worked fine – including using the 2.5V DC intended for the electret mic to turn on the MOSFET to power the electronics without a separate power switch. (Interestingly, Les reported blowing a recording with an older prototype by forgetting to turn that switch on. Maybe automating it will save me (or other users of the production version) from the same problem.)
I hoped to be able to see the LEDs through the side of the case so I could make a quick sanity check without walking up on to the stage. I can sort of see them, but it could be a lot better. Maybe a clear window in the side of the case and a plastic mirror over the LEDs at 45° to direct more light out the side?
I’ve used it for one night’s recording at the weekend so far, and it looks good. The recorded level is almost too high – averaging around -12dB, though peaks are never over ~85%. Looking at the recorded waveform in Goldwave, there’s much less dynamic range than I usually see – like the AGC is too effective/aggressive. It sounds very good, and might even be a little easier to dance to the very uniform level, but it just looks different from what I’m used to. I suppose I should arrange for a non-AGC parallel recording to see how much different it sounds. I did set the compression resistor on the 2167 to about the max, so if I don’t like the sound I could tweak the compression down on future builds.
Update 3/5/12: Here are some thoughts/concerns after having used the recorder once at a weekend.
– Access to the USB connector is workable but not great.
– Access to the headphone jack is blocked on the current version.
– Visibility of the LEDs from the edge would be very welcome.
– Routing of the input cable could use more thought.
– There’s considerably more interest in this than I expected, so ‘manufacturing’ considerations now start to matter.
– A little faceplate atop the pot body that could be marked for a few favorite levels would be good.
– Compression level needs to be reconsidered.
– The 3914 goes out of calibration at about 3.0V, so it may give incorrect indications at the end of the battery life, even if the electronics and recorder are OK.
– Need to finish up the doc!
– The slide power button on the Clip is awkward to use. I should build it up or cut part of it back to make it easier to slide up. Not a biggie, but would help, especially if user had big fingers.
Physical layout
It looks like I can get boards made up double sided, drilled, solder masked, 1 side silk screened for $1 ea plus shipping if I can keep the size to 5cm x 5cm. At that rate it’s hardly worth my making them. That way I can hand solder the 3914 DIP as thru-hole instead of bending the legs and doing it SMT. And the pot is thru hole anyway. I suppose I could even use 3mm LEDs thru-hole pointing out the side of the case to make them more visible that way.
The one downside is the pot. The current board is 6.4cm tall, so using a 5cm board would move the pot down from its “protected” spot in the top corner unless I located the board at the top of the case – making soldering the leads for the recorder harder. Hmm – I suppose I could have them come out the back of the Sansa case and mount it thru-hole. Hmm.
The USB connector remains a concern. Depending on the size of the outside of the connector being used, if I moved the Sansa absolutely as high as I can in the case (touching the top edge) and mounted the battery at the very bottom of the case the connector might fit above the battery. That would leave the battery leads cramped, but might be OK.
Moving the Sansa up might make access to the power button on the top edge of the Clip+ a little hard, though relieving a lip on the case might help. I’d really like to keep the option of using both Clip and Clip+ to ease access to used recorders.
The last consideration for the USB connector is that since moderate force is needed on insertion, physical mounting of the Sansa to the PCB and the PCB to the case needs to be pretty robust. Servo tape seems good for the latter, and generous hot melt is probably OK for the Sansa-PCB. I really should put something in the directions about pushing against the Sansa, not the case when plugging in a USB cable.
Access to the headphone jack is a conundrum. Even if rotating the pot and moving the Sansa as far down as possible would provide access the jack, that would completely defeat any effort to make the USB connector more accessible. And since at least in normal usage, the headphone jack is never used and the USB connector is used daily, the jack loses that fight. But as long as it’s there, it would be nice to design so it could be used. If I move the Sansa as far up as possible (to help with the USB connector) and especially if I only have a 5cm tall board, I could mount the pot low enough that the jack would be accessible. But I’ve put protecting that pot pretty high on the list of objectives, and moving it down would make it less protected. Darn tradeoffs.
Compression level
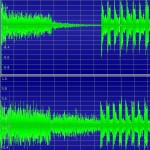
 On all the recent AGC boards, I’ve used a 100K resistor to set the 2167 compression pretty high – between 5:1 and 10:1. I figured more is better in the interest of making the device deal gracefully with a wide range of input levels. Looking at the recorded signal from the latest board scared me a little because it looked so devoid of dynamics. I did a quick test to look at (and listen to) music I’m familiar with recorded with and without the latest high compression. Here’s several seconds’ worth of Blue Boys Da Ba Dee with an explosion that fades to nothing. Top is recorded with the compression resistor shorted (1:1 compression); bottom at 100K.
It looks way different – both the lack of fade out and the lack of spike on downbeats after the beat resumes. The fade sounds quite different, especially when it doesn’t go away at the end. During the last part of the fade, I can hear background hiss come up as the AGC cranks the gain way up, but I had to listen carefully several times before I noticed it. I guessed I’d hear the missing spikes – maybe a cymbal hit or something? – but after several A-B listenings I couldn’t hear any significant difference.
Part of the question is whether we’re recording in the “limiting” area. Going below noise gate is obvious – it goes silent. But the when you go above the “rotation” point (into limiting) it’s not so obvious. I made another recording with compression with the level set lower so the fade out fell below the noise gate at the end, hoping that would keep us out of limiting, and possibly put the spikes back in after the fade out. But there was no visible difference there. Again, I couldn’t tell the difference among the three recordings in the section after the beat came back.
So maybe I’m just being paranoid, but I really care about the audio quality of the recordings. The older AGC boards produced superb recordings, and these are different. I think I have things set up to do a dual recording of a live dance tonight. I’ll look at and listen to that pretty critically, and hope to come up with some science behind whatever decisions I make about the compression level in the next round of boards.
Update 3/20/12: The reorder has returned from its first mission not in my hands. Janet took it to record at a weekend we didn’t attend.
Recordings varied from fine to unusable. The bad ones ran afoul of the noise gate. I don’t know how the LEDs looked for those, but maybe I should raise the level of the lowest LED so the noise gate is even farther below that point.
Recording level was generally perfect, but some just sounded kind of muddy. I suspect those were running into limiting. Maybe I should lower the level at the top LED to reduce that. It would make level setting more sensitive, but if it produced better recordings, I guess that would be OK. Gee, I wonder if the Sansa recorder is just really not quite as good as the Iriver. That would be very unfortunate. Maybe I should do some careful comparison testing (without any 2167s in the path).
